background image

SUNL   SUNL   SUNL   SUNL   SUNL   SUNL   SUNL   SUNL   SUNL   SUNL   SUNL   SUNL   SUNL   SUNL   SUNL

SUNL   SUNL   SUNL   SUNL   SUNL   SUNL   SUNL   SUNL   SUNL   SUNL   SUNL   SUNL   SUNL   SUNL   SUNL

SUNL   SUNL   SUNL   SUNL   SUNL   SUNL   SUNL   SUNL   SUNL   SUNL   SUNL   SUNL   SUNL   SUNL   SUNL

SUNL   SUNL   SUNL   SUNL   SUNL   SUNL   SUNL   SUNL   SUNL   SUNL   SUNL   SUNL   SUNL   SUNL   SUNL

SUNL   SUNL   SUNL   SUNL   SUNL   SUNL   SUNL   SUNL   SUNL   SUNL   SUNL   SUNL   SUNL   SUNL   SUNL

SUNL   SUNL   SUNL   SUNL   SUNL   SUNL   SUNL   SUNL   SUNL   SUNL   SUNL   SUNL   SUNL   SUNL   SUNL

SUNL   SUNL   SUNL   SUNL   SUNL   SUNL   SUNL   SUNL   SUNL   SUNL   SUNL   SUNL   SUNL   SUNL   SUNL

SUNL   SUNL   SUNL   SUNL   SUNL   SUNL   SUNL   SUNL   SUNL   SUNL   SUNL   SUNL   SUNL   SUNL   SUNL


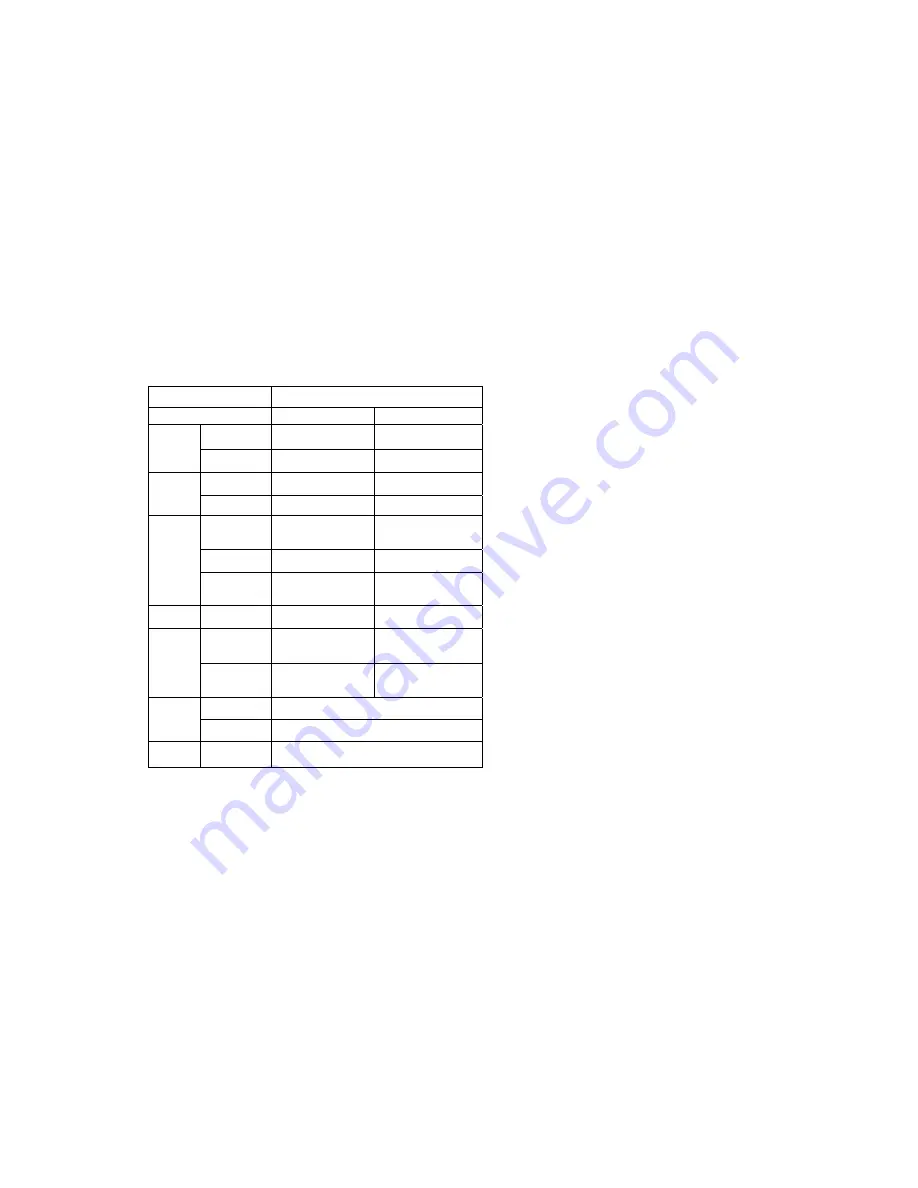
2. Main Technical Parameter Table 
 

Item Parameters 

Type 

  Single seat 

Double seats 

L

×

W

×

H  

(mm) 

2100×1250×1360 2240×1390×1440 

External 
Dimensi

on 

Axle Base 
(mm) 

1460 1610 

Dry Weight 
(Kg) 

185


230


Weight 

Passenger(s) 

1


2


Type 

Single Cylinder, Four 

Strokes,  

Wind Cooling 

Single Cylinder, Four 

Strokes,  

Wind Cooling 

Exhaust (ml) 

149.6


149.6


Engine 

Form of 

Transmission 

CVT(with back gear)

CVT(with back gear)

Power 

Highest 
Speed (km/h) 

70 65 

Type/Air 
Pressure 
Front 

19×7-8 10 P.S.I


19×7-8  10 P.S.I


Tire 

Type/Air 
Pressure 
Rear 

18×9.5-8 15 P.S.I

22×11-10 15P.S.I


Battery 

12V     9Ah


Electrical 

System

Safety Fuse 

10A


Capacity 

Oil tank(L) 

6.0 

3. Vehicle Assemblage


1. Take off the cover and fixing poles by using 

wrench. 

2. Take out Steer Wheel and pan head cruciform 

slot screws or hexangular flange face screws and install 

Steer Wheel on the Steer Wheel fixing base (pay 

attention to the place of Steer Wheel, put the front 

turning wheels parallel to the rear wheels, let Steer 

Wheel with 3 strips up face the rear). Fasten the screw 

and put on the cover of Steer Wheel.   

3. If it is equipped

put the protective small plastic 

jacket into the pipe of goods shelf, put the screw bolt 

backings into the hexangular flange face screws and 

then fix the goods shelf with the backing screw. 

4. If it is equipped

put the protective large plastic 

jacket into the pipe of bodywork, put the screw bolt 

backings into the hexangular flange face screws and 

then fix the protective pipes with the backing screw. 

5. Take the oil tank from the box and fix on the oil 

output mouth. Fix oil tank on the supporter by 

hexangular flange face screws. Put one end of 

non-burning rubber oil-input pipe into the oil-output 

mouth. Take off the dust-free cover on the mouth of the 

Summary of Contents for SLGK-150

Page 1: ...nd pictures provided in the Manual is the latest information made according to the newest products There possibly are differences between the contents in the manual and the actual situation of Kart as a result of the improvement or changes of the products But the user has to operate by the real situation The producer preserves the rights revision of the Manual at any time with no further informati...

Page 2: ...SUNL SUNL SUNL SUNL SUNL Contents 1 Brief Introduction to Off road Kart 2 Main Technical Parameter Table 3 Vehicle Assemblage 4 Important Events and Safety 5 Components and Operation Introduction 6 How to Drive Off road Kart Properly 7 Maintenance of Off road Kart 8 Schematic Diagram Attention the picture shows the external size for the double seats Kart and the size in the bracket is for the sing...

Page 3: ...independent suspension and articulated and complicated shock absorber in the rear frame are adopted which is comfortable and is of great help to prolong the life of the components of the whole vehicle Front wheel and rear axle hydraulic disk arrester is adopted which has a good effect and easy and soft operation This type of karts has taken an engine with high efficiency and low oil consumption Th...

Page 4: ...age 1 Take off the cover and fixing poles by using wrench 2 Take out Steer Wheel and pan head cruciform slot screws or hexangular flange face screws and install Steer Wheel on the Steer Wheel fixing base pay attention to the place of Steer Wheel put the front turning wheels parallel to the rear wheels let Steer Wheel with 3 strips up face the rear Fasten the screw and put on the cover of Steer Whe...

Page 5: ...l the speed properly according to the road situation the field of vision your driving experiences and your operating conditions You must drive with defined number of passengers and loading capacity with no over loading driving Keep a proper gap with the other vehicles to avoid collision Please examine the off road Kart before driving making sure that it is in the condition that safe driving can be...

Page 6: ...afely You must add petrol to the oil tank before you drive it for the first time If it is two stroke engine you must add the petrol with proper quantity of engine oil and the ratio of petrol and engine oil is 25 1 If it is four stroke engine you must add the engine oil in time according to the requirement of the engine Attention please don t add the fuel when the engine is in operation or it is ho...

Page 7: ...onents and Operation Introduction 5 1 Location of Components See Picture 1 1 5 2 Operation of Components Steer Wheel Steer Wheel is used to control the direction of the off road Kart and the kart will turn right or left according to the corresponding operation Braking Pedal Braking Pedal is operated by left foot It will work when step hard forward and the off road kart will slow down Warning You m...

Page 8: ...ight of the seat and the back gear device for double seats is located at the right and lower part of Steer Wheel The gear operating ways for the engine are as follows Move the handle backward and locate the gear pole at the back gear the kart will go backward Warning Attention you must stop when conduct gear changes Control Panel Ignition Key and Blanket Switch 1 Ignition Key 2 Cutout 3 Headlamp 4...

Page 9: ...sten Oil Tank Cover after finishing adding petrol Hand Brake The hand brake of single seat kart is located at the back of the back gear double seats kart is between the two seats The Kart will be braked if you pull upward the hand brake when stopped and will be loosened if you put down the brake 6 How to Drive Off road Kart Properly Special Attention 1 The petrol in the oil tank and the engine oil...

Page 10: ...ry d Tires You should check the tightness of the screw bolt and screw nut the state and the air pressure of the tires to see if it is suitable to drive e Accelerator Please check the accelerator if it can move freely and if it can resume its position f Ignition Key and Blanket Switch Please check the joints and plugs if they are tight and work properly g Screw Bolt Screw Nut Fastener Please check ...

Page 11: ...ways and treading Gas Pedal gradually 6 6 Turning You should control the speed properly when turning and it will be difficult to run in the expected direction and track if you run at an excessive speed You should use Gas Pedal and Braking Pedal properly to ensure the security when turning And you should lurch to the turning direction 6 7 Stop It will be better for you to choose a flat place to par...

Page 12: ...uld be chosen to conduct the maintenance The engine should be stopped unless necessary Please choose the real products if it is necessary to change the components 3 Please ask help from dealers of the producer if you can not conduct the maintenance by yourself 4 It will be better for you to ask the dealers of the producer to repair or maintenance the items with unless you have enough tools mainten...

Page 13: ...mmable and high flash point Then soak the filter in the clean engine oil for 5 minutes and squeeze out the rest engine oil Attention You should not tighten it to squeeze out the rest engine oil and the otherwise will damage the filter Dust the empty Air Filter Box the cover and the entrance and place the dry filter into Air Filter Box 7 4 Brake Staff Disk Brake is adopted in the vehicle and you sh...

Page 14: ...e if the depth of tire checker is less than 2 mm 7 7 Battery You must connect the red wire to pole and the black wire to pole when installing the battery You should replace the battery if it cannot store electricity Generally speaking battery should be replaced every 2 3 years Safety Wire Safety Fuse must be installed in the safety wire box If safety wire is frequently damaged there is possibly a ...

Page 15: ...NL SUNL SUNL SUN L SUNL SUNL SUNL SUNL SUNL SUN NL SUNL SUNL SUNL SUNL SUNL SU UNL SUNL SUNL SUNL SUNL SUNL SU UNL SUNL SUNL SUNL SUNL SUNL S SUNL SUNL SUNL SUNL SUNL SUNL SUNL SUNL SUNL SUNL SUNL SUNL 中性 150F S Series Off road Kart USER S MANUAL ...

Page 16: ......

Reviews: