background image

Mystic Tan Kyss™


Owner’s Manual


19


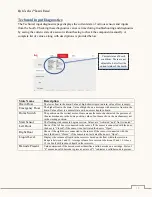
Technical Diagnostic Outputs 

The Diagnostic Outputs page provides a way to manually check the operation and output of the 
various components and systems of the booth. Using these options will save a considerable 
amount of time in troubleshooting and identifying issues before they arise. Along with the option 
to toggle the various systems ON and OFF, this screen will display important information 
regarding the state and performance of the components. The values displayed are instrumental in 
ensuring that the components are operating within the recommended spec. Refer to Appendix 2 
for recommended tolerances for each category.  


The Admin Screen 

The Admin screen provides access to critical system features and settings. Access to the Admin 
screen is password protected. It is advised to limit dispensing the Admin password to only 
necessary personal. The default page for the Admin screen is the System page.  

The Admin System Page 

Adjust important system settings and preferences here.  


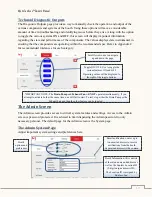
Scroll Arrows- use to navigate 

up and down the page. 

Toggle ON/ OFF- Use to toggle the 

various features ON and OFF. 

Operating values will be displayed to 

the right of the toggle buttons.  

*IMPORTANT NOTE- The 

Drain Pump

 and 

Exhaust Fan

 will 

NOT

 operate simultaneously. If you 

attempt to activate both at the same time, one will fail to start. To test, stop either the Drain Pump or the 

Exhaust Fan and then the other feature can be toggled.  

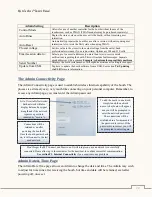
Email notifications- enter up to 

two email addresses to receive 

notifications from the booth. 

Separate addresses with a comma. 

Booth Information- this consists 

of the salon name and address as 

well as the Sunless Location ID 

(5-digit unique numeric ID). 

The Location ID is assigned by 

Sunless, Inc.  

Booth 

options and 
preferences 

Summary of Contents for Mystic Tan KYSS MT-6500

Page 1: ...Mystic Tan Kyss Owner s Manual 1 Technical Guide to the Mystic Tan KYSS MT 6500 220V 50 60 Hz www sunless com Owner s Manual Version 1 0 TM ...

Page 2: ... on off switch and on your touch screen Please use this serial number when calling for service or replacement parts Serial Number __________________ Installation Date ____ ____ ______ Mystic 6500 Sunless Inc 8909 S Freeway Drive Macedonia OH 44056 Tech Support 855 450 3500 For Support with Sales Solutions Lotions and Products 888 974 9977 Copyright 2016 Sunless Inc All Rights Reserved ...

Page 3: ...when a hazard may be present but always follow all relevant safety guidelines when operating this equipment Familiarize yourself with all precautions and read all warnings in this manual before operating the equipment Perform monthly inspections and replace any damaged or excessively worn components NOTE ON PART REPLACEMENT DIELECTRIC GREASE Stringent quality control and testing has shown that add...

Page 4: ...age Navigation 15 Staff Tools Page 15 When to Use the Staff Tools 15 Staff Settings Page 16 The Tech Support Button 16 The Technical Screen 17 Technical Setting Page 17 Technical Input Diagnostics 18 Technical Diagnostic Outputs 19 The Admin Screen 19 The Admin System Page 19 The Admin Connectivity Page 20 Admin Date Time Page 20 Preparing for Your First Session 21 Running Your First Session 22 Ad...

Page 5: ...mpressor Filters 33 Run a Test Session 33 Perform Diagnostic Output Check 33 Monthly Maintenance Checklist 34 Troubleshooting 34 T1 Internet Connectivity 35 T2 Session Not Starting Cartridge Label Not Displayed 37 T3 Rinse Down Process Not Starting 37 T4 Sump Not Draining 38 T5 Adjusting the Air Pressure 38 T6 Updating Software via USB 40 Updating the Booth Firmware 40 Updating the Touchscreen Sof...

Page 6: ...ptions 45 Blue Faults 45 Orange Faults 46 Red Faults 47 Appendix 2 Technical Diagnostic Output Tolerances 49 Appendix 3 Quick Start Staff Guide 50 Select a Solution and Myxer 50 Prepare the Booth 51 Start the Session 52 Appendix 4 Maintenance Checklists 54 ...

Page 7: ...edicated outlet which matches the respective power cord shipped with the booth at installation plug ends vary by country 4 It is recommended that the booth be used on a dedicated circuit rated for the voltage and current for your respective model The dedicated circuit should have no additional outlets or branch circuits If the provided plug does not fit into your outlet consult a qualified electri...

Page 8: ...ion is necessary when this product is used near children Do not allow children to play in or around the booth or to play with the touchscreen controller Severe injury or harm could occur due to moving parts and electrical features of the Mystic Kyss booth 15 Use this product only as intended per the instructions in this manual Limit spray solutions or cleaning compounds to mild detergents such as ...

Page 9: ...ndergarments Communicating and following these five steps will ensure that your tanners will have a safe automated spray tanning experience The complete FDA advisory on spray tanning can be found here http www fda gov Cosmetics ProductsIngredients Products ucm134064 htm A link to the FDA advisory can be found on the Sunless Inc Mystic Tan and Versa Spa web sites Additionally salons can order an in...

Page 10: ... delivery date you will receive shipment and tracking information on your new unit It will arrive on location prior to the certified installation technician s arrival Once it arrives make sure not to open the package as some of the components could be damaged If you notice any damage to the packaging make sure to note it on the bill of lading before signing for the package Any obligations will be ...

Page 11: ...um of inch internal diameter and should connect to the sewer system with a proper anti syphon connection A manual cutoff valve is also recommended for the drain so that it will be accessible after installation Arrangements should be made to have any staff that require training present once the installation is complete If any electrical or plumbing modifications are required to meet these stipulati...

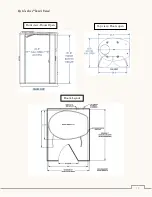
Page 12: ...Mystic Tan Kyss Owner s Manual 12 Top view Doors open Front view Doors Open Room Layout ...

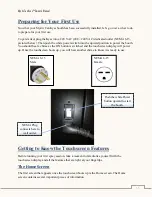
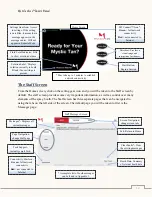
Page 13: ...d and the touchscreen display will power up Once the touchscreen boots up you will hear another chime to know it is ready to use Getting to Know the Touchscreen Features Before running your first spray session take a moment to familiarize yourself with the touchscreen display and all the features that are right at your fingertips The Home Screen The first screen that appears once the touchscreen b...

Page 14: ...setting icon is Blue it means that a message appears in the message center Will not appear in Remote Mode Directions Provides a visual image and instructions for the user Fluid Level Indicator Fills to show solution volume Solution Label Displays solution currently in booth Blank if no cartridge is present Home Screen Staff Messages Screen Page Navigation change Staff page views Screen Navigation ...

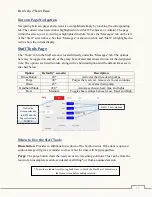
Page 15: ...tion and the default times are in the chart below Option Default seconds Description Rinse Button 20 Activates the rinse down pumps Purge 90 Purges the reservoir removes left over solutions Drain 20 Activates drain pump Handheld Mode 900 Activates exhaust heat fans and lights Heat Medium Toggles heat settings between Low Med and High When to Use the Staff Tools Rinse button Provides an additional ...

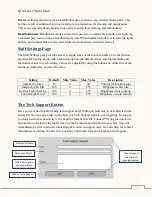
Page 16: ...e buttons on either side of the setting to either raise or lower the value Setting Default Min Value Max Value Description Speaker Volume 15 0 40 Volume for Booth Audio Interior Light Idle 100 0 255 Brightness while idle Interior Light Session 100 0 255 Brightness while running Column Light Level 100 0 255 Brightness on side column The Tech Support Button Have you ever had trouble finding tech sup...

Page 17: ...r decreases speed of vertical movement Decreasing the speed will increase session time Dry Time Between Seq Length of dry time between positions in session Time Plus Post Session Add additional time to dry cycle at end of session This value is added to the minimum 90 seconds Purge Duration Length of time Purge function runs 1st Rinse Duration Length of 1st Rinse cycle 2nd Rinse Duration Length of ...

Page 18: ...on value of not home shows the mechanism is not in the starting position Start Sensor The flashing start sensor to begin a session Values are Activated and Not Activated Left Door Shows if the left door is connected to the sensor If the sensor is connected with the door the door is Closed if the sensor is not activated the door is Open Right Door Shows if the right door is connected to the sensor ...

Page 19: ...is password protected It is advised to limit dispensing the Admin password to only necessary personal The default page for the Admin screen is the System page The Admin System Page Adjust important system settings and preferences here Scroll Arrows use to navigate up and down the page Toggle ON OFF Use to toggle the various features ON and OFF Operating values will be displayed to the right of the...
Page 20: ...Page The Admin Connectivity page is used to establish wireless Internet capability of the booth The process is extremely easy very much like connecting on your personal computer Remember to access any Admin page you must enter the Admin password Admin Date Time Page The Admin Date Time page allows an Admin to change the date and time The Admin may wish to adjust for time zone after receiving the b...

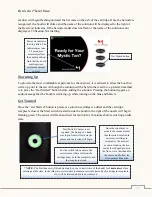
Page 21: ...con shows the amount of solution currently in the booth Always check this indicator before adding a new container to make sure that the reservoir is not already full The MT Connect icon shows if the booth has internet connectivity If the icon is red see section T1 Internet Connectivity Notice the color of the MT Connect icon In this image it is operating properly The amount of solution in the rese...

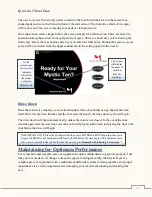
Page 22: ...OT PUT FINGERS INTO CARTRIDGE RECEPACLE PIERCING HAZARD Close the cartridge receptacle The cartridge cap will be opened and a vent pierced in the bottle Filling Up Once the cartridge is inserted and the receptacle door closed several things will happen You will notice the Reservoir indicator fill to represent the solution from the cartridge The bar code The cartridge is inserted upside down cap fi...

Page 23: ...to the right of the nozzle will begin flashing green The sensor will flash and wait for motion for 16 minutes before entering an idle state Reservoir indicator showing filled The indicator may take 3 5 seconds to accurately reflect the quantity added Note that the booth must register a minimum amount to start Get Started button NOTE The Start Sensor will blink waiting for a cue to start wave of th...

Page 24: ...he rinse down will begin automatically unless the door is not closed In the event the door remains open after the user steps out the booth will play an audio track instructing the door to be shut before the rinse will begin Maintaining for Optimum Performance Every machine and complex piece of equipment requires maintenance to perform properly Just like your car needs an oil change to keep the eng...

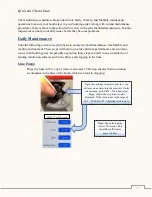
Page 25: ...o provide optimum performance and avoid any issues with booth hygiene Repeatedly neglecting these steps can lead to an accumulation of tanning solution on surfaces and in the filters and clogging in the lines Line Purge Purge the lines with cup of clean warm water This step ensures that no solution accumulates in the lines of the booth which can lead to clogging Staff Tools Screen Open the cartrid...

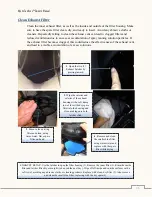
Page 26: ...2 Exhaust Latches by pressing inward 2 Remove the existing filter and clean using warm water Have spare filter on hand 3 Wipe the interior and exterior of the exhaust housing with a soft damp towel Insert the dry spare filter into the housing and close making sure both latches click EXHAUST RECAP Use the latches to open the filter housing 1 Remove the inner filter 2 Rinse the inside filter and let...

Page 27: ...ent that may have accumulated from bodies or surfaces You may need a soft bristled brush to brush away lint or sediments from the filter Clean the sump basin of any sediment then replace the filter and slide the cover back into place Now move to the touchscreen After hand washing the drain filter go to the touchscreen and select Staff Tools and start a manual Rinse Make sure both doors are closed ...

Page 28: ...n setting from the Staff Tools screen menu to clear any excess water LEAVE THE DOORS TO THE BOOTH OPEN AT THE END OF DAY TURN OFF THE WATER SUPPLY TO THE BOOTH AT THE END OF DAY The installation agreement requires the salon to provide a cutoff valve on the water supply to the booth so that the supply may be stopped quickly in the event of a leak or ruptured hose Use the cutoff valve to close the w...

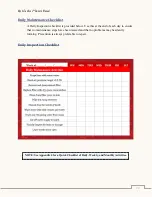
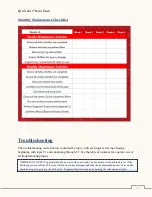
Page 29: ... provided below Use this at the end of each day to ensure that no maintenance steps have been missed and that no problems may be silently forming Prevention is always preferable to repair Daily Inspection Checklist NOTE See Appendix 4 for a Quick Checklist of Daily Weekly and Monthly Activities ...

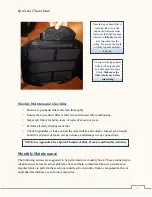
Page 30: ...ure proper evacuation and filtration of solution particles during the spray session Routine failure to clean the top exhaust filter can lead to a reduction in air flow less solution being filtered out during the session and a sticky buildup of solution in the filter The top exhaust filter is located on the ceiling of the booth upper left side if facing the booth Please use a stepladder to reach sa...

Page 31: ...n a monthly basis These actions help to identify issues before an actual problem arises and help to maintain like new performance Regular failure to perform these actions could lead to downtime from a component failure or unplanned maintenance at an inconvenient time Once the top exhaust filter is removed take it to a sink and wash with warm water Only once the filter has been allowed to fully dry...

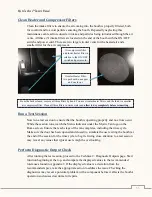
Page 32: ...ndle If the panel has an accumulation of solution clean with warm water and Dawn or other mild detergent Clean the sump basin and remove any debris Use a nonabrasive cloth and warm water to clear any sediment that may have accumulated Once the sump basin and float switch plate have been cleaned carefully reassemble the components back into place Go to the Staff Tools page and run a manual rinse fo...

Page 33: ...o simulate the user exiting the booth at the end of the session for the rinse cycle to begin Giving close attention to a test session may reveal any issues that typical users might be overlooking Perform Diagnostic Output Check After running the test session proceed to the Technical Diagnostic Outputs page Start function beginning at the top and compare the displayed values to the recommended tole...

Page 34: ...ng through T7 See the table of contents for a quick view of all troubleshooting topics IMPORTANT NOTE To quickly identify an error with your booth visit the Home screen and look to see if the Settings gear icon is Blue If the icon is Blue check any messages and take the recommended action You can also check any input by going to the Technical Diagnostic Inputs screen and checking the relevant inpu...

Page 35: ...he Star icon is visible in the bottom left corner of the screen View available networks and network statistics Touch a network to select it and enter the password to connect if required Star Icon visual indicator of network connectivity Connectivity tab Solution 1 If network names are listed in the connectivity page then the booth is receiving the wireless or wired signal If using wireless and som...

Page 36: ...onnected Enter the Admin Connectivity page and select the wireless network Enter the network password if required Wait at least three minutes to see if communication is successful If so there may be a problem with your Ethernet wire or connection B If you are using wireless and the above options fail try to connect an Ethernet cable to the booth The female connection for the booth is located behin...

Page 37: ...e in the back when inserting the cartridge The red light emits from the barcode reader Once the reader identifies the barcode the light will flash red If the reader does not recognize the barcode it will display a constant red light If the light is flashing red open the receptacle make sure the cartridge is inserted correctly and close again See if the solution name appears on the screen now Solut...

Page 38: ... to allow water to exit the sump If the cutoff to the sewer is closed the sump pump will not be able to remove any water Open the cutoff and try to drain once more You can manually activate the drain from the Staff Tools page You can also check the current state of the sump floats from the Technical Diagnostic Inputs page The technical page will require a password Solution 2 If the sump is still n...

Page 39: ... the Technical Diagnostic Outputs page again and adjust until the compressor PSI is within the tolerance range To adjust the air compressor open either the Staff Tools Purge option OR the Technical Diagnostic Outputs Compressor option both show PSI value Use this to monitor the current PSI output from the compressor To alter the PSI adjust the black cap with your fingers allowing the silver locknu...

Page 40: ...g the Touchscreen Software The same USB drive containing the firmware can also contain the touchscreen software Also a very simple process with the covering panel still removed locate the extension USB cord Insert USB drive here Power OFF the booth Insert the USB drive into the female port then power the booth ON The firmware update will only take a few moments and you will hear the sump activate ...

Page 41: ...ng the SD card is extremely easy due to a special access hatch The SD card is housed on the board located above the touchscreen display The SD card is stored on the same board as the USB port for updating firmware There is no need to remove any covers or panels the SD card has its own access hatch Location of SD card slot accessible from an external access hatch The SD card access hatch is located...

Page 42: ...o an issue The booth is equipped with multiple notification capabilities to ensure that the message is delivered to the appropriate individuals so that a rectifying action may be taken There are three main means of notification regarding a fault The Gear icon on the Home screen turned blue to indicate a message the email notifications and the booth reporting an error to Sunless Inc technical suppo...

Page 43: ...ecorded faults me Page Pressing the Setting gear icon will take you directly to the Staff Messages screen and display a list of any recorded messages List of all current messages Clear Faults Button take any appropriate action resulting from the message and press the Clear Faults button If the issue is resolved the message will not reoccur In the message above the booth shows an orange fault Fault...

Page 44: ... continue the session albeit some functions may be degraded or components cut off Orange Faults are more severe than Blue faults and these issues MAY cause the booth to end the session Orange faults typically require some action or attention to particular details such as solution remaining in the reservoir so that you do not overfill or to notify you that a session was Email addresses are added he...

Page 45: ...ed by the heater and exhaust fans 202 Heater Fan current exceeds 1 0 amps Heaters and heater fans will be turned off Fan is running too slow or not running Turn on Heater fan in Technical Diagnostics If it does not run check fuse replace if blown If it does run check AC voltage at fan Should be 208 Volts AC If Low voltage replace cable or AC board If voltage at the fan is 208 or higher replace fan...

Page 46: ... door switches on roof 209 Drain pump fault pump not emptying the sump Drain not emptying sump basin Rinse will not start while to basin is full see section T4 for help 210 Cannot rinse emergency float is high The sump basin is too full Rinse cycle will not start See section T4 for more help 211 Rinse was stopped due to door opened Door was opened during the rinse cycle so rinse cycle was halted 2...

Page 47: ...voir level Displays current volume in reservoir before a purge on a scale of 1 19 Ignores values of 2 or below Red Faults Fault Code Display Message Description 101 Vertical motor home switch not detected Vertical motor not finding the home position sensor Session will be canceled Go to Technical Diagnostic Outputs and turn Vertical Motor On If the motor is running is the nozzle moving up and down...

Page 48: ...activated within 16 minutes after enable Start sensor idle for 16 minutes after queuing a session The session will be cancelled 107 Air compressor current exceeded Compressor current is above maximum of 7 for 115v or 3 5 for 230v Session will be cancelled Check wall voltage during session If it s below 208 V AC during session electrical needs to be brought up to spec If it s above 208 V AC during ...

Page 49: ... 30 0 34 Exhaust Fan Value is either OFF 0 or ON 1 During ON the Exhaust Fan should run Wash Solenoid Value is either OFF 0 or ON 1 Activation should toggle between states Start Lamp Value is either OFF 0 or ON 1 During ON the start sensor should illuminate In the ON state the start sensor does not blink Drain Pump Value is either OFF 0 or ON 1 During ON the Drin Pump should run Vertical Motor spi...

Page 50: ... http mystictan com in salon or call 888 974 9977 for more information Choose from an extensive list of additives that may be added directly into the cartridge Unscrew the black plastic lid open the additive pouch and pour it into the cartridge Screw the black lid back onto the cartridge and you are ready to go There is a wide selection of Myxer additives to enhance your tan Accelerators help to b...

Page 51: ...it ON Once the booth is powered ON press the Get Started button to begin the warm up cycle While the booth is preparing place the sealed cartridge into the receptacle upside down The back of the cartridge with the groove will face toward the back and the front graphic will face toward the front Once inserted push the receptacle closed The black cap will be punctured and a flow vent will be pierced...

Page 52: ...he booth has reached temperature the solution cartridge is added and solution is in the reservoir start switch will begin flashing green inside the booth The user simply needs to enter the booth close the door stand on the two footpads and wave a hand in front of the flashing sensor NOTE The flashing start sensor will time out after 16 minutes of inactivity and the session will be cancelled Don t ...

Page 53: ...d and face away from the spray nozzle for the back session After the back spray the voice prompt will inform the user of the final drying session After drying the user should exit the booth and shut both doors IMPORTANT NOTE ON THE RINSE CYCLE Following the spray session the booth will begin an automatic rinse cycle see page 18 on The Admin System Page if this feature is not activated The rinse cy...

Page 54: ...Maintenance Checklists DO NOT ATTEMPT THESE ACTIVITIES WITHOUT FIRST REFERRING TO THE MANUAL FOR SPECIFIC INSTRUCTIONS IN EACH CATEGORY FAILURE TO FOLLOW INSTRUCTIONS CAN LEAD TO INJURY OR DAMAGE TO THE BOOTH Checklists are on the following pages ...

Page 55: ... Manual 55 Daily Maintenance Checklist DO NOT ATTEMPT THESE ACTIVITIES WITHOUT FIRST REFERRING TO THE MANUAL FOR SPECIFIC INSTRUCTIONS IN EACH CATEGORY FAILURE TO FOLLOW INSTRUCTIONS CAN LEAD TO INJURY OR DAMAGE TO THE BOOTH ...

Page 56: ...l 56 Weekly and Monthly Maintenance Checklist DO NOT ATTEMPT THESE ACTIVITIES WITHOUT FIRST REFERRING TO THE MANUAL FOR SPECIFIC INSTRUCTIONS IN EACH CATEGORY FAILURE TO FOLLOW INSTRUCTIONS CAN LEAD TO INJURY OR DAMAGE TO THE BOOTH ...

Reviews: