SunMaxx Solar LLC
Page 10 of 39
4.3 System start-up procedures
After the system installation, check there is no leakage in the system and follow the
following steps to start up the system.
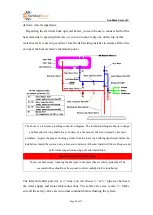
Step 1: Connect Garden Pipe to Drain Valve V4, and keep V4 Open.
Step 2: Open the following valves: V0, V2, V4 and shut off the following valves: V1,
V3, V5
Step 3: Keep the water running for 5 minutes to flush out the solder or stains after the
water from V4 is observed.
Step 4: Shut off V4 and Open V3, and the system is in normal operating status.
4.4 System pipe anti-freezing protections
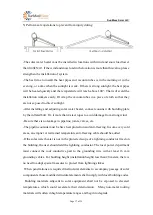
This is a direct DHW system. The plumbing copper pipe needs anti-freezing protection
when the lowest temperature is below 23 Fahrenheit or -5 Celsius in the coldest climate.
The anti-freezing protection detail is described below.
The tables SRCC uses to evaluate the freeze protection provided by pipe insulation
indicate that 1.5 inches of insulation on a 0.75 inch type L copper pipe will protect the
pipe down to ~14°F. It would be okay for the whole system if all the pipe was insulated
well under this temperature condition.
It would be better to drain down the whole system if the temperature is lower than 14
o
F
to avoid freezing in the connecting pipe.
In case of black out or power loss during cold weather when the temperature is lower
than 14°F or -10° Celsius, a system drain out procedure must be followed as follows,
and the existing auxiliary water heater must have adequate capacity, listed and labeled
by an accredited listing organization to continue providing adequate hot water.
Step 1: Shut off V2 and V3 Solar Isolation valves to isolate solar system.
Step 2: Open V1 to using auxiliary hot water heater system, and bypass the solar water
system. Ensure the V0 is open.
Step 3: Connect Garden Pipe to both Drain Valve V4 and V5.
Step 4: Put both Garden Pipes in the house drain dock or sinks.
Step 5: Open both V4 and V5 drain valves until no more water comes out of either pipes.
Step 6: Shut off both V4 and V5 drain valves.
When the electricity is back to normal, follow the system start-up procedures to set up
the system to normal operation.
4.5 Specific notices
4.5.1 Auxiliary Hot Water Heater
The system is not a replacement of the existing auxiliary hot water heater. It is installed
upstream of the existing conventional hot water heater. The auxiliary hot water heater
must be maintained as usual. The auxiliary hot water heater must have adequate
capacity, listed and labeled by an accredited listing organization. It should have built-

