background image


SunMaxx Solar

 | 

Flush Mounting


Step 3:

 Attaching the Rails 

a.


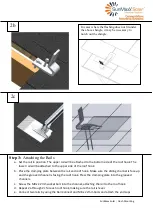
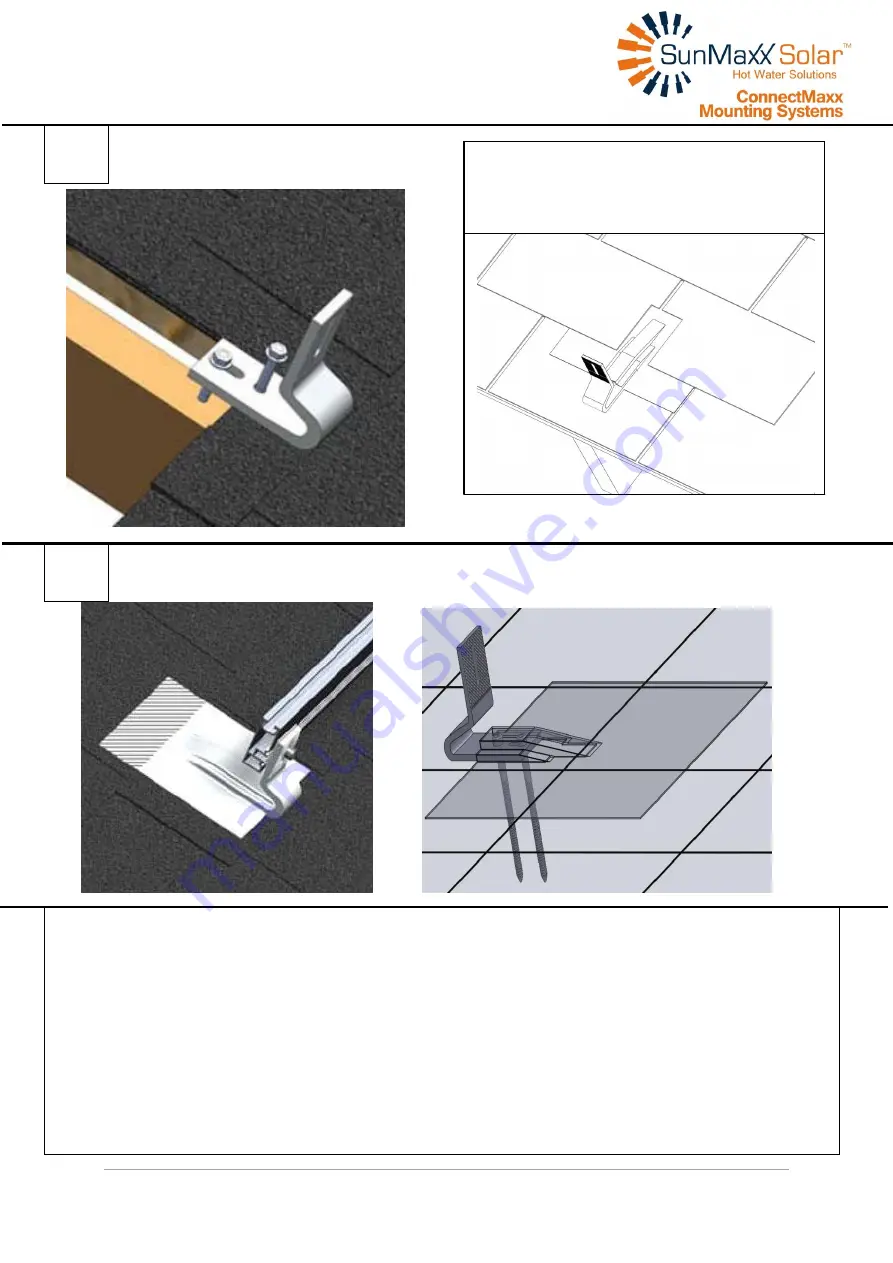
Set the rail in position. The upper rail will be attached to the bottom side of the roof hook. The 

lower rail will be attached to the upper side of the roof hook. 

b.


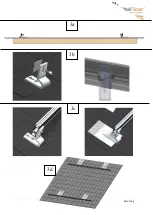
Place the clamping plate between the rail and roof hook. Make sure the sliding channel is face-up 

and the grooved channel is facing the roof hook. Press the clamping plate into the grooved 
channels. 

c.


Screw the M8 x 22mm socket bolt into the channel, attaching the rail to the roof hook. 

d.


Repeat 2a through 2c for each roof hook, making sure the rail is level. 

e.


Connect two rails by using the Rail Connect and M8 x 22mm bolts and attach the end caps 


2b 

2c 

In cases where the flashing does not fit under 
the above shingle, it may be necessary to 
notch out the shingle. 

Summary of Contents for TitanPower Plus-SU2 Collector

Page 1: ...SunMaxx Solar Flush Mounting ConnectMaxx Mounting Systems Installation Instructions TitanPower Plus SU2 Collector Flush Mounting...

Page 2: ...outdoors Rinsing filling and maintenance During installation and setup of the collectors keep them covered to prevent damages Please consider the national rules and manufacturer instructions for the u...

Page 3: ...eld Attention Circumferential additional approximately 5 91 of space is needed Pressure Loss Tm 20 C Flow l h 0 50 100 150 200 250 Pressure Loss Pa 0 564 1168 1811 2493 3215 Number of Collectors Field...

Page 4: ...Screw M8x22 ConnectMaxx 18000305 End Cap PP 40x40mm ConnectMaxx 74010701 2120 Mounting Rail Medium 40x40 7ft length ConnectMaxx 74011003 Rail Connector Fixed for 40x40mm ConnectMaxx 74022601 Adjustab...

Page 5: ...e roof hook on the roof Loosen the shingle above the roof hook and temporarily set the flashing in place This is to make sure the placement of the roof hook is accommodating b Using the Simpson Strong...

Page 6: ...sliding channel is face up and the grooved channel is facing the roof hook Press the clamping plate into the grooved channels c Screw the M8 x 22mm socket bolt into the channel attaching the rail to t...

Page 7: ...SunMaxx Solar Flush Mounting 3b 3c 3d 3a...

Page 8: ...gether Make sure to include the graphite washer c Once the panel s are in the desired position attach the adjustable clamping plate to the panel using the Hex bolts included on the ends of the collect...

Page 9: ...e Universal Connect Set a Left to Right Piping from bottom left to top right b Right to Left Piping from bottom right to top left The Hot Supply from the collector should be the shortest pipe run 5a T...

Page 10: ...SunMaxx Solar Flush Mounting Bottom Left of Collector Bottom Right of Collector 5b Top Left of Collector Top Right of Collector Bottom Left of Collector Bottom Right of Collector...

Page 11: ...perature sensor well Insert temperature sensor and tighten the compression nut so that the sensor wire is sealed Contact Us Headquarters Sales Office 56 Broome Corp Pkwy Conklin NY 13748 Training Faci...

Reviews: