6
We value your experience using Sunny Health and Fitness products. For assistance with parts or
troubleshooting, please contact us at support@sunnyhealthfitness.com or 1-877-90SUNNY (877-
907-8669).
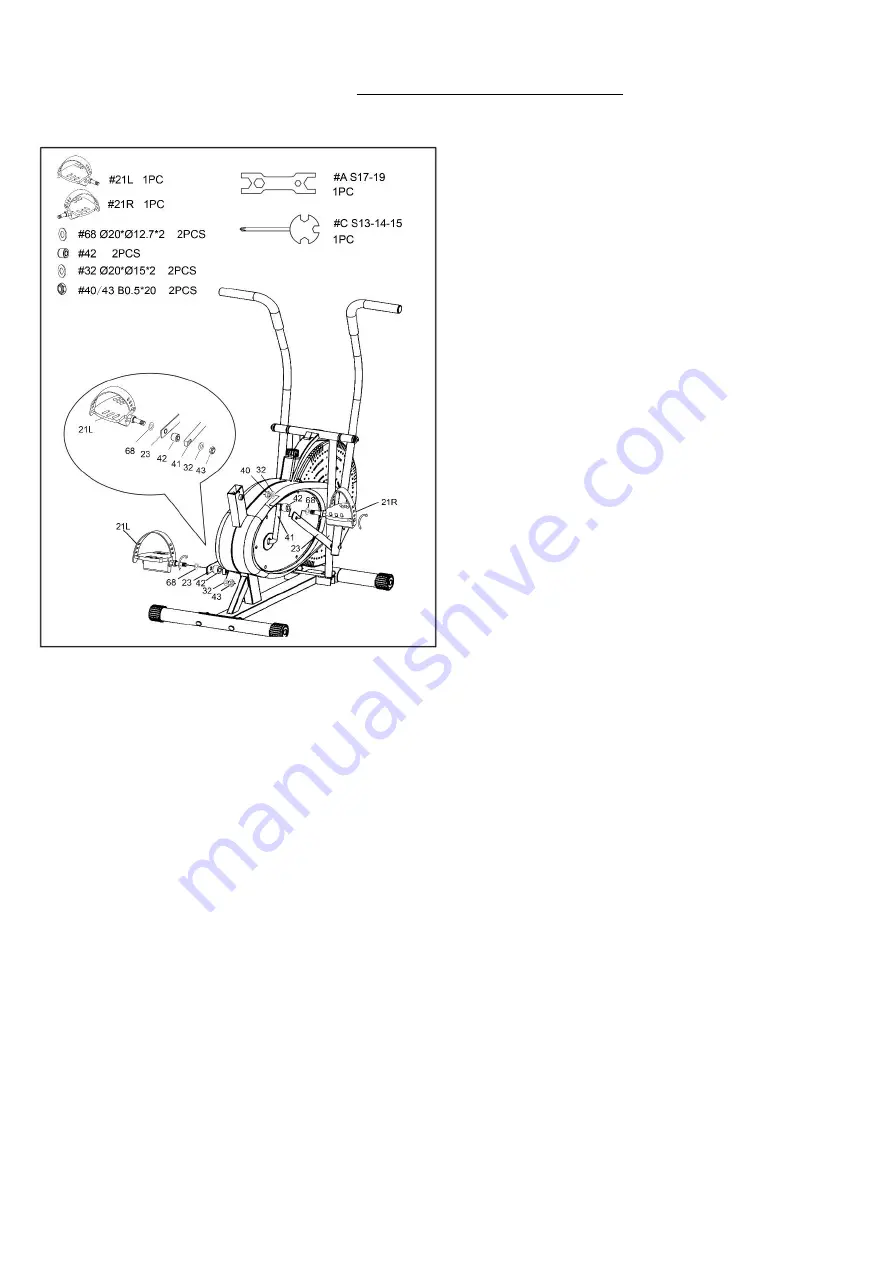
STEP 3:
Turn the
L/R Crank (No. 41)
to the front to make
it horizontal.
Remove the 2
Metal Bushings (No. 68)
, 2
Spacers (No. 42),
and 2
Left & Right Lock
Nuts (No. 43
&
No. 40)
from the
Left & Right
Pedals (No. 21L/R)
using the
Multi Hex Tool
(No. A)
and
Spanner (No. C)
.
Insert the
Left
Pedal (No. 21L)
into the
Metal
Bushing (No. 68)
, then attach
Connection
Piece (No. 23)
and
Spacer (No. 42)
. Connect
those parts to the
Left
Crank (No. 41)
.
Turn the
Left
Pedal (No. 21L) counter-clockwise
as
tightly as you can with your hands,
then use
Spanner (No. C)
to
tighten securely.
Use
Spanner (No. C)
to hold the bolt for the pedal in
place, then use
the
Multi Hex Tool (No. A)
to
screw the
Left
Lock Nut (No. 43)
and the
Spring Washer (No. 32) clockwise
onto the
thread end of
the
Left Pedal (No. 21L)
.
Insert the
Right
Pedal (No. 21R)
into the
Metal
Bushing (No. 68)
, then attach
Connection
Piece (No. 23)
and
Spacer (No. 42)
. Connect
those parts to the
Right Crank (No. 41)
.
Turn
the
Right
Pedal (No. 21R) clockwise
as tightly
as you can with your hands,
then use
Spanner
(No. C)
to
tighten securely.
Use
Spanner (No.
C)
to hold the bolt for the pedal in place then use
the
Multi Hex Tool (No. A)
to screw the
Right
Lock Nut (No. 40)
and
the
Spring Washer (No.
32) counter-clockwise
onto the thread end of
the
Right Pedal (No. 21R)
.
Summary of Contents for SF-B2618
Page 3: ...2 EXPLODED DIAGRAM ...
Page 11: ...10 ...


