7
We value your experience using Sunny Health and Fitness products. For assistance with parts or
troubleshooting, please contact us at
support@sunnyhealthfitness.com
or 1-877-90SUNNY (877-907-
8669).
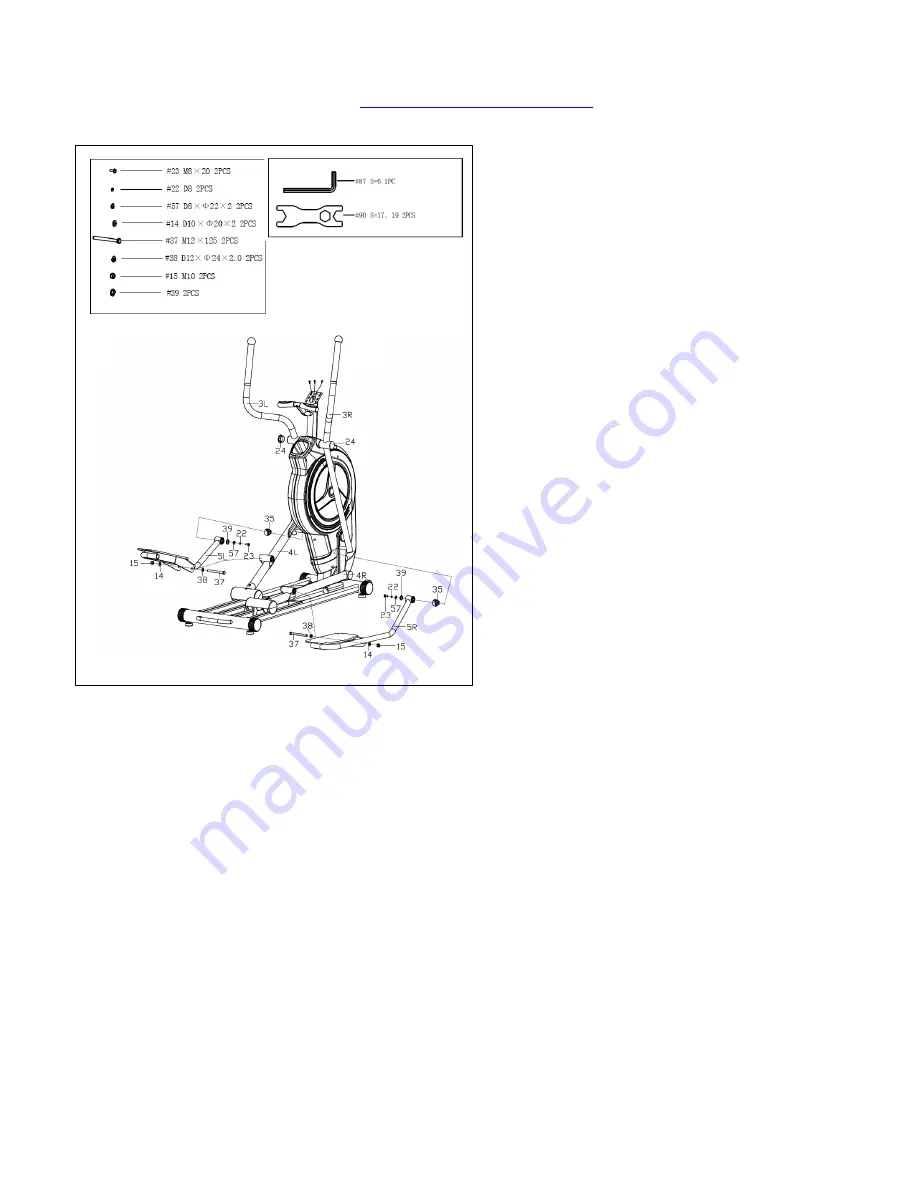
STEP 3:
Remove the preassembled 2
Inner Hex
Pan Head Bolts (No. 23)
, 2
Spring
Washers (No. 22)
, 2
Flat Washers (No.
57)
, 2
Sleeves (No. 39)
and 2
Plastic
Bushings (No. 35)
from the
Swing Tubes
(No. 3L/R).
Attach the
Pedal Supports
(No. 5L/R)
to the
Swing Tubes (No. 3L/R)
with
2
Inner Hex Pan Head Bolts (No. 23)
,
2
Spring Washers (No. 22)
, 2
Flat
Washers (No. 57)
2
Sleeves (No. 39)
and
2
Plastic Bushings (No. 35)
that were just
removed. Tighten and secure with
Allen
Wrench (No. 87)
.
Note:
Do not fully tighten at this time.
Remove the preassembled 2
Hex Bolts
(No. 37)
, 2
Big Flat Washers (No. 38),
2
Small Flat Washers (No. 14)
and 2
Nylon
Nuts (No. 15)
from the
Pedal Supports
(No. 5L/R).
Attach the
Pedal Supports
(No. 5L/R)
to the
Wheel Frames (No. 4L/R)
with 2
Hex Bolts (No. 37)
, 2
Flat Washers
(No. 38)
2
Small Flat Washers (No. 14)
and 2
Nylon Nuts (No. 15)
that were just
removed. Tighten and secure with
Spanner
(No. 90)
.
Now fully tighten all bolts assembled in Step
2 and 3 that connect the
Swing Tubes (No.
3 L/R)
to the
Main Frame (No. 1)
and to the
Pedal Supports (No. 5 L/R)
. Fully tighten
the bolts that connect the
Pedal Supports
(No. 5 L/R)
to the
Wheel Frames (No. 4
L/R)
. Cover the bolts on the
Swing Tubes
(No. 3 L/R)
with 2
Caps (No. 24)
.
Note:
If the elliptical trainer makes noise
during use, the bolts may be loose on the
trainer. Please inspect and tighten any
loose bolts.
Summary of Contents for SF-E3875
Page 3: ...2 EXPLODED DIAGRAM ...


