8
We value your experience using Sunny Health and Fitness products. For assistance with parts or
troubleshooting, please contact us at support@sunnyhealthfitness.com or 1-877-90SUNNY
(877-907-8669).
#48 M8*16 4PCS
#105 M5*15 4PCS
#104 2PCS
48
#B
104
#A S6
104
105
48
48
48
80
78
106
47
49
106
105
105
107
105
104 105
105
107
105
105
104
#26 M8*16 1PC
32
22
#A S6
#8 M8 1PC
#22 M8*45 1PC
#B S13-14-15
#24 d8* 20*1.5 1PC
#25 d8* 20*1.5*R30 1PC
8
24
26
25
21
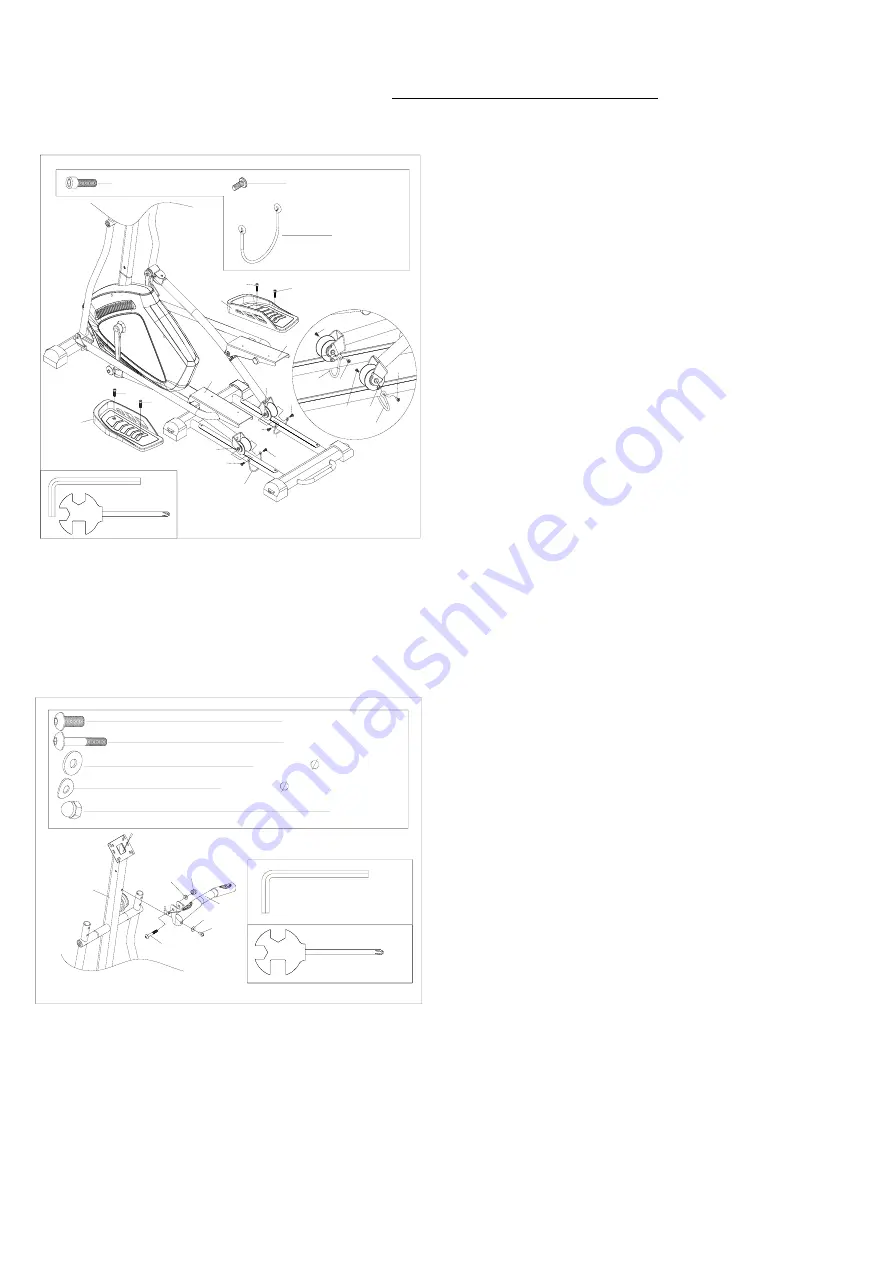
STEP 6:
Remove 4
Screws (No. 48)
from
Left & Right
Pedal Tubes (No. 47 & No. 78)
with
Allen
Wrench (No. A).
Attach
Left Pedal (No. 49)
onto
Left Pedal Tube
(No. 47)
using 2
Screws (No. 48)
that were
removed. Tighten and secure with
Allen Wrench
(No. A)
Attach
Right Pedal (No. 80)
onto
Right Pedal
Tube (No. 78)
using 2
Screws (No. 48)
that were
removed. Tighten and secure with
Allen Wrench
(No. A)
Align 2
U-shaped Buckles (No. 104)
to the U
slots of 2
Limit Washers (No. 107)
, then secure
with 4
Crosshead Bolts (No. 105)
. Tighten with
Spanner (No. B).
STEP 7:
Remove 1
Bolt (No. 22),
1
Screw (No. 26)
, 1
Washer (No. 24)
, 1
Arc Washer (No. 25)
and 1
Domed Nut (No. 8)
from
Upright Post (No. 21)
with
Allen Wrench (No. A)
and
Spanner (No.
B).
Attach
Middle
Handlebar (No. 32)
to
Upright
Post (No. 21)
with 1
Bolt (No. 22),
1
Screw (No.
26)
, 1
Washer (No. 24)
, 1
Arc Washer (No. 25)
and 1
Domed Nut (No. 8)
that were removed.
Tighten and secure with
Allen Wrench (No. A)
and
Spanner (No. B).
Summary of Contents for SF-E3957
Page 18: ...17 ...


