7
ASSEMBLY INSTRUCTIONS
We value your experience using Sunny Health and Fitness products. For assistance with parts or
troubleshooting, please contact us at
support@sunnyhealthfitness.com
907-8669).
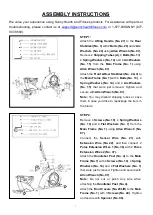
STEP 1:
Attach the
Lifting Handle (No. 27)
to the
Rear
Stabilizer (No. 3)
with 2
Bolts (No. 26)
and 2
Arc
Washers (No. 20)
using
Allen Wrench (No. 97)
.
Remove 2
Shipping Tubes (A)
, 4
Bolts (No. 13)
,
4
Spring Washers (No. 14)
and 4
Arc Washers
(No. 15)
from the
Main Frame (No. 1)
using
Allen Wrench (No. 97)
.
Attach the
Front &
Rear Stabilizer (No. 2 & 3)
to
the
Main Frame (No. 1)
with 4
Bolts (No. 13)
, 4
Spring Washers (No. 14)
and 4
Arc Washers
(No. 15)
that were just removed. Tighten and
secure with
Allen Wrench (No. 97).
Note:
You may discard shipping tubes or save
them in case you’d like to
repackage the item in
the future.
STEP 2:
Remove 4
Screws (No. 19)
, 4
Spring Washers
(No. 14)
and 4
Flat Washers (No. 7)
from the
Main Frame (No. 1)
using
Allen Wrench (No.
97).
Connect the
Sensor Wire (No. 21)
with
Extension Wire (No. 22)
, and then connect 2
Pulse Extension Wires 1 (No. 36)
with 2
Pulse
Extension Wires 2 (No. 37).
Attach the
Handlebar Post (No. 4)
to the
Main
Frame (No. 1)
with 4
Screws (No. 19)
, 4
Spring
Washers (No. 14)
and 4
Flat Washers (No. 7)
that were just removed. Tighten and secure with
Allen Wrench (No. 97)
.
Note:
Do not cut or pinch any wire when
attaching the
Handlebar Post (No. 4).
Attach the
Front Covers (No. 23L/R)
to the
Main
Frame (No. 1)
with 3
Screws (No. 24)
. Tighten
and secure with
Spanner (No. 98).
Summary of Contents for SF-RB4880
Page 3: ...3 EXPLODED DIAGRAM ...
Page 20: ...20 ...


