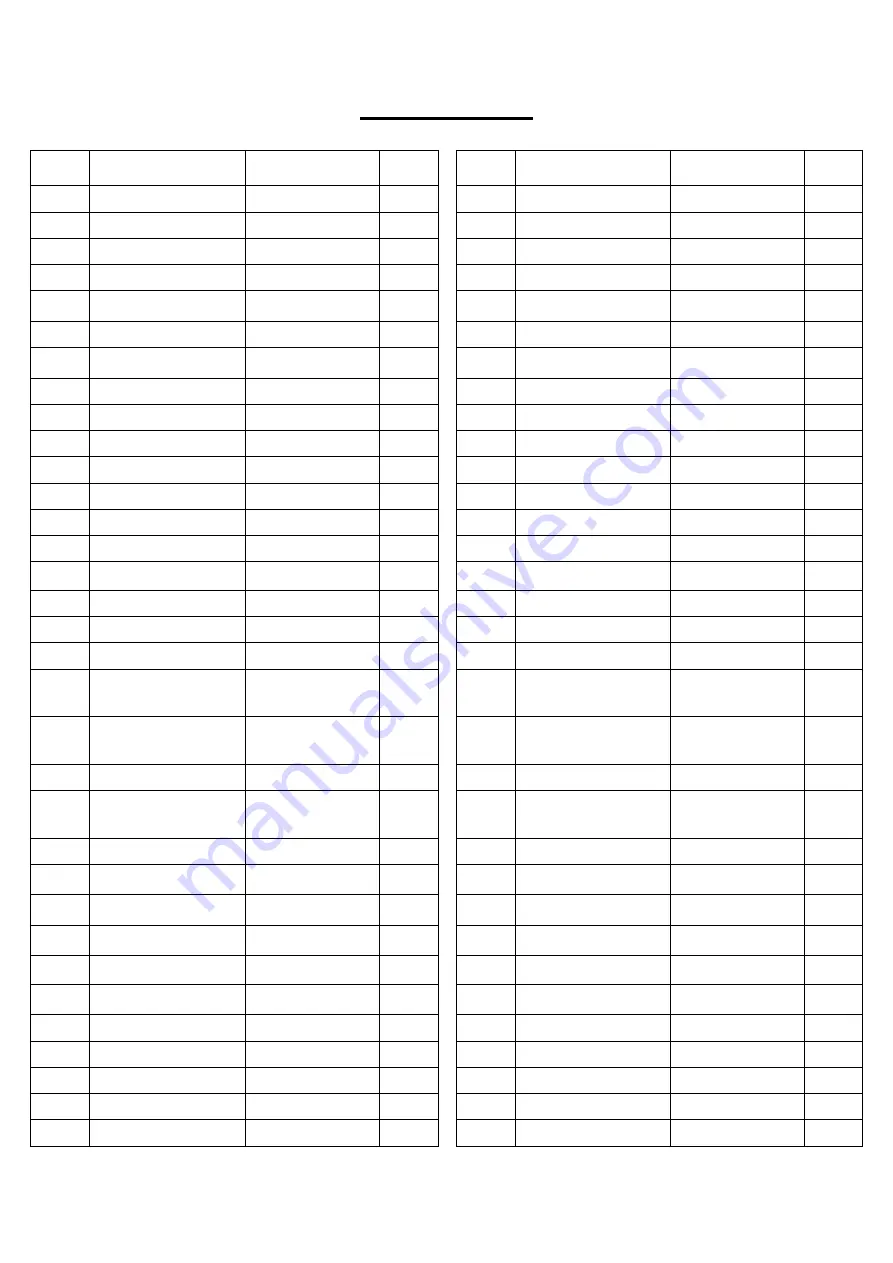
background image


PARTS LIST 


No. 

Description 

Spec. 

Qty. 


No. 

Description 

Spec. 

Qty. 

Computer 


31 

Seat 


1a 

Computer Wire 


32 

Seat Post 


1b 

Computer Wire 


33 

Bolt 

M8*16 

4   

1c 

Computer Wire 


34 

Bolt 

M8*32 

Nylon Nut 

M8*H7.5*S13 


35 

Nylon Nut 

M8 

10 

Washer 

d8*Φ20*2


36 

Adjusting Bolt 

M6*40 

Bolt 

M8*90*20*S13 


37 

Adjusting U Seat 


Handlebar 


38 

Nylon Nut 

M6 

Mesh Belt 


39 

Spacer 

Φ12.5*Φ8.2*10


End Cap 

Φ32*17


40 

Roller for Seat Slider   

Foam Grip 


41 

Bolt 

M8*28 

Front Stabilizer 


42 

Seat Axle 


10L/R 

End Cap 


43 

Washer 

d8*Φ16*1.5


11 

Bolt 

M8*20*S13 


44 

Aluminum Rail 


12 

Washer 

d8*Φ22*2


45 

Axle 

Φ10.9*80*14


13 

Screw 

ST4.2*25 


46 

Locating Mount 

Φ11.4*Φ27*26


14 

Main Frame 


47 

Washer 

d6*Φ16*1.2


15 

Spring Washer 

d8 


48 

Bolt 

M6*16*S5 

16 

L Knob 


49 

Upper Part of Heart 

Rate Receiver 


17 

End Cap 

Φ38*28


50 

Lower Part of Heart 

Rate Receiver 


18 

Bolt 

M12*139 


51 

Bolt 

M5*16*Φ8.5


19 

Bushing 

Φ50*3


52 

Aluminum Rail 

Support Frame 


20 

Washer 

d12*Ф24*2


53 

Back Stand 


21 

Nylon Nut 

M12 


54 

Rubber Board 


22 

Aluminum Rail Link 


55 

Bolt 

M5*16*Φ10


23L/R 

Pedal 


56 

Trunk Wire 


24 

Bolt 

M12*160 


57 

Trunk Wire 3 


25 

Bolt 

M8*50*S14 


58 

Adapter 


26 

Bushing 

Φ16*2


59 

Pulse Sensor Wire 


27 

Trunk Wire 4 


60 

Screw


ST4.2*10 

4


28 

Trunk Wire 2 


61 

Motor


1


29 

End Cap 

Φ22


62 

Handlebar Seat


1


30 

Pedal Strap 


63 

Washer 

d5*Φ10*1.0


Summary of Contents for SF-RW5854

Page 1: ...R MANUAL IMPORTANT Please retain owner s manual for maintenance and adjustment instructions Your satisfaction is very important to us PLEASE DO NOT RETURN UNTIL YOU HAVE CONTACTED US support sunnyhealthfitness com or 1 877 90SUNNY 877 907 8669 ...

Page 2: ...he equipment The equipment is designed for adult use only 4 Use the equipment on a solid flat level surface with a protective cover for your floor or carpet To ensure safety the equipment should have at least 2 feet 60CM of free space all around it 5 Ensure that all nuts and bolts are securely tightened before using the equipment The safety of the equipment can only be maintained if it is regularl...

Page 3: ... 47 46 46 45 44 31 38 37 35 35 43 35 43 42 42 43 35 43 35 4140 39 35 36 41 40 39 32 11 12 22 38 37 36 35 51 48 47 46 46 45 53 54 55 52 2 3 4 33 33 35 15 15 32 33 43 35 43 43 33 43 13 59 49 50 34 58 3 57 29 29 26 26 23L 23R 24 24 24 24 25 12 15 56 28 27 13 35 41 41 40 40 39 40 40 39 1a 1b 1c F ...

Page 4: ... 3 105 105 104 77 77 77 77 77 76 77 77 76 77 76 76 88 78 80 79 87 82 81 83 85 86 80 78 79 80 78 79 78 79 67 110 61 60 73 71 70 74 72 71 70 69 75L 75R 66 96 101 95 94 89 90 91 92 93 99 103 98 97 98 102 80 84 65 100 68 107 108 109 111 103 108 ...

Page 5: ...0 20 S13 1PC 11 M8 20 S13 2PCS 12 d8 Φ22 2 4PCS 15 d8 4PCS 51 M5 16 Φ8 5 1PC 24 M12 160 4PCS 45 Φ10 9 80 14 1PC 46 Φ11 4 Φ27 26 2PCS 47 d6 Φ16 1 2 1PC 48 M6 16 S5 1PC 25 M8 50 S14 2PCS 55 M5 16 Φ10 1PC A S13 14 15 1PC D S13 14 1PC B S6 1PC C S5 1PC E S17 19 1PC ...

Page 6: ...l 1 12 Washer d8 Φ22 2 4 45 Axle Φ10 9 80 14 2 13 Screw ST4 2 25 4 46 Locating Mount Φ11 4 Φ27 26 4 14 Main Frame 1 47 Washer d6 Φ16 1 2 2 15 Spring Washer d8 4 48 Bolt M6 16 S5 2 16 L Knob 1 49 Upper Part of Heart Rate Receiver 1 17 End Cap Φ38 28 2 50 Lower Part of Heart Rate Receiver 1 18 Bolt M12 139 1 51 Bolt M5 16 Φ8 5 1 19 Bushing Φ50 3 2 52 Aluminum Rail Support Frame 1 20 Washer d12 Ф24 2...

Page 7: ...er Post Cover 2 80 Washer d10 Φ20 2 0 4 107 Bolt Φ14 81 5 M8 S6 1 81 Idler Wheel Connect Staff 1 108 Sensor Wire 2 82 Pulling Spring Φ2 2 1 109 Bolt M4 8 1 83 Idler Wheel 1 110 Resistance Control Cable 1 84 Wave Washer d12 Φ15 5 0 3 1 111 Magnet Φ10 3 1 85 Washer d6 Φ16 1 5 1 A Spanner S13 14 15 1 86 Bolt M6 12 1 B Allen Wrench S6 1 87 Nut M10 1 1 C Allen Wrench S5 1 88 Inertial Wheel 1 D Spanner ...

Page 8: ...60 4PCS E S17 19 1PC S19 STEP 1 Attach Front Stabilizer No 9 to Main Frame No 14 using 2 Bolts No 25 2 Spring Washers No 15 and 2 Washers No 12 Tighten and secure with Spanner No A STEP 2 Insert the 2 Bolts No 24 into the bottom hole in position B of the Main Frame No 14 and tighten with Spanner No E Insert the 2 Bolts No 24 into the upper hole in position A of the Main Frame No 14 through the Ped...

Page 9: ...t as the arrow directs to prevent assembly in the wrong direction Attach 2 Locating Mounts No 46 to Aluminum Rail No 44 using 1 Axle No 45 1 Washer No 47 and 1 Bolt No 48 Tighten and secure with Allen Wrenches No B No C Attach Back Stand No 53 to Aluminum Rail No 44 using Bolt No 51 and Bolt No 55 Tighten and secure with Spanner No A STEP 4 NOTE To avoid damage to the wires please ensure that you ...

Page 10: ...nk Wire 2 No 28 with Computer Wire No 1b Connect Trunk Wire 4 No 27 with Computer Wire No 1c Secure Computer No 1 to the Computer Post No 104 using Bolt No 4 2 Washers No 3 and Nylon Nut No 2 with Spanners No A No D STEP 6 Pull out the Handlebar No 5 then take out the Paper Tube No F and keep the Mesh Belt No 6 in the middle of Handlebar No 5 then put Handlebar No 5 in the handlebar seat of Main F...

Page 11: ...E in setting mode or to confirm the PROGRAM PROFILE in User program RESET 1 Press RESET button to clear all setting data to 0 or the default value 2 Press RESET button for 2 seconds to enter initial mode and reset all value to 0 RECOVERY Press RECOVERY to enter recovery mode F1 0 Excellent F2 0 Good F3 0 Fair F4 0 Below Average F5 0 No Good User needs wireless belt to use this function This produc...

Page 12: ...unt up from 1 mile 1000 CALORIES The calories burned will be displayed on the window Its scope is 0 0 999 kcal Count up Without setting the calories value the computer will count up from 0 0 to 999 kcal Count down Setting the calories consumption the computer will count down from your setting value Once you reach the setting value computer will produce beep sounds and then stop Press any button to...

Page 13: ... of next function 2 There will be beep sounds when you reach the desired value If there is more than one desired value press any button to continue work out after the beep and to reach next one PROGRAM 8 COMPETITION PROGRAM 1 Press the buttons to program 8 2 Press MODE button to enter the competition program 3 The Time display will flash and then press the buttons to set up the desired time to do ...

Page 14: ...e TIME COUNT DISTANCE CALORIES and the computer stops If there is more than one desired value press any button to continue work out after the beep and to reach next one USER PROGRAM U1 U4 1 Press the buttons to U1 U4 2 Press MODE button to enter the USER program 3 The Time display will flash and then press the buttons to set up the desired time to do the exercise Press MODE button to confirm your ...

Page 15: ...mputer LCD screen PEDAL ADJUSTMENT The pedal strap is adjustable and can be personalized to fit the user s foot size MOVING THE ROWER To move the rower lift up Aluminum Rail No 44 until the transportation wheels on End Caps No 10L R touch the ground With the wheels on the ground you can transport the rower to the desired location with ease ...

Page 16: ...l the L Knob No 16 break away from the Aluminum Rail Link No 22 and you can release the L Knob No 16 now As shown in figure A 2 When the Aluminum Rail Link No 22 rotates to a certain angle the L Knob No 16 will automatically fit into the hole on the Aluminum Rail Link No 22 after that screw the L Knob No 16 tightly As shown in figure B Attention It is easy to hit your head when the Aluminum Rail N...

Page 17: ......

Reviews: