


8
We value your experience using Sunny Health and Fitness products. For assistance with parts or
troubleshooting, please contact us at
support@sunnyhealthfitness.com
(877-907-8669).
d6*
Φ
16*1.2 1PC
#47
Φ
10.9*80*14 1PC
#45
#48
M6*16*S5 1PC
Φ
11.4*
Φ
27*26 2PCS
#46
46
48
47
46
45
51
55
#55
M5*16*Φ10
1PC
#51
M5*16*Φ8.5
1PC
44
31
53
#B S6 1PC
#A S13-14-15 1PC
S14
S13
S15
#C S5 1PC
44
57
59
d8*Φ22*2 2PCS
#12
#11 M8*20*S13 2PCS
#15 d8 2PCS
16
14
59
57
22
11
12
15
#A S13-14-15 1PC
S13
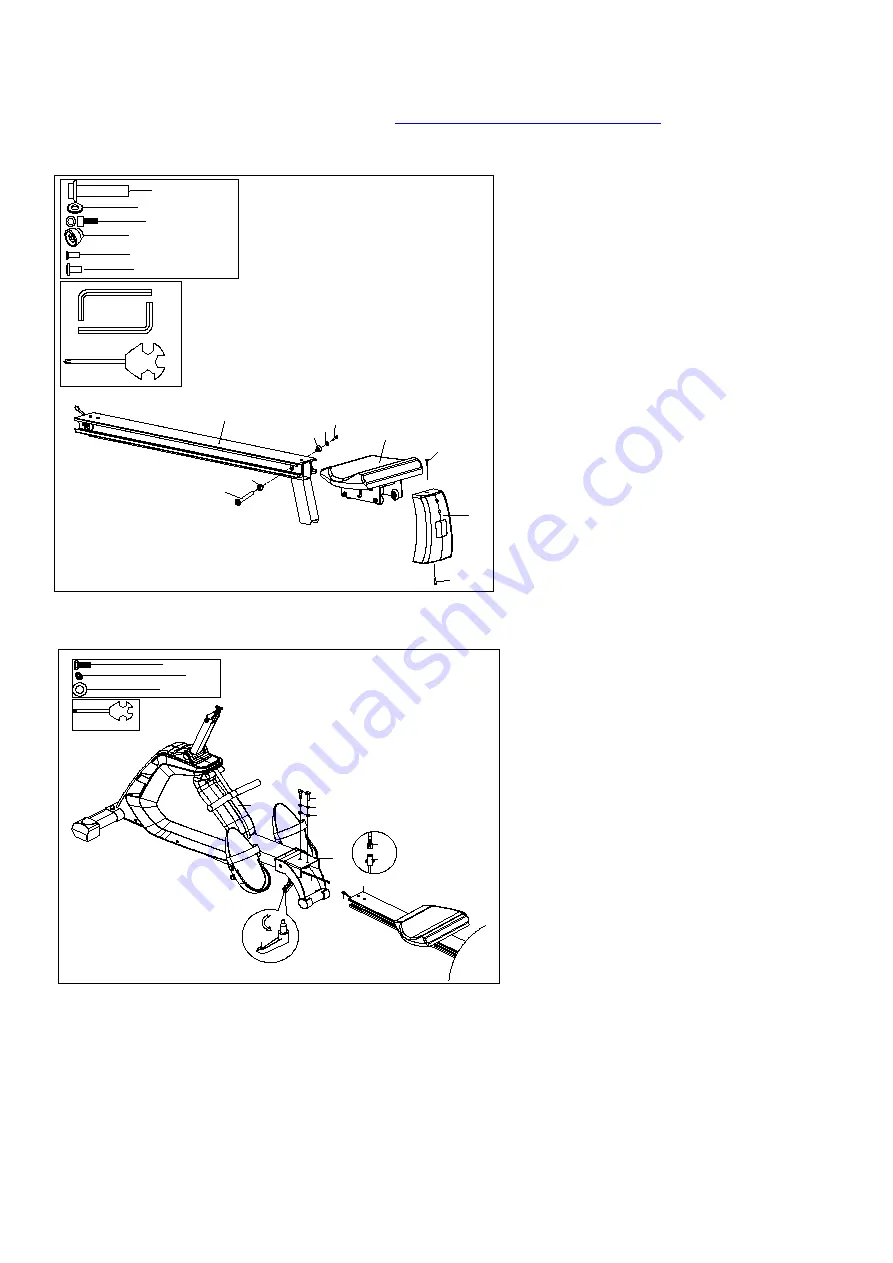
STEP 3:
Attach
Seat (No. 31)
onto
Aluminum
Rail (No. 44)
.
Note:
There is an arrow sticker marked
on
Seat (No. 31)
, please attach it as the
arrow directs to prevent assembly in the
wrong direction.
Attach 2
Locating Mounts (No. 46)
to
Aluminum Rail (No. 44)
using 1
Axle
(No. 45)
, 1
Washer (No. 47)
and 1
Bolt
(No. 48)
. Tighten and secure with
Allen
Wrenches (No. B
&
No. C)
.
Attach
Back Stand
(No.
53)
to
Aluminum Rail (No. 44)
using
Bolt (No.
51)
and
Bolt (No. 55)
. Tighten and
secure with
Spanner (No. A)
.
STEP 4:
NOTE:
To avoid damage to the wires,
please ensure that you keep the wires
beneath
Main Frame (No. 14)
and
Aluminum Rail (No. 44)
, away from the
connection point of the two sections.
Connect
Trunk Wire 3 (No. 57)
with
Pulse
Sensor Wire (No. 59)
.
Attach
Aluminum Rail (No. 44)
into the
Aluminum Rail Link (No. 22)
using 2
Bolts (No. 11)
,
2
Spring Washers (No.
15)
, and 2
Washers (No. 12)
. Tighten
and secure with
Spanner (No. A).
Tighten and secure the
Aluminum Rail
Link (No. 22)
with
L Knob (No. 16)
.
Summary of Contents for SF-RW5854
Page 17: ......


