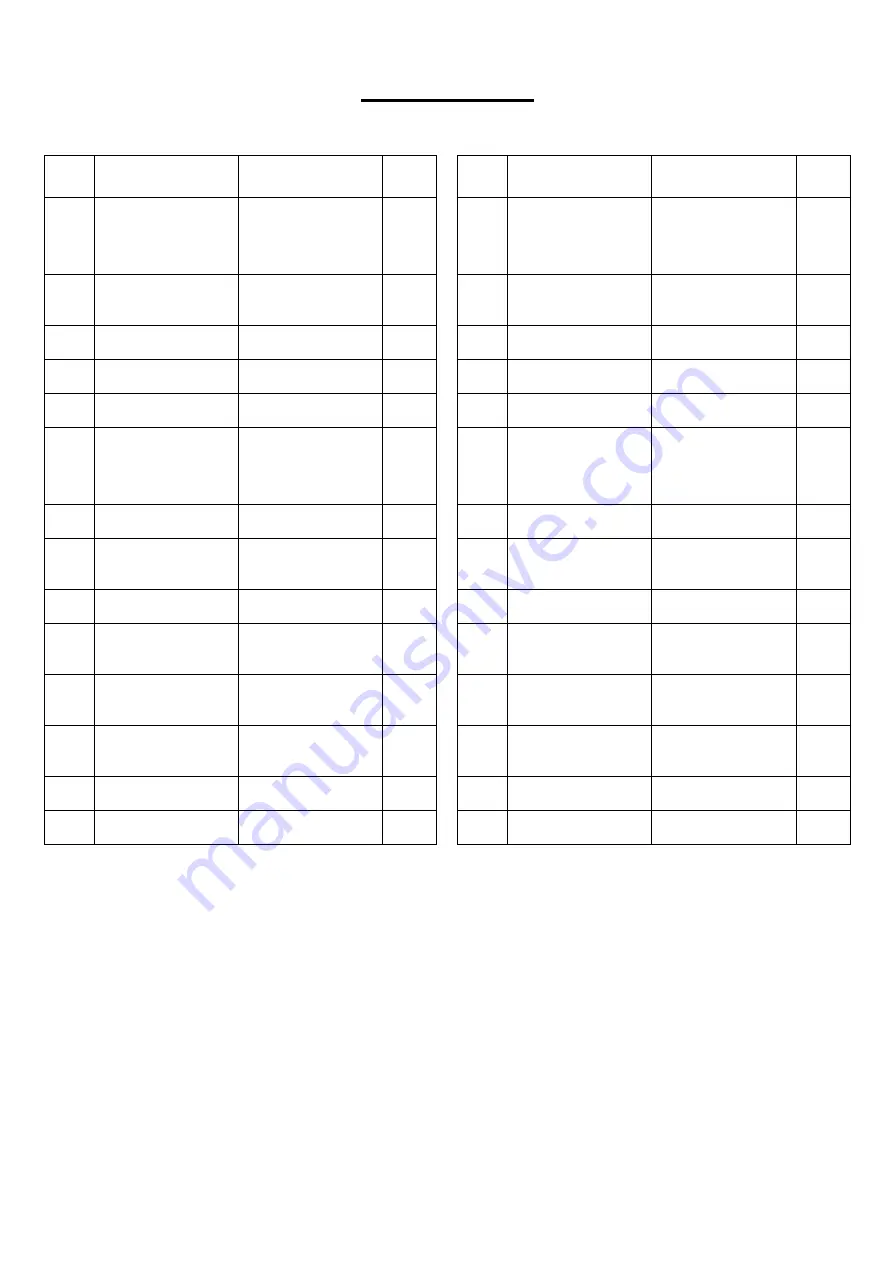
background image


PARTS LIST 


NO. 

Description 

Spec 

Qty.    NO. 

Description 

Spec 

Qty. 

Lower 

Connecting 

Frame 


15 

Cushion 

80*

50*16 

Fixed Frame 


16 

Round Inner Pipe 

Plug 

25 

Right Shelf 


17 

Hex Bolt 

M12*30 

12 

Left Shelf 


18 

Hex Bolt 

M12*75 

13 

Middle Frame 


19 

Hex Bolt 

M8*20   

16 

Upper 

Connecting 

Frame 


20 

Flat Washer 

8.4*

16*1.6 

16 

Ball Rack 


21 

Flat Washer 

13*

24*2.0 

40 

Counterweight 

Hanging Rod 


22 

Big Flat Washer 

13*

37*2.0 

10 

Fixed Piece 

82*45*3.0 


23 

Spring Washer 

8.1*

12.3*2.1 

16 

10 

Rectangular Pipe 

Plug 

75*50*2.0 


24 

Lock Nut 

M12 

25 

11 

Hollow Sleeve 

60*t1.5*

50*152 


25 

Open-End 

Wrench 

S16-S18 

12 

Barbell Support 

Bar 

100*

50*200 


26 

Allen Wrench 

5mm 

13 

Screw 

M8*8 


27 

Allen Wrench 

4mm 

14 

Spring Clip 

50 


Summary of Contents for SF-XF920025

Page 1: ... USER MANUAL IMPORTANT Please retain owner s manual for maintenance and adjustment instructions Your satisfaction is very important to us PLEASE DO NOT RETURN UNTIL YOU HAVE CONTACTED US support sunnyhealthfitness com or 1 877 90SUNNY 877 907 8669 ...

Page 2: ...e equipment The equipment is designed for adult use only 4 Use the equipment on a solid flat level surface with a protective cover for your floor or carpet To ensure safety the equipment should have at least 2 feet 60 CM of free space all around it 5 Ensure that all nuts and bolts are securely tightened before using the equipment The safety of the equipment can only be maintained if it is regularl...

Page 3: ... 17 17 17 17 17 17 17 17 17 17 18 18 18 18 18 18 18 18 18 18 18 18 18 23 20 19 19 23 20 16 18 16 18 25 25 27 26 21 21 21 21 21 21 21 21 21 21 21 21 21 21 21 21 21 21 21 21 21 21 21 21 21 21 21 21 21 21 21 21 21 21 21 21 21 21 21 21 22 22 22 22 22 22 22 22 22 22 24 24 24 24 24 24 24 24 24 24 24 24 24 24 24 24 24 24 24 24 24 24 24 24 24 ...

Page 4: ...M8 20 16 6 Upper Connecting Frame 1 20 Flat Washer 8 4 16 1 6 16 7 Ball Rack 4 21 Flat Washer 13 24 2 0 40 8 Counterweight Hanging Rod 3 22 Big Flat Washer 13 37 2 0 10 9 Fixed Piece 82 45 3 0 3 23 Spring Washer 8 1 12 3 2 1 16 10 Rectangular Pipe Plug 75 50 2 0 2 24 Lock Nut M12 25 11 Hollow Sleeve 60 t1 5 50 152 4 25 Open End Wrench S16 S18 2 12 Barbell Support Bar 100 50 200 3 26 Allen Wrench 5...

Page 5: ... manual The product name found on cover of manual The part number found on the EXPLODED DIAGRAM and PARTS LIST found near the front of the manual Please contact us at support sunnyhealthfitness com or 1 877 90SUNNY 877 907 8669 18 M12 75 13PCS 17 M12 30 12PCS 21 13 24 2 0 40PCS 22 13 37 2 0 10PCS 24 M12 25PCS 27 4mm 1PC 26 5mm 1PC 25 S16 S18 2PCS 16 18 19 M8 20 16PCS 20 8 4 16 1 6 16PCS 23 8 1 12 ...

Page 6: ...g Flat Washers No 22 3 Hex Bolts No 18 3 Flat Washers No 21 and 3 Lock Nuts No 24 Secure with 2 Open End Wrenches No 25 Do not tighten the Hex Bolts No 18 during this step Attach the Right Shelf No 3 onto the right side of the Lower Connecting Frame No 1 using 3 Big Flat Washers No 22 3 Hex Bolts No 18 3 Flat Washers No 21 and 3 Lock Nuts No 24 Secure with 2 Open End Wrenches No 25 Do not tighten ...

Page 7: ... the 2 connecting plates of the Middle Frame No 5 onto the connecting plates of the Left Shelf No 4 and Right Shelf No 3 using 16 Flat Washers No 21 8 Lock Nuts No 24 and 8 Hex Bolts No 17 Secure with 2 Open End Wrenches No 25 Do not tighten the Hex Bolts No 17 during this step Attach the connecting plates of the Upper Connecting Frame No 6 onto connecting plates of the Left Shelf No 4 and Right S...

Page 8: ...olts No 18 Tighten and secure with 2 Open End Wrenches No 25 STEP 5 Attach the 3 Counterweight Hanging Rod No 8 and 3 Fixed Pieces No 9 onto the Right Shelf No 3 using 6 Flat Washers No 21 3 Lock Nuts No 24 and 3 Hex Bolts No 18 Tighten and secure with 2 Open End Wrenches No 25 16 18 25 S16 S18 2PCS 18 M12 75 4PCS 21 13 24 2 0 4PCS 24 M12 4PCS 22 13 37 2 0 4PCS 21 24 24 24 24 7 7 7 7 18 22 18 22 1...

Page 9: ...lthfitness com or 1 877 90SUNNY 877 907 8669 27 4mm 1PC 13 M8 8 3PCS 8 8 12 12 12 13 13 13 14 14 14 15 15 15 8 STEP 6 Attach the 3 Cushions No 15 and 3 Barbell Support Bars No 12 onto 3 Counterweight Hanging Rods No 8 using 3 Screws No 13 to fix and lock 3 Barbell Support Bars No 12 then install 3 Spring Clips No 14 into 3 Barbell Support Bars No 12 ...

Page 10: ...l Brackets etc Replace any worn or torn parts immediately Check and ensure the equipment is leveled at all time Check and tighten all adjustment pins knobs regularly WEEKLY MAINTENANCE Use damp cloth on plastic parts only use dry cloth on metal frames Inspect the metal frame structure of the equipment Version 1 1 ...

Page 11: ......

Reviews: