background image


BATTERY REPLACEMENT


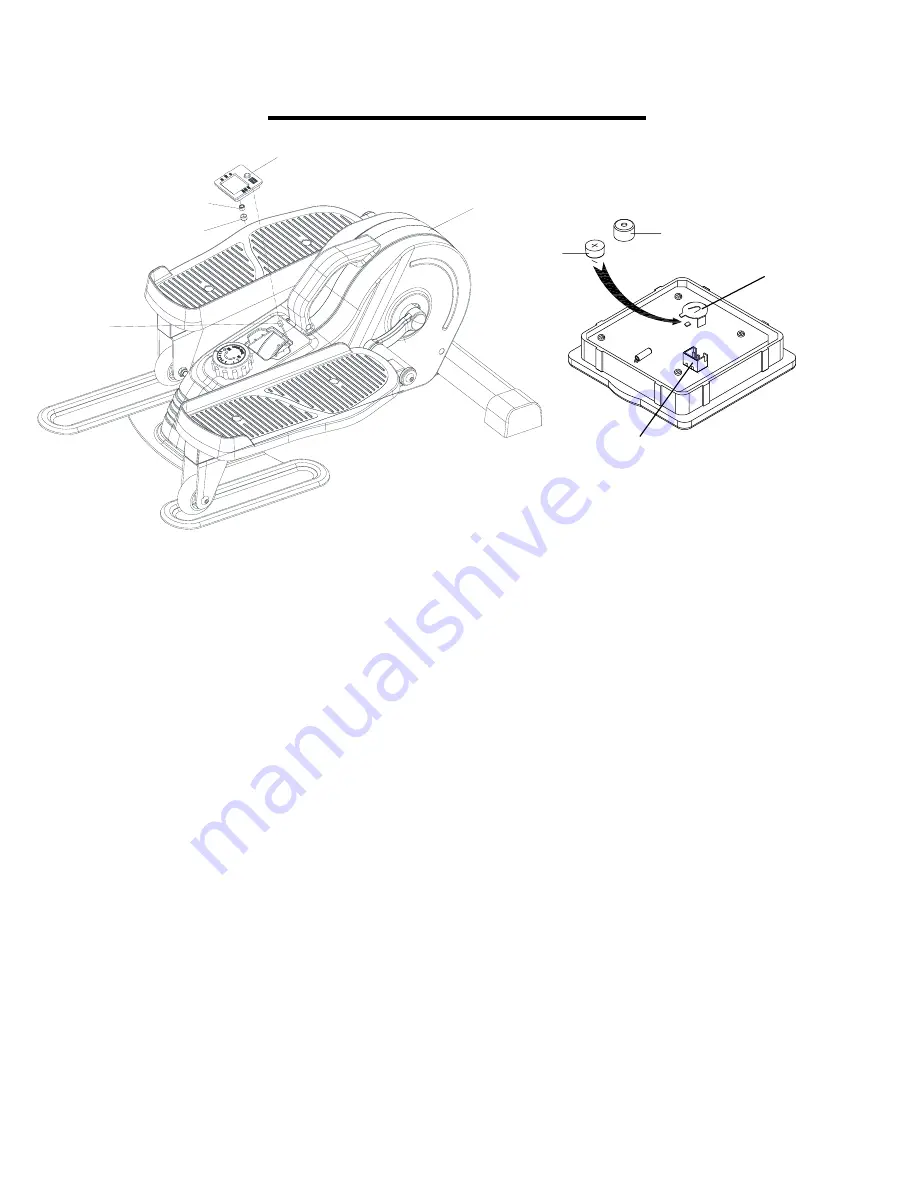
1.  Remove the 

Meter (No. 10)

 from 

Main Frame (No. 1)

. Then disconnect the link wire of 

Inductor (No. 

49)

 with the 

Meter (No. 10)

.


2.  Remove the plastic cap from the back of 

Meter (No. 10)

 
3.  Remove the old battery and insert the new battery using your fingers. Ensure that the positive side of 

the battery which is labeled with a 

+

 sign is facing upward once the battery is in place. 

 
4.  Put the plastic cap onto the battery seat. 
 
5.  Insert the link wire of 

Inductor (No. 49)

 into the hole on the back of 

Meter (No. 10)

 
6.  Attach the 

Meter (No. 10) 

onto 

Main Frame (No. 1)

.


The replacement is complete. 


LR44

PLASTIC CAP

10

BATTERY

PLASTIC CAP

49

1

WIRE INSERTING HOLE 

BATTERY SEAT 

Version 4.2 


Summary of Contents for SF-E3908

Page 1: ...RNOS ONTACTADO support sunnyhealthfitness com 1 877 90SUNNY 877 907 8669 Fran ais Page 13 15 IMPORTANT Veuillez conserver le manuel du propri taire pour les instructions de r glage et d entretien Votr...

Page 2: ...EGURIDAD Gracias por haber elegido nuestro producto Para garantizar su seguridad y salud utilice este equipo correctamente Es importante leer todo el manual antes de ensamblar y usar el equipo Solo se...

Page 3: ...rodukt entschieden haben Zur Gew hrleistung Ihrer Sicherheit und Gesundheit verwenden Sie dieses Ger t bitte ordnungsgem Es ist wichtig diese gesamte Bedienungsanleitung zu lesen bevor Sie das Ger t m...

Page 4: ...13 14 14 15 16 16 17 17 18 18 19 20 20 19 21 22 22 22 22 21 23 23 23 23 23 23 23 23 24 24 24 24 24 24 25 25 26 26 27 27 24 28 28 29 29 30 31 32 33 32 33 34 35 35 36 37 37 39 40 41 42 42 44 43 45 34 4...

Page 5: ...pecificaciones Cant n Descripci n Especificaciones Cant 1 Estructura Principal 1 28 Perno M6 12 4 2R Estructura del Pedal R 1 29 Tuerca de Nailon M6 4 2L Estructura del Pedal L 1 30 Rueda de Cinta 1 3...

Page 6: ...Embout d Extr mit 2 54 Embout d Extr mit 2 27 Rondelle Ondul e 17 21 0 4 2 55 Rondelle 16 2 28 1 2 2 TEILELISTE Nr Bezeichnung Spezif Menge Nr Bezeichnung Spezif Menge 1 Hauptrahmen 1 28 Bolzen M6 x 1...

Page 7: ...sunnyhealthfitness com o 1 877 90SUNNY 877 907 8669 Pour commander des pi ces de rechange clients am ricains et canadiens seulement Veuillez fournir les informations suivantes afin que nous puissions...

Page 8: ...n exercise from start to finish SCAN Displays functions automatically in the following order TIME CAL CALORIES and DIST DISTANCE NOTE 1 Please use 1pc of BUTTON CELL LR44 1 5V battery as a power suppl...

Page 9: ...e highest USAGE GUIDE IMPORTANT NOTE Please remove the plastic tab from the meter before use WARNING The elliptical is intended to use in a standing position as shown in FIG 1 Do not stand on the elli...

Page 10: ...attery using your fingers Ensure that the positive side of the battery which is labeled with a sign is facing upward once the battery is in place 4 Put the plastic cap onto the battery seat 5 Insert t...

Page 11: ...al de calor as quemadas durante un ejercicio de principio a fin SCAN ESCANEO Muestra funciones autom ticamente en el siguiente orden TIME TIEMPO CAL CALOR AS y DIST DISTANCIA NOTA 1 Utilice 1 pieza de...

Page 12: ...o GUIA DE USO NOTA IMPORTANTE Retire la leng eta de pl stico del medidor antes de usarlo ADVERTENCIA La el ptica est dise ada para usarse en una posici n de pie como se muestra en la FIG 1 No se suba...

Page 13: ...que el lado positivo de la pila que est marcado con un signo quede hacia arriba luego de colocar la pila 4 Coloque la tapa de pl stico en el compartimiento de las pilas 5 Inserte el cable de conexi n...

Page 14: ...de calories br l es du d but la fin d un exercice SCAN BALAYAGE Affiche automatiquement les fonctions dans l ordre suivant TIME DUR E CAL CALORIES et DIST DISTANCE REMARQUE 1 Veuillez utiliser une pil...

Page 15: ...NTE Retirer la languette en plastique du compteur avant utilisation ATTENTION L exerciseur elliptique est con u pour tre utilis en position debout comme indiqu sur la FIG 1 Ne pas se tenir debout sur...

Page 16: ...assurer que le p le positif de la pile marqu d un soit orient vers l ext rieur une fois la pile en place 4 Remettre le couvercle en plastique du compartiment piles 5 Introduire le c ble de raccordeme...

Page 17: ...gs vom Anfang bis zum Ende verbrannt wurden SCAN Zeigt die Funktionen automatisch in der folgenden Reihenfolge an TIME ZEIT CAL KALORIEN und DIST DISTANZ HINWEIS 1 Bitte verwenden Sie 1 KNOPFZELL LR44...

Page 18: ...HSANWEISUNG WICHTIGER HINWEIS Bitte entfernen Sie vor dem Gebrauch den Kunststoffstreifen vom Messger t WARNUNG Der Ellipsentrainer ist f r die Benutzung im Stehen vorgesehen wie in FIG 1 dargestellt...

Page 19: ...ten Sie darauf dass die positive Seite der Batterie die mit einem Zeichen gekennzeichnet ist nach oben zeigt wenn die Batterie eingesetzt ist 4 Setzen Sie die Kunststoffkappe auf das Batteriefach 5 F...

Page 20: ...19...

Reviews: