5.
STEPS:
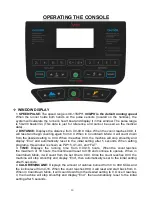
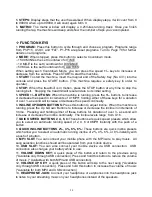
Display steps that the user has walked. When display steps, it will count from 0
to 99999, when up to 99999, it will count again form 0.
6.
MATRIX:
The matrix window will display a 0.25miles running track. Once you finish
running the lap, the machine will beep and show the number of laps you
’ve completed.
FUNCTION KEYS
1.
PROGRAM:
Press this button to cycle through and choose a program. Programs range
from P1-P15, U1-U3
, and “FAT”. P1-P15 are preset programs. Turn to
Page 16
for further
details on all programs.
2.
MODE:
When stopped, press this button to select a
Countdown mode
.
o
15:00 MINS is the set
Countdown
for TIME
o
1.0 MILE is the set
Countdown
for DISTANCE
o
50 KCAL is the set
Countdown
for CALORIES
When setting each
Countdown Mode
, you can press the speed
+/
–
keys to increase or
decrease from the set data. Press START to start the machine.
3.
START:
To start the machine, insert the magnet end of the Safety Key (No. C31) into the
console and press the START button. (This machine requires a safety key in order to
operate)
4.
STOP:
When the treadmill is in motion, press the STOP button at any time to stop the
running belt. Stopping the treadmill will reset all data to its initial setting.
5.
SPEED
+/
– BUTTONS:
When the machine is running, press the
+/
–
buttons to increase
or decrease the speed in increments of 0.1MPH; holding either of these keys for a duration
of over ½ a second will increase or decrease the speed continually.
6.
INCLINE
UP/DOWN BUTTONS:
Press this button to adjust incline. When the machine is
running, press the Up & Down Buttons to increase or decrease the incline in increments of
1/time. Pressing and holding either of these buttons for duration of over ½ a second will
increase or decrease the incline continually. The incline levels range from 0-16.
7.
QUICK SPEED BUTTONS 2, 4, 6, 8:
These buttons are quick speed presets which allow
you to select an automatic running speed of 2, 4, 6 or 8MPH instantly with the push
of a
button.
8.
QUICK INCLINE BUTTONS 2%, 4%, 6%, 8%:
These buttons are quick incline presets
which allow you to select an automatic running incline of 2%, 4%, 6%, or 8% instantly with
a push
of a button.
9.
MP3 SLOT:
You can connect your mobile phone with the MP3 wire to play music. All
song selection functions should still be operated from your mobile device.
10.
USB SLOT:
You can also connect your mobile device via USB connection. USB
connection also charges your battery while in use.
11.
VOLUME DOWN KEY:
A quick press of this button will return to the previous song
(*Available only through USB connection). Press and hold this button to reduce the volume
of music. (*Available with both MP3 and USB connection).
12.
VOLUME UP KEY:
A quick press of this button will skip to the next song (*Available
only through USB connection). Press and hold this button to increase the volume of music
(*Available for both MP3 and USB connection).
13.
HEADPHONE JACK:
Connect your headphone or earphones into the headphone jack
to listen to your streaming music on your headphones instead of the speakers.
14
Summary of Contents for SF-T7512
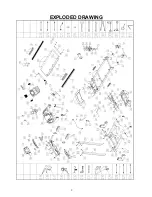
Page 4: ...EXPLODED DRAWING 3...


