DSL-8903
Page 2 / 2
TROUBLESHOOTING
Why don't the blades spin?
• Make sure the windmill is on a flat, level surface.
• Check to make sure the hardware is not over-tightened.
• Make sure the blades are facing the correct direction.
• The blades are designed to spin slowly, do not force or alter the blade assembly as this may damage the product.
INSTALLATION
Level Surface
:
Select a flat, level surface to display the windmill. Sloped and uneven surfaces may cause the
windmill to tip over and break.
Add Stability
:
Consider anchoring the windmill to prevent it from being blown over during highly windy conditions.
Example: insert long stakes (not included) into the ground and place the windmill over the stakes.
CARE
The finished appearance of the wood is the result of the surface being lightly burned with fire. Over time, the windmill will
mellow in color; this is part of the natural aging process.
Cleaning
:
Follow the woodgrain with a soft brush or cloth to remove dust, dirt and debris. Do not use chemicals or
abrasive materials as they will damage the wood.
Storage
:
Maintain the appearance and prevent damage by storing this item indoors during inclement weather.
• High winds may cause the windmill to tip over and/or break the blades.
• Wood expands when wet and contracts when it dries. Repeated and excessive exposure to moisture, rain or snow
can cause damage to the product. Resulting damage includes, but is not limited to, pre-assembled components
separating, wood cracking, mold and mildew growth, and hardware rust.
• Bring the windmill inside before freezing temperatures. Freezing can cause moisture to become trapped in the wood
which may lead to unwanted cracking, pre-assemble components separating, as well as mold and mildew growth.
ASSEMBLY
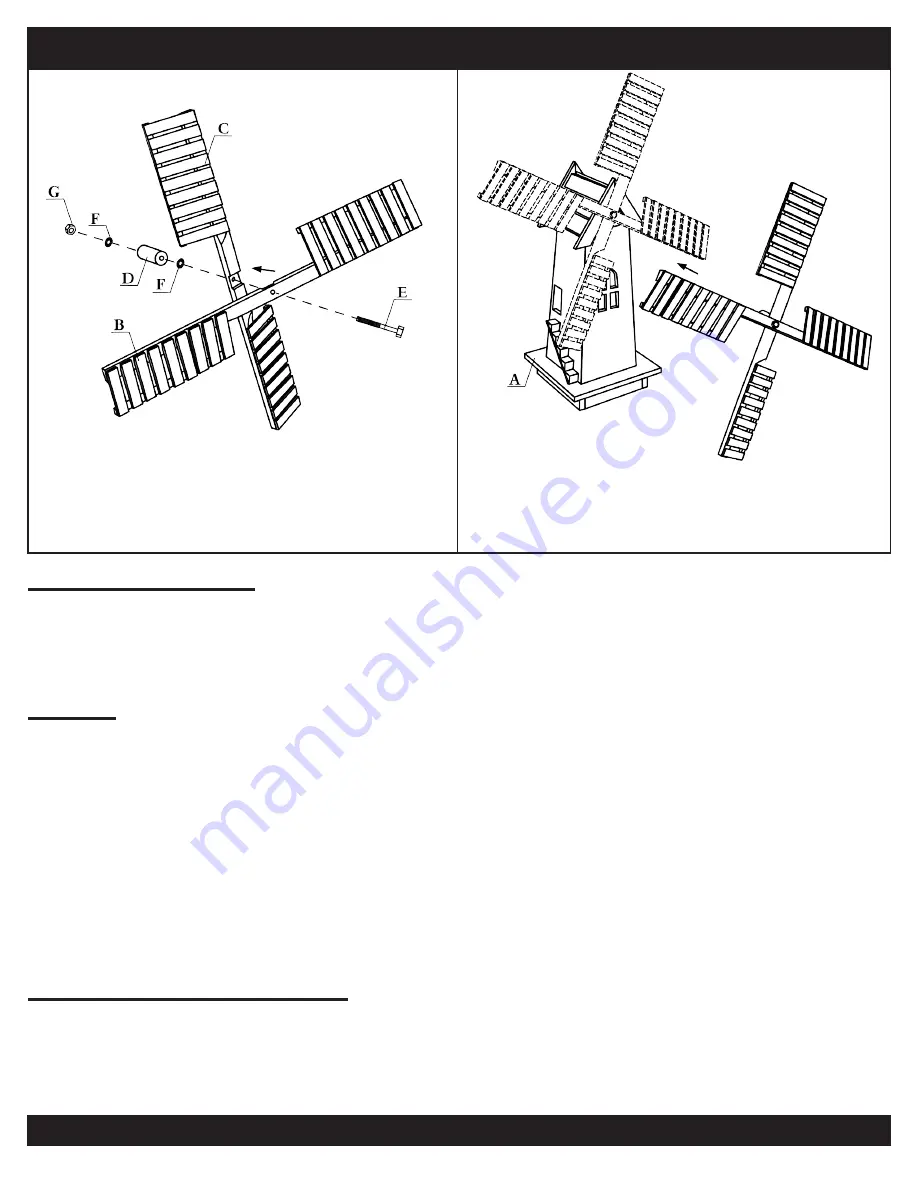
STEP 1
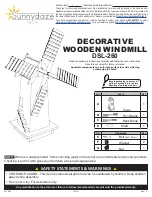
STEP 2
Place Front Blade (B) onto Back Blade (C) as shown.
Slide Bolt (E) through the blades, Washer (F), Shaft
(D), Washer (F), and Nut (G). Hand-tighten the bolt.
Do not over-tighten the hardware.
Thread the bolt into the top of Tower (A).
NOTE: the blade assembly is designed to spin gently, do not force
spinning or alter the assembly as it may damage the product.
06/2020
Any modification to the product or failure to follow recommended care will void the product warranty.


