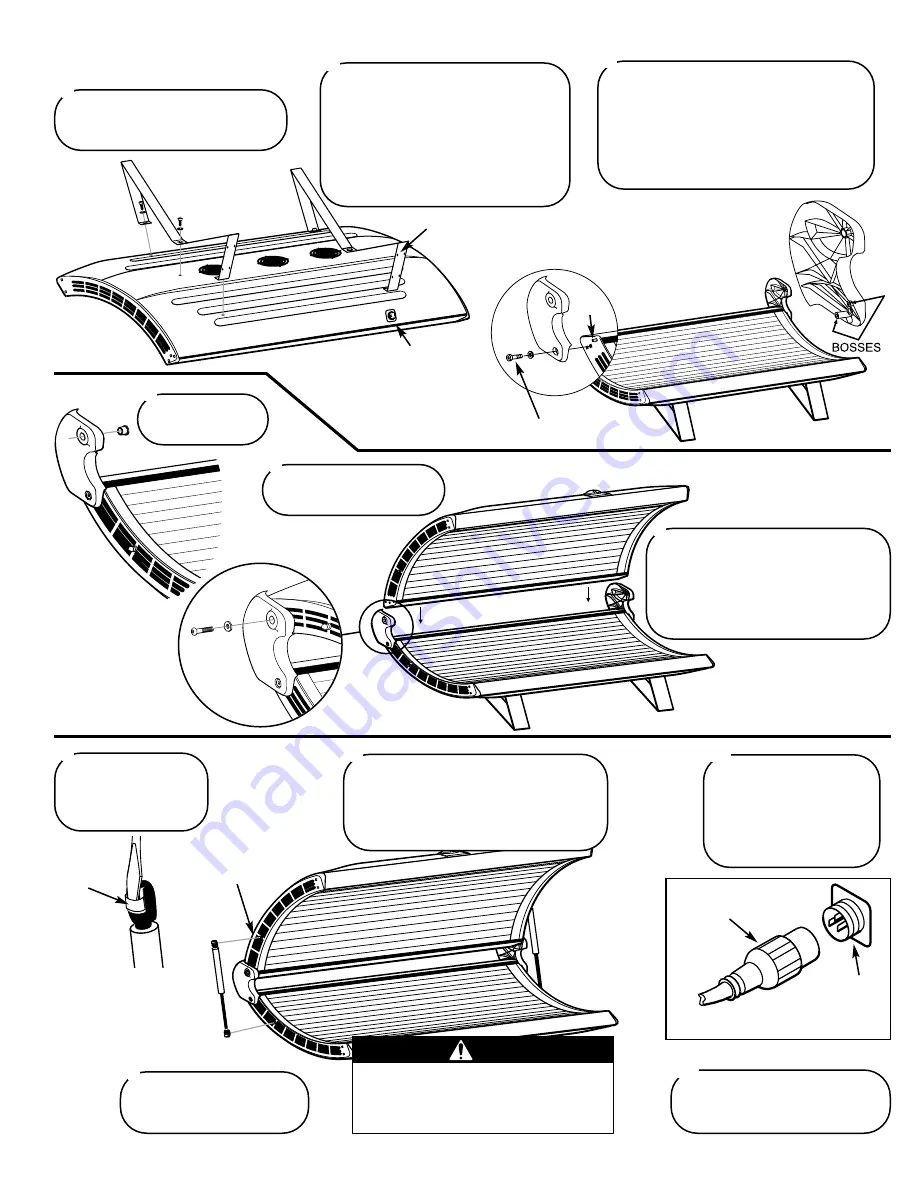
Assembly Procedures
(ELECTRICAL CONNECTOR
INDICATES BACK OF BENCH)
SHORT BOLT
Lay the bench upside down on the
floor. Locate the two stand legs and
attach to the bench as shown below.
1
Remove the six 5/16” x 1” bolts and
5/16” washers installed in the bench.
Attach the stand legs with the skirt
mounting holes toward the back of the
bench as shown. Install center bolt first.
You may have to gently push the sides of
the legs in to align holes. Tighten with
the Allen wrench.
2
Turn bench over. Install hinge brackets to
ends of bench such that the short boss
engages the stud above the bolt hole, and the
long boss engages the hole below the bolt
hole. Secure using 5/16” x 1” Allen-head
bolts and 5/16” metal washers. Tighten bolt
snug, then an additional half turn.
3
Place the bushings
into hinge brackets.
4
Lift the canopy and hold it
between the hinge brackets.
5
Insert 5/16” x 1 1/2” bolts with nylon
washers into both hinge brackets.
Tighten bolts into the endcap threaded
inserts until snug, then an additional
half turn. Do not overtighten to avoid
damaging threaded inserts.
6
PIVOT STUD
CAUTION
Failure to engage locking clips may
result in the ball joints working loose,
allowing the canopy to fall, which may
result in damage to the unit and injury.
LOCKING
CLIP
SCREW-
DRIVER
Use a screwdriver to
pry back the locking
clips on the gas springs
as they are installed.
7
With a helper holding the canopy open,
align ends of gas spring ball joints with
pivot studs and push into place. Be sure
rod end is down as shown. DO NOT lower
canopy until both gas springs are engaged!
8
Lift and lower canopy a few
times to lubricate gas springs
for optimum performance.
9
THREADED
LOCKING RING
RECEPTACLE
ON BENCH
CANOPY TO BENCH
POWER CORD
Connect the canopy to
bench power cord to the
bench receptacle. Align the
terminals and firmly push
on until seated then tighten
the threaded locking ring.
10
Plug the three-prong 220V AC
power cord into a dedicated outlet
(see Electrical Requirements).
11
SKIRT MOUNTING HOLES
STUD


