background image


11 

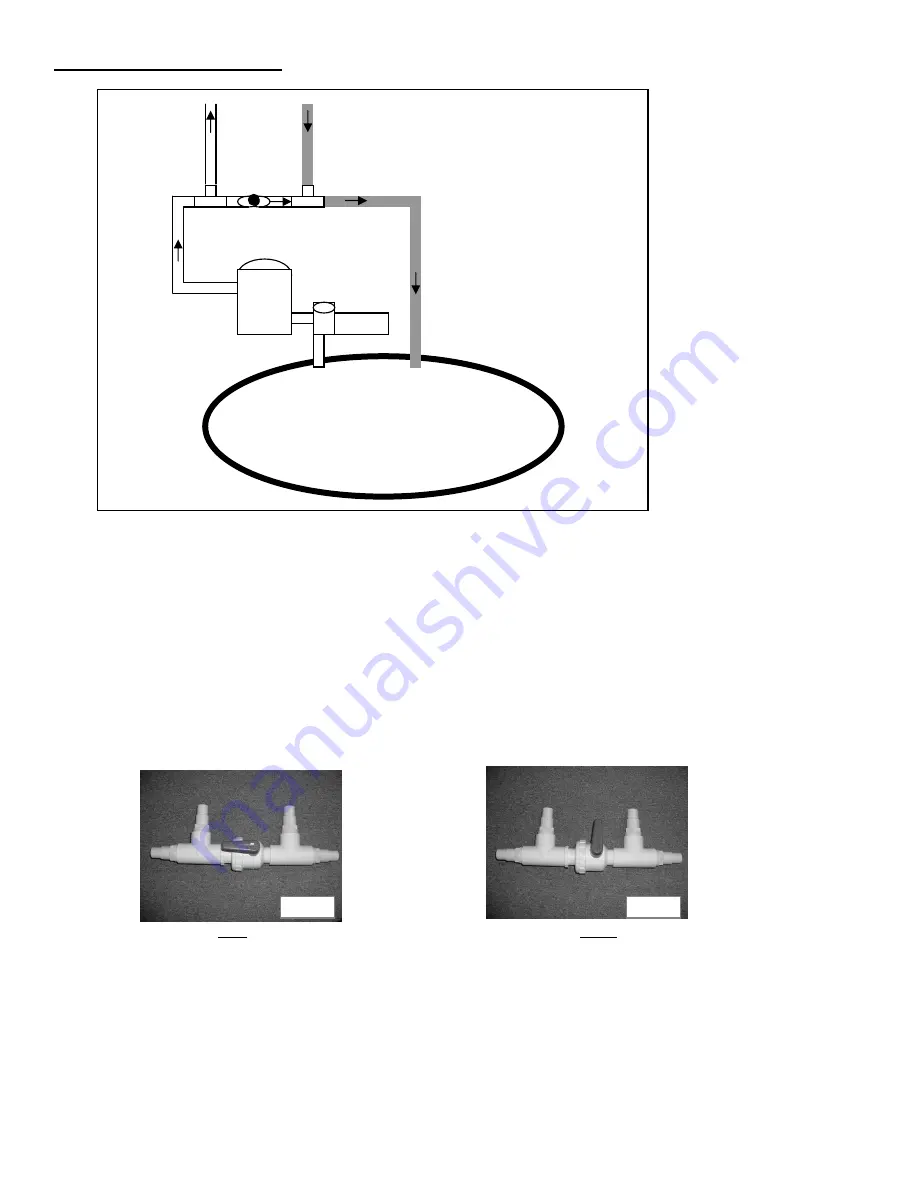
System with diverter near pump


Diagram C-2


1.  Assemble a diverter kit by installing the integrated by-pass valve (

SK-INT-V

) as shown in Diagram C-2 and Fig C2-1. 

(Tees and adapters not supplied) 

2.  Turn off your pool pump. Block the inlet and outlet of your pool so that the water won't empty when you are 

connecting your panel(s). 

3.  Remove the hose from the pool inlet (hose between the filter and the pool) Connect the hose to one side of the 

diverter kit. Place metal collar 

1

/

4

" from edge and tighten collar with screwdriver. See Diagram C-2. 

4.  Take a hose (not supplied) long enough to reach the panel and connect one end to the diverter kit (same side of the 

two-way valve as in step 3) Place metal collar and tighten. Connect other end of the hose to the panel inlet. Place 
metal collar and tighten. See Diagram C-2. 

5.  Take another hose (not supplied) and connect it to the panel outlet. Place metal collar and tighten. Connect other 
      end of the hose to the diverter kit. Place metal collar and tighten. See Diagram C-2. 
6.  Take the last hose (not supplied) and connect it to the last open end of the diverter kit. Place metal collar and tighten. 

Connect the other end of the hose to your pool inlet. Place metal collar and tighten. See diagram C-2. 

7.  Make sure the valve on the diverter is on the open position. 


            Valve in the open position  


       Valve in the closed position 


        Solar heating is OFF (not heating) 


      Solar heating is ON (heating) 

8.  Make sure that your hoses are all connected the correct way and that all the collars have been tightened.  
      Unblock the inlet and outlet of your pool.  
9.  Turn on your pool pump. Check for any leaks. If any of the threaded fittings leak, remove the fitting and apply more 

Teflon. If any of the hoses leak at the connection, loosen the collar and push the hose over the fitting and re-tighten 
the metal collar. You will see air bubbles coming from the pool inlet. This is normal, the air in the hoses is being 
purged. 

10.  Turn your solar heating system on by turning the two-way valve in the diverter to the closed position. See Fig C2-2.     

Once again you will see air bubbles coming from your pool. The system is now purging the air that is in the 
solar panel(s). 

Diverter Kit 


Swimming Pool 


Filter 

Pump 

Pool Outlet 

Pool Inlet 

To Panel 
Inlet 

From Panel 
Outlet 

Fig C2-1


Fig C2-2


Summary of Contents for SQ-2220-ID

Page 1: ...Model SQ 2220 ID INSTALLATION OPERATION MANUAL Read all the instructions before installing your solar heating system...

Page 2: ...y from your pool or one story up then your pump may need to be 1HP or more Where can the solar panel be placed The solar panel can be placed on the ground Avoid placing in high traffic areas as it is...

Page 3: ...ve Optional parts Roof Mounting Kit SQ RMK5 High Wind Roof Mounting Kit SQ HWK 1 SQ RMK5 per SQ 2220 system is required for Roof For high wind areas to be used in addition to the roof mounting or Rack...

Page 4: ...Description 1 SK FTG A Threaded 2 way valve 4 SK FTG K Rubber hose 3 75 2 SK FTG B Threaded nipple 8 SK FTG L Metal collar Hose clamp 2 SK FTG C Threaded tee 1 SK VRV Vacuum Relief Valve 4 SK FTG D T...

Page 5: ...ig 3a 4 Apply Teflon to threads of by pass valve SK INT V Screw side of valve with handle into the panel as per Diagram Step 3a Do not over tighten See Fig 3a 7 Loosen the union on the valve See Fig 3...

Page 6: ...Put O rings SK FTG I on both combination adapters SK FTG D See Fig 3a 3 Thread both combination adapters into the panels as per Diagram Step 3b Do not over tighten See Fig 3a 4 Push the rubber hose yo...

Page 7: ...ver See Fig 3a 10 Repeat for other end of panel Slide another metal collar onto the rubber hose Connect the 2 panels together by pushing the rubber hose over the second panel header Tighten metal coll...

Page 8: ...ap for this type of installation Thread the cap into the panels as per Diagram Step 3d Do not over tighten See Fig 3a 2 If you are using flexible piping to connect panels to your pump then put O rings...

Page 9: ...SK FTG K to connect the two set together as per Diagram Step 3d Install mounting kits as per instructions included with them Panels must be installed with a slight slope minimum 2 inch per 10 feet to...

Page 10: ...tightened Unblock the inlet and outlet of your pool 5 Make sure the valve on the integrated diverter is on the open position See Fig C1 1 Valve in the open position Valve in the closed position Solar...

Page 11: ...plied and connect it to the last open end of the diverter kit Place metal collar and tighten Connect the other end of the hose to your pool inlet Place metal collar and tighten See diagram C 2 7 Make...

Page 12: ...that all your piping in drained 4 Run you feed and return PVC piping from your pool to your solar panels Make sure piping is installed in such a way to allow proper drainage 5 Make sure that your pipi...

Page 13: ...losed turn your by bass valve in such a way to allow the water from your panels to drain Wait half an hour for panels to drain Unscrew the Vacuum Relief Valve or the Threaded cap at the top of the sol...

Page 14: ...logies Inc Claims will not be accepted for a solar panel s damage in transit unless damage to shipping container is noted at time of delivery on the transport company s delivery bill Sunsolar Energy T...

Reviews: