background image


9

d) 

Cont. 


Apply Teflon on reducer adapter (

SK-FTG-M

) included in the system kit (

SQ-SK) 

sold 

separately. Thread reducer adapter into the panel as per diagram Step 3d.  
Do not over tighten. See Fig 3d-3. 


Apply Teflon on vacuum relief valve (

SK-VRV

). Thread vacuum relief valve into 

      the reducer adapter. Do not over tighten. See Fig 3d-3. 


Note: The vacuum valve assembly must be installed at the top of the panels as per diagram Step 3d. 


Push the rubber hose you cut in half previously over the panel header as per diagram 
Step 3d. Slide a metal collar (

SK-FTG-L

 ) onto the rubber hose. Place metal collar 

1

/

4

from edge and tighten collar with screwdriver. See Fig 3a-10. Repeat for other end of 
panel. 


Slide another metal collar onto the rubber hose. Connect the 2 panels together by  
pushing the rubber hose over the second panel header. Tighten metal collar to secure 
assembly. See Fig 3a-11. Repeat for other end of panel. 


Repeat previous 2 steps for other system. 


You should now have two sets of connected panels. You need to use rubbers from the system 
kit (

SK-FTG-K

 ) to connect the two set together as per Diagram Step 3d. 


Install mounting kits as per instructions included with them.

 Panels must be installed with a slight 

      slope (minimum 2 inch per 10 feet) toward the inlet

. This will allow the panel to drain properly. 


Note: The inlet must always be at the lower end of the panel and the outlet at the higher end of the panel. 


Note: A maximum of 12 2ft panels (6 systems) may be plumbed in parallel 


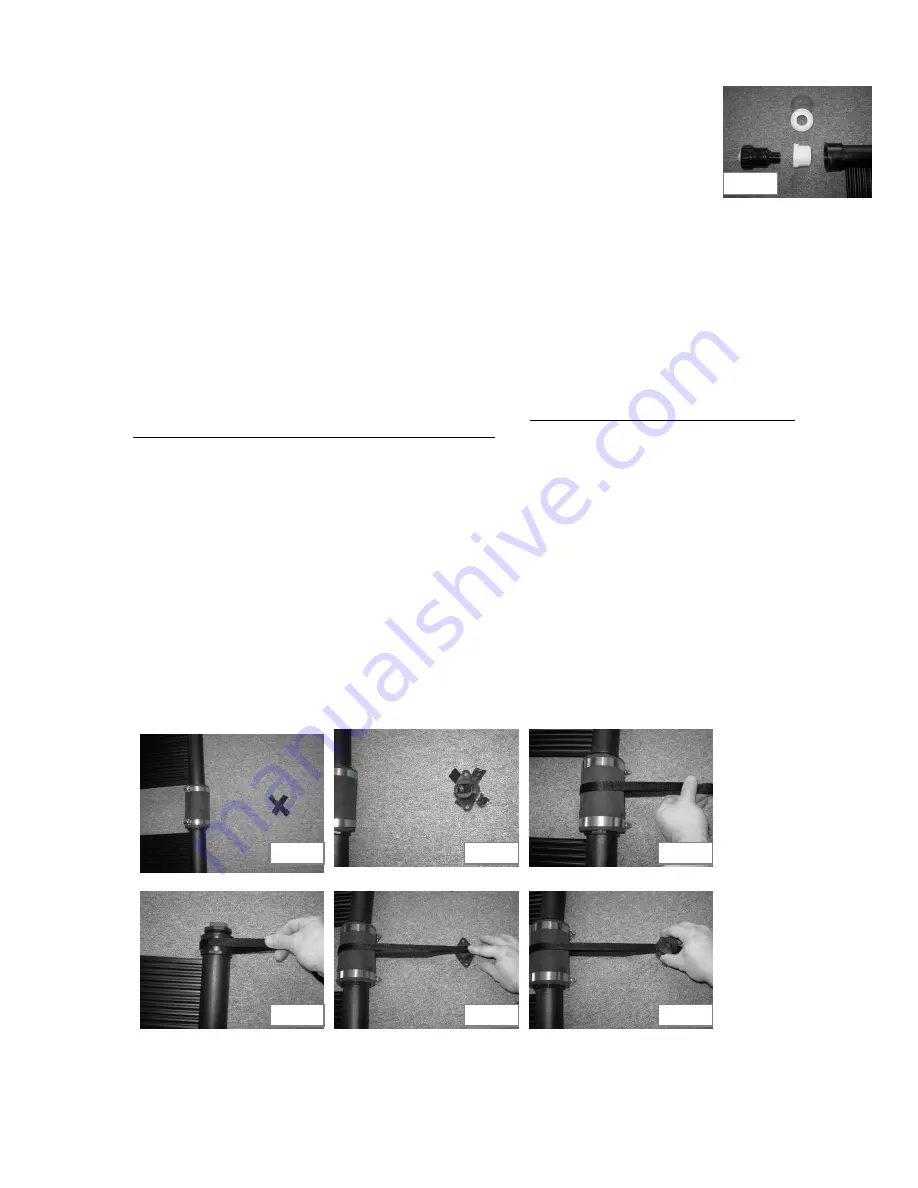
For high wind areas you can install the Nylon straps and Vinyl straps from System Kit. 
Mark a spot 6" to the right of the outlet. Mark spots 6" to the right of every second 
rubber hose that are on the same side as the outlet. Mark a spot 6" to the right of the 
cap. See Fig 3d-4. Place mounting base (

SK-RMK-BASE

) on these spots. Drill pilot 

holes, apply silicone roof sealant and screw mounting base into roof. See Fig 3d-5. 
Wrap a Nylon strap (

SK-RMK-ST-N32

) around the panel header (see Fig 3d-7) or 

around rubber hose (see Fig 3d-6). Lay both ends of strap in the mounting base and 
pull tight. See Fig 3d-8. Screw on mounting cap.(

 SK-RMK-CAP

). See Fig 3d-9. 

Repeat process on the inlet side of the panels but using the Vinyl straps (

SK-RMK-ST-V32

instead. 


Fig 3d-3


Fig 3d-6


Fig 3d-5


Fig 3d-4


Fig 3d-7


Fig 3d-8


Fig 3d-9


Summary of Contents for SQ-2220-ID

Page 1: ...Model SQ 2220 ID INSTALLATION OPERATION MANUAL Read all the instructions before installing your solar heating system...

Page 2: ...y from your pool or one story up then your pump may need to be 1HP or more Where can the solar panel be placed The solar panel can be placed on the ground Avoid placing in high traffic areas as it is...

Page 3: ...ve Optional parts Roof Mounting Kit SQ RMK5 High Wind Roof Mounting Kit SQ HWK 1 SQ RMK5 per SQ 2220 system is required for Roof For high wind areas to be used in addition to the roof mounting or Rack...

Page 4: ...Description 1 SK FTG A Threaded 2 way valve 4 SK FTG K Rubber hose 3 75 2 SK FTG B Threaded nipple 8 SK FTG L Metal collar Hose clamp 2 SK FTG C Threaded tee 1 SK VRV Vacuum Relief Valve 4 SK FTG D T...

Page 5: ...ig 3a 4 Apply Teflon to threads of by pass valve SK INT V Screw side of valve with handle into the panel as per Diagram Step 3a Do not over tighten See Fig 3a 7 Loosen the union on the valve See Fig 3...

Page 6: ...Put O rings SK FTG I on both combination adapters SK FTG D See Fig 3a 3 Thread both combination adapters into the panels as per Diagram Step 3b Do not over tighten See Fig 3a 4 Push the rubber hose yo...

Page 7: ...ver See Fig 3a 10 Repeat for other end of panel Slide another metal collar onto the rubber hose Connect the 2 panels together by pushing the rubber hose over the second panel header Tighten metal coll...

Page 8: ...ap for this type of installation Thread the cap into the panels as per Diagram Step 3d Do not over tighten See Fig 3a 2 If you are using flexible piping to connect panels to your pump then put O rings...

Page 9: ...SK FTG K to connect the two set together as per Diagram Step 3d Install mounting kits as per instructions included with them Panels must be installed with a slight slope minimum 2 inch per 10 feet to...

Page 10: ...tightened Unblock the inlet and outlet of your pool 5 Make sure the valve on the integrated diverter is on the open position See Fig C1 1 Valve in the open position Valve in the closed position Solar...

Page 11: ...plied and connect it to the last open end of the diverter kit Place metal collar and tighten Connect the other end of the hose to your pool inlet Place metal collar and tighten See diagram C 2 7 Make...

Page 12: ...that all your piping in drained 4 Run you feed and return PVC piping from your pool to your solar panels Make sure piping is installed in such a way to allow proper drainage 5 Make sure that your pipi...

Page 13: ...losed turn your by bass valve in such a way to allow the water from your panels to drain Wait half an hour for panels to drain Unscrew the Vacuum Relief Valve or the Threaded cap at the top of the sol...

Page 14: ...logies Inc Claims will not be accepted for a solar panel s damage in transit unless damage to shipping container is noted at time of delivery on the transport company s delivery bill Sunsolar Energy T...

Reviews: