Page 2
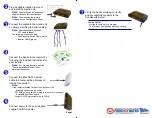
Find a suitable location to mount
and install the Apollo unit.
Note:
Ensure the cables and power
supply will reach their destinations
Note:
The mounting template is
included on the Configuration Sheet
Connect the cables to the Apollo unit
by simply matching the color coding.
Note:
The following are optional:
- CT2 cable (orange)
The following are not needed:
- The Pressure Switch Cable (violet)
- Inverter Cable (green)
Connect the Apollo to the inverter by
following the included instructions for
your inverter
Note:
For Fronius Inverters, see the
"Apollo Installation Manual" from
www.sunreports.com
Connect the Blue CAT5 Internet
cable to a router with an 'always on'
Internet connection
Note:
If the router is located far from the Apollo unit, the
following options can be used:
- PLC Bridge (uses the AC wiring in the home to connect)
Available from SunReports
- Longer CAT5E patch cable (up to 300ft)
Connect power to the unit using the
supplied AC/DC Adapter.
2
3
4
5
6
Verify the Apollo starts up correctly
and successfully connects to the
SunReports Server
Startup Routine:
- All Lights come on for a moment
- The 'Internet' light flashes while connecting
- The 'Internet' light turns solid on when connected
7
Page 3


