background image

25

WheelDrive   Rev.G

1

2

1

2

23 

24 

5  Anti-tip settings

For your own safety the power assist is 

equipped with a so-called anti-tip device. This 

will prevent you from tipping-over backwards.

 Warning!

Always use the anti-tip device in its protective 

position when driving with the power assist.

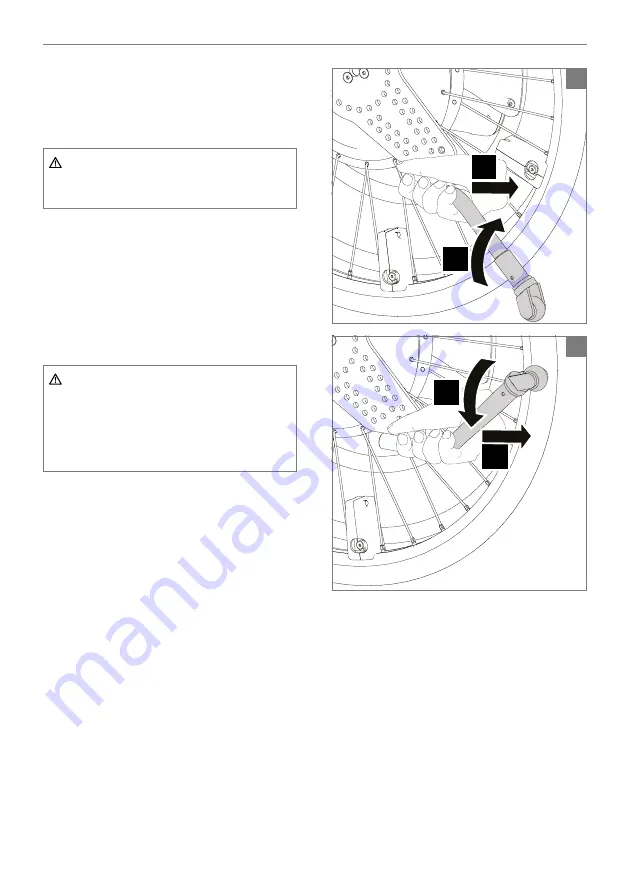
For transportation or driving down a curb 

you can temporarily rotate the anti-tips in an 

upwards position. This can be done by pulling 

the anti-tip backwards, and rotating it upwards 

(figure 23)

By again pulling the anti-tip backwards, and 

rotating it downwards, the anti-tip can be set 

back to its protective (safe!) position (figure 24).

 Warning!

The anti-tip device is important for your 

safety and prevent you from tipping 

backwards in case of a high acceleration. 

If the anti-tip blocks other parts of your own 

wheelchair please contact your dealer

Summary of Contents for Empulse WheelDrive

Page 1: ...WheelDrive Generation 2019 USER MANUAL EN Power assist 9008027G ...

Page 2: ...2 WheelDrive Rev G ...

Page 3: ...ed is valid for the product in its standard version Sunrise Medical as distributor can therefore not be held liable for any damage resulting from specifications of the product deviating from the standard configuration Illustrations contained in the manual may deviate from the configuration of your product The information made available has been prepared with all possible diligence but Sunrise Medi...

Page 4: ... 3 Charging the batteries 14 4 4 Using the batteries 16 4 5 Driving using the rims 16 4 6 Obstacles and slopes 18 4 7 Mounting and dismounting a power assist 20 4 8 Storage 22 4 9 Lifting the power assist wheels 23 4 10 Safety functionalities 23 5 Anti tip settings 25 6 Transport 26 6 1 Transport without occupant 26 6 2 As a passenger seat in a car 27 6 3 Special shipping requirements 28 7 Mainten...

Page 5: ...e any questions regarding the use maintenance or safety of your wheelchair In case there is no authorised dealer in your area or you have any questions contact Sunrise Medical either in writing or by telephone For information about product safety notices and product recalls go to www SunriseMedical eu 1 3 Symbols used in this manual Note Pointing out possible problems to the user Caution Advice fo...

Page 6: ...been tested for compliance with the relevant requirements regarding electromagnetic radiation EMC requirements This implies the power assist can be used under normal circumstances Note It cannot be excluded that electromagnetic radiation emanating from mobile telephones medical apparatus and other sources may have an influence on the power assist It cannot be excluded that the power assist will in...

Page 7: ...e contact your dealer immediately if you observe a potential danger during the use of the product The power assist is suitable for indoor and outdoor use EN 12184 class B Warning Only use the power assist as intended and as prescribed in this manual Do not adjust or change the product if not promptly described Do not use parts or add ons which are not clearly marked as compatible with the power as...

Page 8: ...this angle the power assist can be insufficient While driving on a steep slope more than 3 and taking obstacles it is advised to use the large rim In case of emergency you can propel and brake manually Caution Never open the batteries or electronic housings Do not connect any other equipment to the power assist Do not drive faster than 6 km h with the power assist without connected batteries to pr...

Page 9: ...ve power assistance while driving The amount of support that is provided is dependent on the selected profile and the force applied to the rim The smaller Drive rim provides continuous support and can be used to move forwards or backwards in this case no manual propulsion is required The power assist is very intuitive to use but some practise and training is required for safe usage 3 1 Main parts ...

Page 10: ...n a wheelchair with the power assist at a time Do not allow young children to drive unsupervised in a wheelchair with the power assist 3 3 The wheelchair The power assist is compatible with most common wheelchair frames in the market The installation can be done with a number of standard parts supplied with the power assist wheels For each wheelchair frame model a different setting is needed Once ...

Page 11: ...g on slight slopes In case you want to use the Drive rim on slopes make sure that you make the correct power setting before you start to take the slope Beware that in difficult situations you should be able to take over to the Assist rims Take special care when driving down slopes of any kind Adjust your speed to maintain safe control When descending with Assist rims the system will reach and keep...

Page 12: ...les I II III Each profile and support level with specific driving characteristics can be selected by pushing the appropriate button on the user interface When choosing profile I the orange LED below button B1 will light up When choosing profile II the orange LED s below button B1 and B2 will light up When choosing profile III all 3 LED s will light up An appropriate driving profile and speed shoul...

Page 13: ...B2 Two beeps Indoors limited number of obstacles Medium III rear B3 Three beeps Outdoor areas and inclines High Note Selection of the same driving profile on both power assist wheels normally gives the best driving experience When turning on the power assist the driving profile will start at profile I C Battery indicator see next paragraph ...

Page 14: ...the main battery is indicated via the battery indication LEDs on the user interface figure 7 Please note that batteries can discharge differently max 10 Warning In case all battery indication LEDs are off when the power assist is turned on this might be due to a system error Please contact your dealer During charging the LED on the charger will turn red When the battery is fully charged the LED in...

Page 15: ...batteries to become completely empty deep discharge of the batteries will damage the batteries Remove the charger when batteries are completely charged Never pull the cable to remove the battery charger from the mains or charge connector Always attach the black connector cover if no battery charger is connected to prevent water and dirt coming in Warning In case the batteries are completely empty ...

Page 16: ...le do not push your fingers in any openings to prevent possible injuries or damages 4 5 Driving using the rims Assist rim A in figure 11 This rim works the same as the rims on a manual wheelchair By using these Assist rims the motor supports the forward and backward movement The support level is dependent on the selected profile and force applied to the rim Assist rim usage When applying more forc...

Page 17: ...give continuous support As long as the Drive rim is pushed forward the wheelchair will move forward If the Drive rim is pushed backwards the wheelchair will move backwards When the Drive rim is released the motor support will stop The wheelchair will not immediately stop but gradually brake on the motor If the system is turned off the Drive rims have no function Drive rim usage The Drive rim can b...

Page 18: ...best control for driving and braking Taking obstacles The power assist is certified for taking obstacles up to 50 mm Obstacles higher than 25 of the front wheel diameter should be taken by backward driving Low obstacles can be taken by forward driving The size and construction of the front wheels of your wheelchair are of great influence on taking obstacles Drive carefully towards the obstacle wit...

Page 19: ...ims the motor can start generating energy and charging the battery when braking on the motor is activated When descending with a too high speed the power assist can shut down automatically due to over voltage The wheels continue to run but power assistance is not available anymore Driving up slope with Assist rim 1 Propel the Assist rim slowly forward 2 When releasing the Assist rim the motor brak...

Page 20: ...pe of your manual wheelchair frame and determined by your dealer At the rear side of a power assist wheel there is an anti tip plate in which 2 cone shaped supports are screwed figure 12 The position of the supports is dependent on the brand and type of your manual wheelchair frame and determined by your dealer Dismounting of a wheel figure 13 By rotating the wheel handle upwards the wheel handle ...

Page 21: ... the wheelchair Do not mount the power assist wheels on a wheelchair with more than 4 degrees camber Mounting a wheel figure 16 To mount a wheel the wheel handle has to be pulled upwards in the open position 1 Position the axle in the hole of the adapter sleeve on your wheelchair and unlock the axle by pushing the unlock button just above the handle with your thumb and release the button again The...

Page 22: ...en the power assist is not in use it must be stored in a dry place where it will not be exposed to weather conditions Note During storage the ambient temperature should not be lower than 15 C or higher than 30 C 40 C is the maximum allowed temperature for the used batteries Caution When not using the batteries It must be avoided that the batteries will get discharged deeply deep discharge will dam...

Page 23: ...s are described here 1 When the wheel handle is in open position at startup no support is possible The system will detect this situation give 1 beep 2 A continuous Power assist request during about wheel rotation will disable the Power assist functionality e g when the Assist rim is blocked Pushing one of the profile buttons once will enable the function again 3 Limitation of speed is settable wit...

Page 24: ...24 WheelDrive Rev G 6 To save energy and to avoid possible unintended activations the power will be switched off automatically after approximately 15 minutes of not using the power assist ...

Page 25: ...ving down a curb you can temporarily rotate the anti tips in an upwards position This can be done by pulling the anti tip backwards and rotating it upwards figure 23 By again pulling the anti tip backwards and rotating it downwards the anti tip can be set back to its protective safe position figure 24 Warning The anti tip device is important for your safety and prevent you from tipping backwards i...

Page 26: ...wer assist must always be switched off when being transported The battery pack of the power assist can be removed when transporting the system and storing securely In case the power assist is transported unattached from a wheelchair the wheels must be secured against moving during transport to avoid any danger for the occupants and to avoid any damage to the power assist Caution When transporting ...

Page 27: ...rements of ISO 7176 19 2008 A1 2015 as amended The power assist must always be switched off when being transported Check if your wheelchair has been crash tested according to ISO 7176 19 2008 and reduce the maximum user weight with the weight of power assist 20 kg A wheelchair is not primary designed to be used as seat in a motor vehicle during transport Transfer to a regular car seat if possible ...

Page 28: ...o mentioned in chapter 9 Technical specifications For information about dimensions and weight of the power assist please refer to chapter 9 Technical specifications Ensure that any detachable parts are secured with your mobility aid or separately packed and labelled so they do not get lost during loading and unloading We recommend to check in the batteries individually packed and duly protected ag...

Page 29: ...ng the batteries for an extended period of time can damage them Do not use the power assist if the batteries are almost run down and never if the batteries are completely empty This can seriously damage the batteries and you may run the risk of coming to an unintended standstill If the capacity of the batteries is continually decreasing so that the wheelchair can only be used for short trips this ...

Page 30: ...both wheels have same pressure Caution Never exceed the maximum tyre pressure that is mentioned on the tyre Tyres should only be replaced by a qualified specialist please contact your dealer In case of a flat tire while using the power assist make sure to drive slowly and try to inflate the tyres again or let the tires be repaired replaced by a qualified specialist as soon as possible Using the po...

Page 31: ...t possible please ask your local authority about the possibilities for recycling or environmentally friendly disposal of the materials Various different plastics and metals were used in the manufacture of the power assist Furthermore the power assist contains electronic components that should be disposed of as electronic waste The batteries should be disposed of as chemical waste ...

Page 32: ... 5 Check whether the batteries are charged Recharge them if needed 6 Check if the sensor box AA batteries have sufficient capacity During the first use of the Assist rim after starting up a system notification will be given see paragraph 7 1 Replace the AA batteries if needed 7 Use below problem solving tables to find the cause of the problem related to A Switching on B Driving support C Driving b...

Page 33: ...le and turn on the WheelDrive NA A2 2 Wheel handle detection not working correctly Open the wheel handle and close again than turn on the WheelDrive A3 WheelDrive switches on and gives beep code 3 normal ON led s NA A3 1 Assist rim not centered during startup Check if something is causing the hand rim displacement if yes remove it Restart WheelDrive do not touch the hand rims for 3 seconds during ...

Page 34: ...NA NA NA B1 3 Bad contact cable to motor NA NA NA B1 4 Assist rim sensor damaged defect NA NA NA B1 5 Sensor box defect NA NA NA B1 6 Controller defect B2 Drive rim not working Assist rim is working NA NA movement of both hand rims at the same time B2 1 Drive rim support has been turned off because movement of both hand rims was detected at the same time Check if anything unintended is triggering ...

Page 35: ...rim obstructed damaged or bad calibration Check if movement is obstructed by something and remove it for calibration contact your dealer NA NA affect only Drive rim It can make a scratching sound B3 6 Drive rim obstructed or damaged Check if movement is obstructed by something and remove it NA NA NA B3 7 User Interface defect Contact your dealer NA NA NA B3 8 Sensor box defect Contact your dealer ...

Page 36: ...t is equal NA NA NA C1 3 Battery of one wheel almost empty Charge almost empty battery NA NA NA C1 4 Height of front wheels chair is not the same Contact your dealer NA NA NA C1 5 Different software version left and right NA NA NA C1 6 Different profile settings programmed left and right NA NA NA C1 7 Motor function is bad C2 Jerky fast slow fast slow driving NA NA NA C2 1 Motor controller softwar...

Page 37: ...4 2 Sensor foil defect NA NA NA C4 3 Drive rim center position not aligned well NA NA NA C4 4 Drive rim bracket is jammed stuck broken C5 Pinging noise during ride because of broken spoke NA NA NA C4 1 Broken spoke Contact your dealer C6 Rattling noise during driving NA NA small movement battery noticeable C6 1 Battery is rattling because battery holding screws settings are not optimal NA NA NA C6...

Page 38: ...ealer for replacement D2 Charger can not be plugged in NA NA NA D2 1 Battery port is defect Try battery from other wheel If that one does work battery port is defect Contact your dealer for replacement NA NA NA D2 2 Charger plug is defect Try charger plug from other wheel If that one does work charger plug is defect Contact your dealer for replacement D3 WheelDrive beeping during charging continuo...

Page 39: ...amming can be done by your dealer NA NA NA E1 4 Controller defect NA NA NA E1 5 Motor defect E2 Battery housing broken NA NA NA E2 1 Battery housing is cracked E2 Battery cannot be placed or removed NA NA NA E2 1 Dirt around battery contacts Remove dirt NA NA NA E3 2 Battery holding screws settings are wrong NA NA NA E3 3 Wheel handle deformed NA NA NA E3 4 Drive rim bracket is deformed E3 Battery...

Page 40: ...th frame Rotate the wheel so the bumpers are on the right position When bumper installation is too tight contact your deal for adjustment NA NA axle can only be placed in the adapter for 1 cm F1 4 Axle is not in release mode Push release button NA NA axle can only be placed half way in F1 5 Axle is bended Check if axle is bended When it is contact your dealer F2 Cannot remove the WheelDrive from t...

Page 41: ...er G2 Anti tip damaged worn out NA NA NA G2 1 Anti tip is bend Contact your dealer NA NA Makes stripes on floor G2 2 Anti tip wheel is worn out damaged Contact your dealer Problem solving H PowerTalk Problem User Interface feedback other notifications and or check to make Possible cause Actions for user Beeps LED s H1 No USB connection with PC NA NA NA H1 1 USB cable defect NA NA NA H1 2 Wrong PC ...

Page 42: ...me is reached 1 _ switching on power will be switched off when handle is open during system start 2 fast blinking red battery led switching on and driving main battery low 3 driving assist rim not centered during system start Re activation when signal is 0 at restart 4 switching on drive rim not centered during system start Re activation when signal is 0 at restart 5 long _ _ _ _ _ switching on ba...

Page 43: ...irs and scooters Requirements and test methods EN 62304 2006 Medical device software Software life cycle processes ISO 7176 21 2009 Requirements and test methods for electromagnetic compatibility of electrically powered wheelchairs and scooters and battery chargers 9 2 Technical information Product Model Power assist right wheel E1801 1000 Power assist left wheel E1801 1001 Power assist Class 1 Me...

Page 44: ...and 40 Ingress Protection Rating Splashing water proof IPX4 Battery NiMH 24V 3 8Ah Battery charge temperature ºC 10 till 30 Battery storage temperature ºC 15 till 30 Battery service life 500 charging cycles Maximum user weight kg lbs 130 20 5 Maximum camber angle wheelchair º 4 Battery charger N100 24 reference number Indes_SUP012 Charging time full charge approx hours 2 AA batteries sensor box A ...

Page 45: ... number B Date of manufacture C Left L or right wheel R D Serial number 2 Power assist manufacturer label 3 Battery identification label E Date of manufacture F Article number G Serial number 4 Firmware version label Note Never remove or cover up the markings symbols and instructions affixed to the power assist These safety features must remain present and clearly legible throughout the entire lif...

Page 46: ...r the following reasons a Normal wear and tear which include but is not limited to the following parts where fitted batteries armrest pads upholstery tyres brakes shoes ferrules etc b Any overloading of the product please check the EC label for maximum user weight c The product or part has not been maintained or serviced in accordance with the manufacturer s recommendations as shown in the user in...

Page 47: ...47 WheelDrive Rev G ...

Page 48: ...ax 30 0 247554403 www sunrisemedical fr Sunrise Medical S r l Via Riva 20 Montale 29122 Piacenza Italia Tel 39 0523 573111 Fax 39 0523 570060 www SunriseMedical it Sunrise Medical AG Erlenauweg 17 CH 3110 Münsingen Schweiz Suisse Svizzera Fon 41 0 31 958 3838 Fax 41 0 31 958 3848 www SunriseMedical ch Sunrise Medical AS Delitoppen 3 1540 Vestby Norge Telefon 47 66 96 38 00 post sunrisemedical no w...

Reviews: