J3 Carbon Back 127048
Rev.C
10
ENGLISH
INSTALLATION
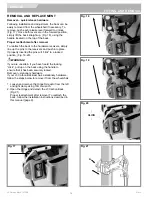
INSTALLING THE MOUNTING HARDWARE
Please read the following instructions before beginning
installation.
To install the J3 Carbon Back, it is best to begin without a
user in the wheelchair. Once the back has been installed
and minor adjustments are needed the user can be seated
back in the wheelchair.
Tools required (included with J3 Carbon Back)*
• 4 mm hex key, (only needed for the QR style)
• 10 mm Spanner.
NOTE:
Wherever torque settings are specified, it is strongly
recommended that a torque meter (not included with
Jay3 Back) is used to verify correct torque specification is
achieved.
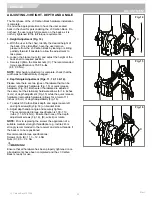
Installation Instructions for the
stationary
mounting
system,
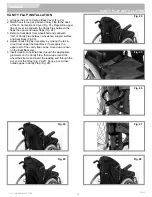
(Figs. 3, 4, 5).
1. Remove the existing wheelchair back according to the
wheelchair manufacturer’s instructions.
NOTE:
If your wheelchair width is 34cm, 40cm or 44cm
wide, you will need to install the Spacers provided with
your back: See Instructions below:
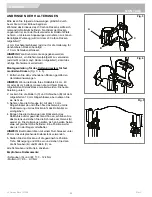
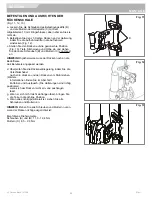
2. Using the included 10mm box end wrench, Loosen, but
do not remove Nuts (C) and Screws (B).
3. Using the 10mm box end wrench loosen and remove
screw (A), Open hinge to allow placement around the
wheelchair Back Cane Tube.
4. Position the mounting hardware at the desired height on
the Wheelchair’s back canes and then close hinge and
tighten hinge screw (A). The mounting hardware should
be at approximately equal heights on each back post.
Higher locations are generally better.
NOTE:
for Back Cane tube diameters smaller than 25mm
use the appropriate sized spacer.
5. Adjust the back to your desired position, depth, tilt and
height and then tighten Screws (B) and Nuts (C).
Tighten all nuts and screws:
Recommended torque specifications:
• Screws (A) & (B): 11.3 – 12.4 Nm
• Nuts (C): 8.5 – 9.3 Nm .
Fig. 3
Fig. 4
Fig. 5
B
C
A
Summary of Contents for J3 Carbon
Page 147: ......


