34
35
930356 Rev. B
930356 Rev. B
X I .
M A I N T E N A N C E
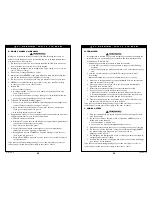
A. INTRODUCTION
1. Proper maintenance will improve performance and extend the useful life
of your chair.
2. Clean your chair regularly. This will help you find loose or worn parts
and make your chair easier to use.
3. Repair or replace loose, worn, bent or damaged parts
before using
this chair
.
4. To protect your investment, have all major maintenance and repair work
done by your authorized supplier.
If you fail to heed these warnings your chair may fail and cause severe injury to
the rider or others.
1. Inspect and maintain this chair strictly per chart.
2. If you detect a problem, make sure to service or repair the chair before use.
3. At least once a year, have a complete inspection, safety check and
service of your chair made by an authorized supplier.
B. MAINTENANCE CHART
Tire inflation level
Wheel locks
All fasteners for wear and tightness
Armrests
Axle and axle sleeves
Wheels, tires and spokes
Casters
Anti-tip tubes
Frame
Upholstery
Service by Authorized Supplier
CHECK...
✓
✓
✓
✓
✓
✓
✓
✓
✓
✓
✓
Annually
6 Months
3 Months
W
eekly
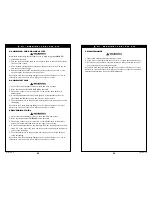
You will need to adjust your chair from time to time for best performance (espe-
cially if you alter the original settings). This chart gives you a first solution, then a
second and a third if needed. You may need to look farther to find the best solu-
tion for a specific problem.
Note:
To keep track of your progress, make only ONE change at a time.
Left
Turn In Chair
Right
Turn In Chair
Looseness In Chair
Sluggish T
urning
Squeaks And
Rattles
Caster Flutter
Add a spacer washer between the plastic saddle and the caster plate
on the top of the left caster plate.
Make sure tire pressure is correct and equal in both rear tires and
front caster tires, if pneumatic.
Make sure all nuts and bolts are snug.
(Note: Do not overtighten,
or aluminum tubes may be damaged).
Make sure all spokes and nipples are tight on radial spoke wheels.
Use Tri-Flow Lubricant (Teflon
®
-based) between all modular frame
connections and parts.
Check for proper caster plate adjustment. See instructions for
caster plate adjustment.
SYMPT
OMS
SOLUTIONS
✓ ✓ ✓ ✓
✓ ✓
✓
✓
✓
✓
✓ ✓ ✓
✓
✓
✓
✓
Add a spacer washer between the plastic saddle and the caster plate
on the top of the right caster plate.
Add a spacer washer between the plastic saddle and the caster plate
on the bottom right caster plate retaining bolts.
Add a spacer washer between the plastic saddle and the caster plate
on the bottom right caster plate retaining bolts.
✓
Make sure both front casters touch the ground simultaneously. If
they do not, add the proper spacers between the bottom bearing of
the caster plate and fork stem nut until they do. Make sure you
check for this problem on a flat surface.
✓ ✓
✓
✓
X . T R O U B L E S H O O T I N G


