17
6) Winding and adjusting lower thread
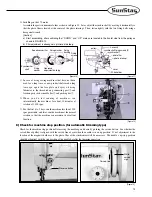
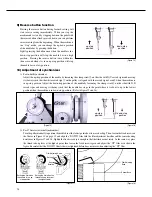
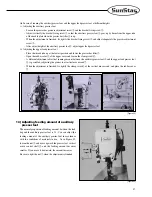
Winding lower thread
a) Pass the thread thru the hole
①
from the rear to the
frontal side of the tension adjusting dish
②
.
b) Bring the thread to the bobbin
③
and wind it
clockwise 5 to 6 times from the bottom.
c) Push the lever
④
so that the pulley
⑤
touches the V-
belt and run the machine.
d) The pulley
⑤
automatically is separated from the V-
belt when the lower thread is winded in the bobbin.
e) The adequate amount of the pulled-out lower thread
is about 80%. (Refer to Figure 24)
[Figure 24]
Adjustment of winding lower thread
a) In case that the lower thread is winded irregular, loosen the bolt
⑥
and adjust by moving it sideways, and tight it again.
b) The amount of winded lower thread becomes larger when you turn adjusting screw
⑦
clockwise, and it becomes
smaller in case of turning it counterclockwise.
c) The tension of lower thread that winded in the bobbin can be adjusted by turning the nut
⑧
: it increases with
clockwise turning and it decreases when you turn counterclockwise.
[Figure 25]
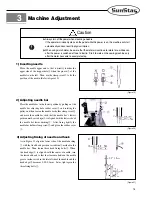
7) Inserting and removing lower thread and adjusting tension
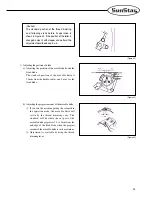
Insert the bobbin into the bobbin case. Later, insert the thread into the thread groove
③
and place it under the spring
④
of
thread adjusting plate. The tension of the lower thread becomes larger when you turn clockwise the tension adjustment
screw
⑤
and becomes smaller when you turn in counterclockwise. When hold the end of thread, make sure that the
bobbin case
⑥
should drop by gravity in order to adjust the lower thread tension.
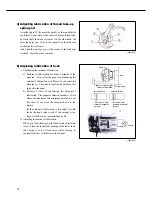
Inserting and removing the bobbin case
Insert into the hook by grabbing the bobbin case handle
①
. Pull out the handle
①
when you remove the bobbin. (The
bobbin
②
removes itself when you release the handle.)
Weaker
Stronger
Caution
▶
Turn off the power when adjusting the lower thread tension.
▶
If the operator mistakenly steps down on the pedal while switched on, the machine will start
automatically and can cause physical injuries.
▶
When using the clutch motor, be aware that the motor will continue to rotate for a while after
the power is switched off. Start to work only after the motor has come to a complete stop.
Summary of Contents for KM-640BL
Page 29: ...29 5 Table Drawing 1 KM 640BL ...
Page 30: ...30 2 KM 640BL 7 ...


