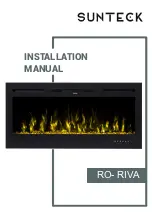
background image


Read all instructions before using this heater!


This heater is 

hot when in use

. To avoid burns, 

DO NOT

 let bare skin touch 

hot

 surfaces. If 

provided, use handles when moving this heater.  Keep 

combustible materials

, such as 

furniture, pillows, bedding, papers, clothes, and curtains at least 

3 feet (0.9m)

 from the 

front of 

the heater

 and 

keep them away from the sides and rear

Extreme caution

 is necessary when any heater is used by or near 

children

 or 

invalids

 and 

whenever the heater is left 

operating and unattended

DO NOT

 operate any heater with a 

damaged cord or plug

 or after the 

heater malfunctions

has been 

dropped

 or 

damaged in any manner

. Discard heater or return to authorized service 

facility for examination and/or repair. 

DO NOT

 run 

power cord

 under carpeting. 

DO NOT

 cover power cord with throw rugs, runners, 

or  similar  coverings. 

DO  NOT

  route power  cord  under furniture  or appliances.  Arrange power 

cord 

away from traffic

 area, and where it will not be tripped over. 

Connect to properly grounded outlets ONLY. 


DO  NOT  insert

  or 

allow  foreign  objects

  to 

enter  any  ventilation  or  exhaust  opening

,  as 

this may cause 

electric shock

 or 

fire

, or 

damage the heater

.  

To p revent a possible fire,

 DO NOT 

block air intakes or exhaust in any manner. Doing so could 

cause a 

fire

DO NOT

 use on soft surfaces, like a bed, where openings may become blocked. 

A  heater  has 

hot  and  arcing  or  sparking  parts  inside

DO  NOT

  use  it  in  areas  where 

gasoline, paint, or flammable liquids

 are used or stored.  

Use  this  heater  only  as  described  in  this  manual.  Any  other  use  not  recommended  by 
the manufacturer may cause fire, electric shock, or injury to persons.


ALWAYS  plug  heaters  directly  into  a  wall  outlet/receptacle.  NEVER  use  with  an 
extension cord or relocatable power tap (outlet/power strip). 


DO NOT


place the heater near a bed

 because objects such as pillows or blankets can fall off 

the bed and be ignited by the heater.  

NEVER

 use this heater in 

bathrooms, laundry rooms

, or any other location where the heater 

could fall into a 

bathtub 

or 

pool

become damp,

 or 

come in contact with water

AVOID FIRE!

 Regularly inspect all air vents to make sure they are free from dust, lint, or other 

blockage. 

Unplug the unit

 and clean with a 

vacuum ONLY

DO NOT

 rinse or get wet. 

ALWAYS

 mount to wall bracket before use. 

DO NOT

 set on the floor, or other surface, to use. 

NEVER

 use a wall mount bracket from another manufacturer.  

This product is

 not intended 

to be a

 primary heat source. 

It is for

 supplemental heat only. 

INDOOR use only!


NEVER 

use this heater

 outdoors!  

Doing so may


result in

 electric shock!


Risk of


electric shock

DO NOT OPEN!

 No user-serviceable parts inside! 

IMPORTANT SAFETY INFORMATION!

WARNING

ALWAYS

 turn this heater off before unplugging it from the outlet. 

ALWAYS


disconnect

  this  unit  from  the 

power

  supply 

before

  performing  any  assembly  or 

cleaning, or before relocating the electric fireplace. 

NEVER

 leave this heater unattended.

  ALWAYS

 unplug this heater when not in use.  

Summary of Contents for RIVA 100

Page 1: ...INSTALLATION MANUAL RO RIVA...

Page 2: ...500W Read and understand this entire owner s manual including all safety information before plugging in or using this product Failure to do so could result in re electric shock or serious personal inj...

Page 3: ...sparking parts inside DO NOT use it in areas where gasoline paint or ammable liquids are used or stored Use this heater only as described in this manual Any other use not recommended by the manufactu...

Page 4: ...use immediately and have a quali ed electrician inspect and or replace the faulty outlets The power cord supplied with the heater has three prongs two at blades live and neutral and one round pin grou...

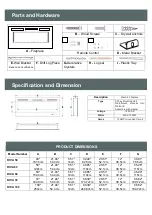
Page 5: ...85 119cm 20 51 52 1cm 12 30 5cm 45 28 115cm RIVA 60 60 152 4cm 21 46 54 4cm 5 51 14cm 46 85 119cm 20 51 52 1cm 12 30 5cm 45 28 115cm RIVA 72 72 182 8cm 21 46 54 4cm 5 51 14cm 68 39 173 72cm 20 51 52 1...

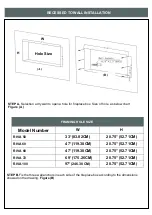
Page 6: ...USING PAINT OR LACQUER TO FINISH THE MANTEL THE PAINT OR LACQUER MUST BE HEAT RESISTANT TO PREVENT DISCOLOURATION Your appliance is a wall mounted recessed and or mantel installed appliance Select a s...

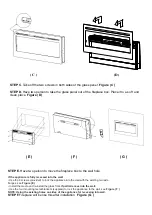
Page 7: ...52 71CM RIVA 60 47 119 38CM 20 75 52 71CM RIVA 60 47 119 38CM 20 75 52 71CM RIVA 72 69 175 26CM 20 75 52 71CM RIVA 100 97 246 38 CM 20 75 52 71CM STEP B Fix the three wall anchors in each side of the...

Page 8: ...appliance is fully recessed into the wall Use the 6 screws provided to lock the appliance into the wall with the existing two side anges see Figure E Install the media and re install the glass front...

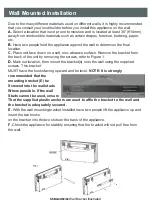
Page 9: ...to Figure 1 D Mark out location then mount the bracket s onto the wall using the supplied screws This bracket MUST have the hooks facing upward and be level NOTE It is strongly recommended that the mo...

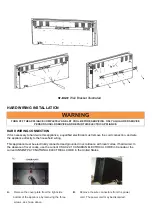
Page 10: ...if hard wired In the absence of local codes use the current CSA C22 1 CANADIAN ELECTRICAL CODE in Canada or the current ANSI NFPA 70 NATIONAL ELECTRICAL CODE in the United States A Remove the cover p...

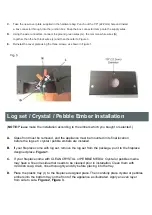
Page 11: ...selected A Glass front must be removed and the appliance must be mounted in its final location before the log set crystal pebble embers are installed B If your replace come with log set remove the log...

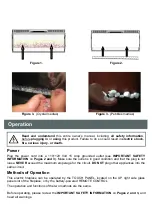
Page 12: ...FORMATION on Pages 2 and 3 Make sure the outlet is in good condition and that the plug is not loose NEVER exceed the maximum amperage for the circuit DO NOT plug other appliances into the same circuit...

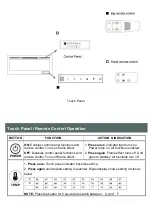
Page 13: ...ontrol Turns o ame e ect 1 Press once Indicator light turns on Power turns on All functions enabled 2 Press again Flame e ect turns o Unit goes to standby All functions turn o TEMP 1 Press once Touch...

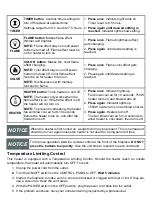
Page 14: ...ater turns on and after the heater turns o 1 Press once Indicator lights up Fan blows cool air for 10 seconds 750W heater turns on and blows warm air 2 Press again Indicator lights up 1500W heater tur...

Page 15: ...onto the cloth or towel Dry thoroughly with a paper towel or lint free cloth NEVER use abrasive cleansers liquid sprays or any cleaner that could scratch the surface Vents Use a vacuum or duster to re...

Page 16: ...www sunteck ca info sunteck ca...

Reviews: