background image

18

3. GARANTÍA

Las Sunwood Marino disponen de 1 año de garantía desde la fecha de facturación.
Si en el periodo de garantía hay un problema técnico con el producto debido a un fallo 
material o un fallo de fabricación, será reparado o reemplazado por Sunwood. En el 
caso de no poder repararse, se compensará de otra forma adecuada. Sunwood decide si 
un fallo se arregla, se reemplaza o se compensa.

Para tener derecho a la garantía, tienen que haberse seguido todas las instrucciones de 
este manual y haberse hecho un uso normal del producto. También se hace hincapié en 
que la estufa tiene que haberse usado en el país correspondiente al idioma del manual 
y el país correspondiente a la pegatina del producto.

La garantía no será ofrecida si el problema ha tenido lugar por causas ajenas a fallos de 
fabricación o si se le ha dado un uso inapropiado al producto.

Para poder disponer de la garantía se necesita tener en todos los casos la factura 
original del producto. Solo el comprador original puede tener el derecho a la garantía.

El derecho a la garantía siempre ha de ser evaluado por Sunwood primero. La garantía 
no incluye siempre una compensación de los gastos de envío de productos defectuosos 
o piezas hacia la fábrica de Sunwood o un punto de venta. Lo mismo ocurre en los 
gastos de vuelta de los productos reemplazados o reparados. La reparación en sí es 
totalmente gratuita dentro del plazo de la garantía.

Summary of Contents for 0063CM3866

Page 1: ...Operation and installation manual Gu a del usuario e instalaci n SUNWOOD MARINO PROPANE ENGLISH ESPA OL HOW TO INSTALL YOUR HOT BUDDY...

Page 2: ...Qn in kW Hs g hr KEEP THE INSTRUCTIONS FOR FUTURE REFERENCE GAS CONNECTION This appliance requires an EN16436 certified flexible gas hose from 40 to 50cm and an EN16129 certified pressure regulator of...

Page 3: ...1x 1x 2x 2x 4x Marino frame burner gas control valve Marino top Bag of lava rocks Castor wheels without brake Castor wheels with brake Spring washers EXPLANATION OF SYMBOLS Turning on Adjusting the f...

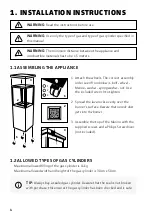
Page 4: ...rner s surface Beware that no rock dust gets into the burner 3 Assemble the top of the Marino with the supplied screws and a Philips Screwdriver not included 1 1 ASSEMBLING THE APPLIANCE 1 2 3 3 2 1 1...

Page 5: ...from candles cigarettes and other ignition sources WARNING Always check that the regulator seal rubber O ring is cor rectly fitted and undamaged If this is not the case it shall be exchanged for a new...

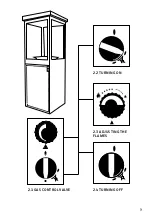
Page 6: ...he appliance with the gas control valve located behind the door 2 3 ADJUSTING THE FLAMES 2 1 OPERATION WITH THE GAS CONTROL VALVE Turn the control knob back to the same position as the image 2 4 TURNI...

Page 7: ...7 2 1 GAS CONTROL VALVE 2 2 TURNING ON 2 3 ADJUSTING THE FLAMES 2 4 TURNING OFF...

Page 8: ...roduct is solely used in the land of destination listed on the product sticker also applies Warranty claims for defects damages arising from inappropriate use incorrect or injudicious use or from norm...

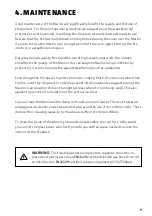
Page 9: ...UV protection outer coating finish this does not mean that the fire is entirely UV proof In order to prevent discolouration we suggest placing the Marino in an area free of direct sunlight at least wh...

Page 10: ...as cylinder or the regulator before moving the appliance Never try to repair or make modifications to this product yourself Never block the air to the burner and or the injector Never block the air to...

Page 11: ......

Page 12: ...S INSTRUCCIONES PARA CONSULTARLAS EN EL FUTURO CONEXI N DE GAS Este aparato necesita una manguera de gas flexible con la certificaci n EN16436 de entre 40 y 50 cm y un regulador de presi n con la cert...

Page 13: ...ador una v lvula de control de gas Cubierta Marino Bolsa de rocas de lava Ruedas Castor sin freno Ruedas Castor con freno Arandelas de resorte EXPLICACI N DE LOS S MBOLOS Incitaci n Configuraci n de a...

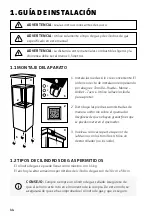
Page 14: ...se de que no hayan granos finos que se puedan meter en el quemador 3 Vuelva a colocar la parte superior de la Marino con los tornillos Utilice un destornillador no incluido 1 1 MONTAJE DEL APARATO 1 2...

Page 15: ...as h galo nicamente en una zona ampliamente ventilada y alejada de velas cigarrillos y dem s fuentes de ignici n ADVERTENCIA Compruebe siempre que el sello del regulador junta t rica de goma est corre...

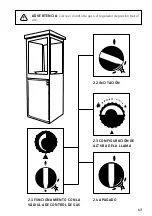
Page 16: ...con la v lvula de control de gas situada detr s de la puerta 2 3 CONFIGURACI N DE ALTURA DE LA LLAMA 2 1 FUNCIONAMIENTO CON LA V LVULA DE CONTROL DE GAS Apagar el fuego girando el mando de control pa...

Page 17: ...17 2 1 FUNCIONAMIENTO CON LA V LVULA DE CONTROL DE GAS 2 2 INCITACI N 2 3 CONFIGURACI N DE ALTURA DE LA LLAMA 2 4 APAGADO ADVERTENCIA Cierre el cilindro de gas o el regulador de presi n tras el uso...

Page 18: ...el pa s correspondiente al idioma del manual y el pa s correspondiente a la pegatina del producto La garant a no ser ofrecida si el problema ha tenido lugar por causas ajenas a fallos de fabricaci n o...

Page 19: ...s del sol Aunque la estufa cuenta con una laca de pintura resistente a las radiaciones UV no significa que sea inmune Para evitar un descoloramiento de la capa de pintura recomendamos que cuando no se...

Page 20: ...s de mover el aparato Nunca haga cambios o reparaciones al producto usted mismo Nunca obstruir la boquilla de direcci n o grabadora de flujo de aire Nunca obstruir la direcci n de flujo de aire la viv...

Reviews: