
LED Low Voltage Landscape Light
Important: Read all instructions prior to installation.
PLMB-W4BK
Parts Included
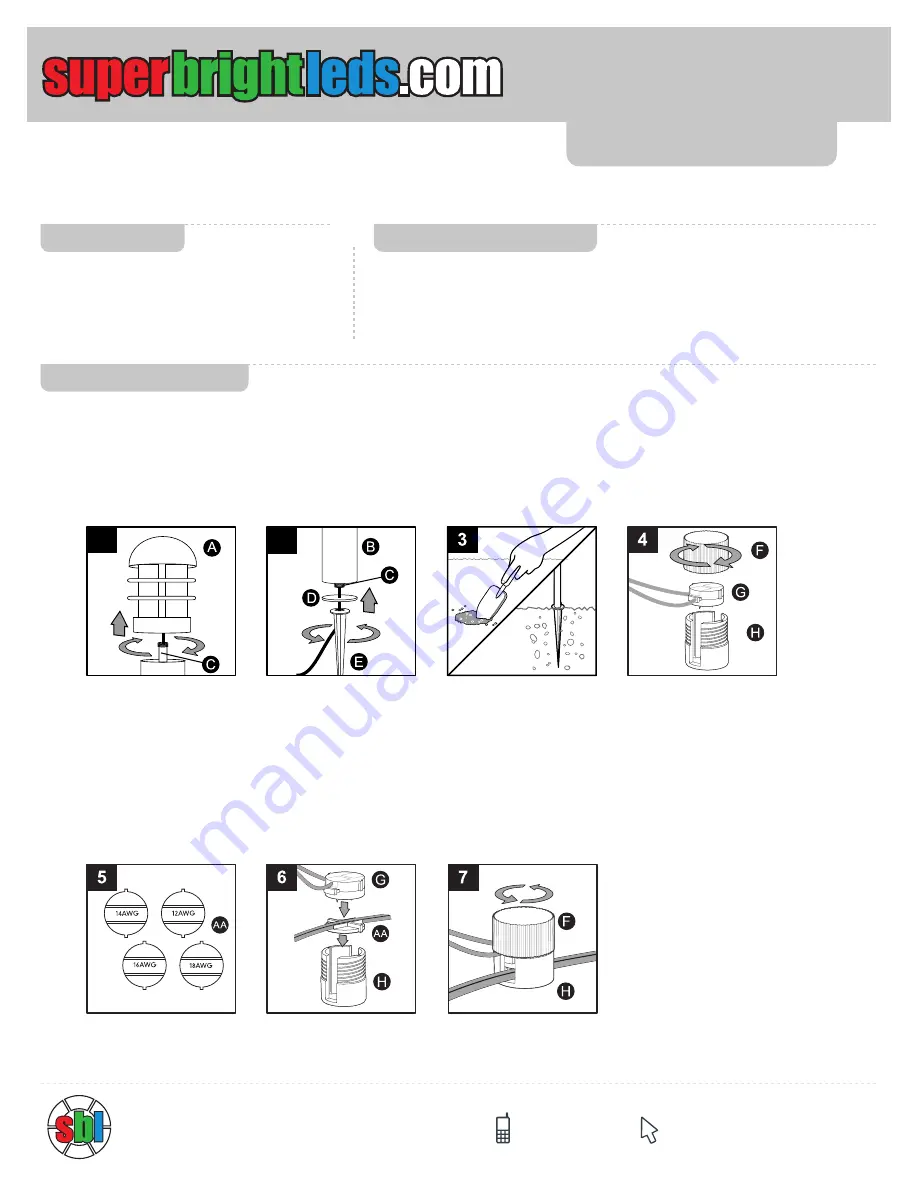
1. Install the lamp head (A) to the threaded center tube (C).
2. Install the bottom ring (D) to the main tube (B) and ground stake (E) to the threaded center tube (C).
3. To install, loosen the ground with a shovel (not included) and/or soften the soil with water, then press the fixture into the
ground. Do not use a hammer. Do not exert excessive force on the fixture while installing as this may cause the fixture to break.
4. Remove the quick connector cap (F) from the quick connector base (H). Set the connector block (G) aside.
Before beginning assembly, installation or operation of product, make sure all
parts are present. Compare parts with package contents list and diagram on
previous page. If any part is missing or damaged, do not attempt to assemble,
install or operate the product. Contact customer service for replacement parts.
Estimated Assembly Time: 15 minutes. Helpful tools: Trowel/Shovel.
Preparation Instructions
Assembly Instructions
Instruction Sheet
Part Number:
4400 Earth City Expy, St. Louis MO 63045
866-590-3533 support@superbrightleds.com
1
2
A - Lamp Head
B - Main Tube
C - Center Tube
D - Bottom Ring
E - Ground Stake
AA - Adapter Trays
(F,G,H) - Threaded
Connector
5. Four (4) adapter trays (AA) are included. Each is marked accordingly: 12 AWG, 14 AWG, 16 AWG and 18 AWG. Select the adapter
tray (AA) that matches the guage of the power cable (not included).
6. Place the power cable on the adapter tray (AA). Align with the grooves in the quick connector base (H) followed by the connector
block (G). NOTE: To ensure uniform brightness, the first fixture should be a minimum of 10 ft. (3m) from the power pack/transformer
(not included).
7. Install the quick connector cap (F) onto the quick connector base (H). Screw the quick connector cap (F) until it is secure, making
sure not to overtighten.


