background image

My Lite X3 - 3000mw RGB Laser - Instruction Manual    Ver:2019.04.18 


8

 / 

16


choose 13CH mode DMX-512 control Channels, then we set the No.1 lighting DMX start address as 
001,No.2 lighting address as 014,No.3 lighting address as 027,No.4 lighting address as 040,and so 
on. 
 

DMX Connection method


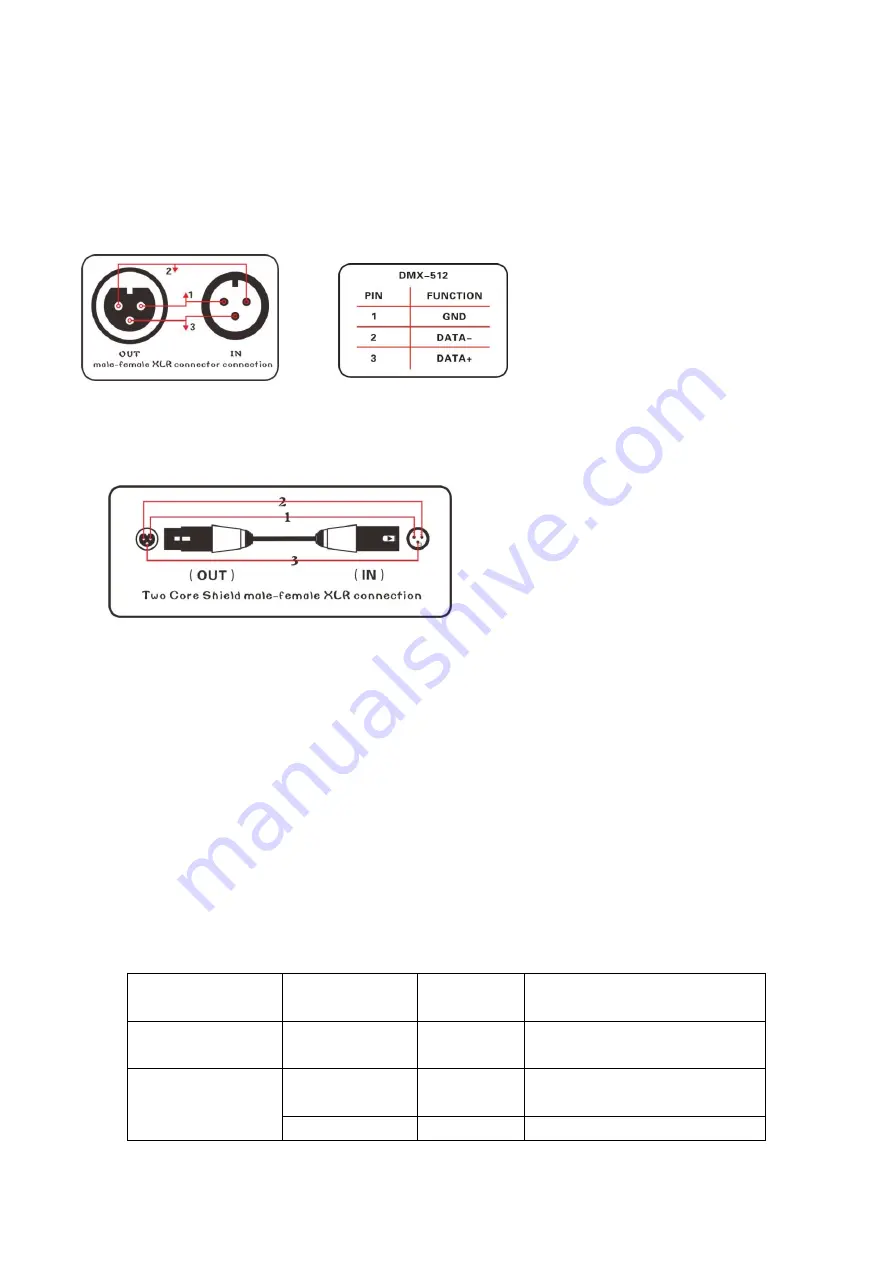
DMX control signal connection must be made with a two core-screened cable, with each core 
having at least a 0.5mm diameter. Please use the product's signal cable OUT and IN as connection. 
The signal OUT and IN cables connection shown as above picture. 
Note: Please do not connect the signal cable OUT and IN in other way except above shown. 


This  product  accepts  digital  control  signals  in  protocol  DMX512(1990).The  amount  of  lighting 
fixtures connected in parallel is no more than 32.Connect the DMX controller's 

Output


to the first 

lighting fixture's 

Input


cable with a 2 core XLR signal cable(Shown as above ),connect the first 

lighting fixture's 

Output

 cable to the second lighting fixture's

 Input cable

 and connect the rest 

light fixtures in the same way. Eventually, connect the last lighting fixture's Output cable to a DMX 
terminator 


Under DMX-512 signal control mode, the last lighting fixture's DMX Output must be connected with 
a DMX terminator. This prevents electrical noise from disturbing and corrupting the DMX control 
signals. The DMX terminator is simply an XLR connector with a  120Ω(ohm) resistor connected 
across pins 2 and 3,which is then plugged into the output socket on the last projector in the chain. 
Then connections are illustrated above. 
 

LCD menu

(MY LITE X3 SD version only)


Level 1 menu 

Level 2 menu  Level 

menu 

Functions 

DMX-512 

Address 

001~512 


Set DMX DIP code 

Iplay 
Build-in 

display 

mode   

Show   

Show~001 

Choose 

the 

performance 

effects 

Music 

OFF / ON 

Sound-active function 

Summary of Contents for MY LITE X3 FB

Page 1: ...LITE X3 SD only back panel different ILDA input SD card player DMX 512 MY LITE X3 FB only back panel different ILDA input Pangolin FB4 DMX 512 Update 2019 04 18 This product manual contains important information about the safe installation and use of this product Please read and follow these instruction carefully and keep this manual in a safe place for future reference ...

Page 2: ...omissions or any resulting damages forthwith The brands and product names mentioned in this manual are trademarks or registered trade marks of their respective owners Contents Latest file to download 3 Safety warning 3 Product technical parameters 4 Product packing list 5 Power Connections Method 5 Back panel ILDA version 5 Back panel SD version 6 Back panel FB version 7 Lighting Fixture s DMX and...

Page 3: ...liquid to clean the optical system Use medicinal absorbent cotton to clean it Please do not attempt to dismantle and or modify the product inner structure Otherwise would not provide 1 year of free warranty Electrical connection must only be carried out by qualified personnel Before installation ensure that the voltage and frequency of power supply match the power requirement of the product It is ...

Page 4: ... 8 Max 60Deg Scanning angle 30 degrees DMX Channel MY LITE X3 ILDA version without DMX 512 Control MY LITE X3 SD version 3 modes of channels 13CH 14CH 25CH MY LITE X3 FB version using Pangolin FB4 Controller please check more information in http www pangolin com Control signal DMX 512 or ILDA MY LITE X3 ILDA version without DMX 512 Control mode MY LITE X3 ILDA version ILDA Back Panel MY LITE X3 SD...

Page 5: ...h the power requirement of the product This product is Class 1 protection equipment The yellow green double colors wire must be earthed by qualified personnel Before installation ensure that the voltage and frequency of power supply match the power requirements of product In power supply and voltage fluctuation large areas we suggest you to use 110V or 220V or use voltage regulator to supply power...

Page 6: ...Y LITE X3 SD version only 1 Menu Key to return back to previous menu 2 ENTER Key to confirm the function you choose 3 UP DOWN Key to go up or down the menu 4 Invert X Y X Y axis switch 5 Safety key Turn ON OFF the laser diode 6 Inver X Y state 7 X Y Size adjusts 8 R G B Brightness adjusts 9 ILDA IN ILDA OUT ILDA signal connectors 10 ILDA state When the ILDA connector was connected this LED will ON...

Page 7: ...5 ILDA IN ILDA OUT ILDA signal connectors 6 DMX 512 IN DMX 512 OUT DMX 512 signal connectors with 3pins XLR 7 Fuse 220V 3A 8 Power Con in out Lighting Fixture s DMX and IP function set up method MY LITE X3 SD MY LITE X3 FB version only When using DMX 512 Controller to control several pieces lighting fixtures each lighting fixture must be given a DMX start address so that the correct lighting can r...

Page 8: ...ller s Output to the first lighting fixture s Input cable with a 2 core XLR signal cable Shown as above connect the first lighting fixture s Output cable to the second lighting fixture s Input cable and connect the rest light fixtures in the same way Eventually connect the last lighting fixture s Output cable to a DMX terminator Under DMX 512 signal control mode the last lighting fixture s DMX Out...

Page 9: ...5CH Channel mode setting TTLMode OFF ON Change the modulation to TTL or not Default Yes No Restitution SD Card files manufacturing process Prepare the SD Card files MY LITE X3 SD version only Create a new PESLASER folder in the SD card root directory go to the PESLASER folder and create three new folders as following ddrfiles ildfiles playlist 1 Ddrfiles folder stores DDR files and DDR files are g...

Page 10: ...f ILD files can also create a new folder but the folder cannot be in Chinese and the length of the file cannot be greater than 8 the reference is as follows create a new ildloves folder to store new ILD files 3 The PlayList folder contains the effects file eff file the list file pla file which can be opened in notepad and read as follows SD Card effects programming 1 First of all you should put th...

Page 11: ...s CH14 The effect value is the channel value so that the effect can be adjusted by DMX then the effect file will be written and saved and will be played through the laser Remark The interval comma the parentheses the two symbols cannot be reduced otherwise the effect of the lamp will be different from your design Finally add the effect file to the playlist pla and save it Insert the SD card into t...

Page 12: ...g position selection 128 255 Vertical moving speed selection CH8 Pattern zoom in zoom out 1 127 Pattern size selection 128 159 zoom out speed selection 160 191 zoom in speed selection 192 255 Zooming speed selection CH9 Pattern size 1 255 Pattern zooming size selection CH10 Pattern gradually painting 1 255 Gradually painting speed selection CH11 Scanning speed Spot effects 1 255 Scanning speed sel...

Page 13: ... 127 Pattern size selection 128 159 zoom out speed selection 160 191 zoom in speed selection 192 255 Zooming speed selection CH9 Pattern A size 1 255 Pattern zooming size selection CH10 Pattern A gradually painting 1 255 Gradually painting speed selection CH11 Pattern A Spot effects 1 255 Scanning speed selection CH12 Pattern A color 0 63 Fixed color selection 64 127 Color change speed selection 1...

Page 14: ...inting speed selection CH25 Pattern B full color 1 255 255 colors selection SD PLAY MODE CH14 CH Function of each channel DMX Data Control function CH1 Laser on off 0 29 Switch light of laser I PLAY mode 30 149 SD PLAY mode this function is invalid SD PLAY mode 150 179 Automatic under manual control CH7 CH14 are effective 180 209 Automatic display built in patterns CH7 CH14 are invalid 210 239 Sou...

Page 15: ...92 255 Zooming speed selection CH12 Pattern DR gradually painting 1 255 Gradually painting speed selection CH13 Pattern BE Spot effects 1 255 Scanning speed selection CH14 Pattern CO color 0 63 Fixed color selection 64 127 Color change speed selection 128 223 Speed selection of flow speed 224 255 Gradually painting speed selection Maintenance To prolong the life of the product it is very important...

Page 16: ...el to fix it The product can turn on but no light coming out Control mode is wrongly setting up Resetting it according to instruction book Control section is damaged Call a qualified personnel to fix it The beam appears dim The product is too hot Take ventilation measures to make it cool Note This product is under warranty for 1 year From the date of delivery 1 years after can provide paid mainten...

Reviews: