background image

MDVR81_SM 

170202 


MDVR81


Portable Digital Video Recorder 

User Guide 


V1.3 

Summary of Contents for MDVR81

Page 1: ...MDVR81_SM 170202 1 MDVR81 Portable Digital Video Recorder User Guide V1 3...

Page 2: ...installed and used in accordance with the instructions may cause harmful interference to radio communications However there is no guarantee that interference will not occur in a particular installati...

Page 3: ...different product inclusions and accessories to suit their market requirements customer demographics and geographical preferences Products very often vary between retailers especially with accessories...

Page 4: ...t complete within the specified recharging time stop further charging immediately Otherwise acid leakage overheating smoke emission bursting and or ignition can occur Do not put the battery pack into...

Page 5: ...F 0 C to 45 C Recharging at temperatures outside this range can cause acid leakage and overheating and may damage it If any fluid leaking from the battery pack contacts your skin or clothing wash it...

Page 6: ...VR81 15 Insert Remove Battery 15 Camera Power Adapter Connection 16 Prepare SDHC Memory Card 18 GETTING STARTED 20 Power On Off the DVR 20 About the Screen Language 21 Date Time Setting 21 Format SDHC...

Page 7: ...design super mini size One 1 to 2 mini A V output jack and one 3 in one A V jack provides video audio input and power secure locking waterproof design rated IP65 small size 3 98 x 2 64 x 1 02 101 mm...

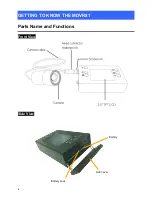
Page 8: ...8 GETTING TO KNOW THE MDVR81 Parts Name and Functions Front View Side View SD Card Slot DC Input Battery Side Cover Battery Lock...

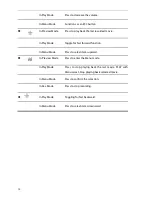
Page 9: ...ld the power button for 2 seconds to turn on off In Preview Mode Press to start recording In Play Mode Press to increase the volume In Preview Mode Press to take a snapshot Audio Video Input connect t...

Page 10: ...rward function In Menu Mode Press to select items upward In Preview Mode Press to enter the Menu mode In Play Mode Press to stop playing back the last movie PLAY with Menu select Stop playing back sel...

Page 11: ...11 Remote Control Function Description Charge the MDVR81 fully before using the remote control...

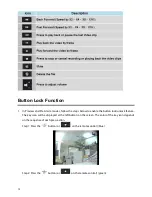
Page 12: ...enable the button lock unlock feature The key icon will be displayed at the left button on the screen The color of the key icon depends on the sequence of each press action Step 1 Press the button or...

Page 13: ...mode can still be used other buttons are disabled 3 If the Lock function is enabled under Pre Alarm mode the button can be used to trigger a Post Alarm and access Post Alarm mode LED Indicators Signa...

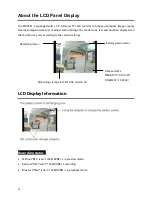
Page 14: ...text and numbers displayed on the monitor may very according to the current settings LCD Display Information Recording status Without REC icon The MDVR81 is in preview mode Red text REC icon The MDVR...

Page 15: ...emove Battery Insert the battery 1 Open the side cover 2 Place the battery downward on the battery bay 3 Carefully insert the battery pack in the orientation shown below then close the cover Remove th...

Page 16: ...battery 3 Pull the battery out of the battery bay 4 Lift the battery from the battery bay as shown in the photo Camera Power Adapter Connection Attach the camera head to the MDVR81 1 Attach the camera...

Page 17: ...remove the camera head turn the head connector lock screw counterclockwise Use power adapter to charge the battery 1 Open the side cover 2 Plug in the power adapter NOTE Do not pull out the battery It...

Page 18: ...over Turn OFF the power supply before attaching the camera head to the recorder When attaching the head connector be sure the pins mate with the holes If the head connector is forced on the camera con...

Page 19: ...19 NOTE A Toshiba or Kingston Class 10 SDHC card is recommended...

Page 20: ...era connector to the head connector on the left side the MDVR81 2 Turn the lock screw clockwise 3 Press and hold the power button 2 or 3 seconds until the LED indicator lights red and the screen appea...

Page 21: ...UAGE The default language is English 3 After completing the setup use the button or on the remote control to select SAVE then press the button or on the remote control to confirm The SETUP SUCCESSFUL...

Page 22: ...ote control to change the value then press the button or on the remote control to confirm and continue in the next field For more details on date types refer to the SYSTEM SETTING Menu DATE TIME 4 Aft...

Page 23: ...ontrol to select SYSTEM SETTING then press the button 2 Press the button or on the remote control to select STORAGE 3 Use the button or on the remote control to select FORMAT then press the button or...

Page 24: ...24 Press the button or on the remote control to cancel formatting your SDHC memory card...

Page 25: ...r the MAIN menu Use the button or on the remote control to select RECORD SETTING then press the button or on the remote control to access in menu items Step 2 Press the button or on the remote control...

Page 26: ...hen press the button or on the remote control again to enter the PLAY PICTURE screen 3 The date of captured images and the picture count is played Use the or buttons or on the remote control to select...

Page 27: ...ms 2 Using the BRIGHTNESS setting as an example press the button or on the remote control to proceed the BROGHTNESS parameter Use the or buttons or on the remote control to increase or decrease volume...

Page 28: ...AST Measures the rate of change of brightness in an image The adjustment range is from 0 100 COLOR Measures the accuracy with which the colors captured in the image match the original scene The adjust...

Page 29: ...Press and hold the power button about 2 or 3 seconds until the LED indicator lights red and the screen appears 2 In preview mode press the button or on the remote control to enter the MAIN menu then p...

Page 30: ...e remote control again to see the detailed information of each record Use the or buttons or on the remote control to select a video clip then press the button or on the remote control to start video p...

Page 31: ...play the video clip with fast forward press the button or on the remote control To play the video clip with fast backward press the button or on the remote control To return to the main menu press the...

Page 32: ...te control to enter the MAIN menu Use the button or on the remote control to select RECORD SETTING then press the button or on the remote control to access menu items 2 Press the button or on the remo...

Page 33: ...t the video photo resolution The default setting is D1 AUDIO Enable the audio with recording function The default setting is OFF ON OFF SAVE Save all the settings of each menu item Menu Item List VIDE...

Page 34: ...red pre alarm time Pre alarm time 10 20 30 40 50 60 SEC POST ALARM Set the required post alarm time Post alarm time 10 20 30 40 50 60 70 80 90 100 110 120 SEC SAVE Saves all settings of each menu item...

Page 35: ...default is ON ON OFF BEEP For an audible indication when you press any button The default is ON ON OFF LANGUAGE Sets the language that is displayed on the LCD monitor ENGLISH DATE TIME This sets the...

Page 36: ...n DEFAULT Return all basic settings to the default setting of the MDVR81 Camera Brightness Contrast Color Hue 50 AUTO REC ON FPS 30 RESOLUTION D1 AUDIO OFF VIDEO LOSS ON PRE POSTALARM FUNCTION OFF PRE...

Page 37: ...charge the battery Unplug the AV cable then confirm the LCD monitor is functional Set the LCD SLEEP to 00 Q 3 Why can t a video clip be played A 3 It may be because you did not insert the SDHC memory...

Reviews: