background image

Assembly and Use

The steam cleaner is designed for cleaning 
bathrooms, toilets and kitchens, as well as most 
other smooth surfaces. Hot steam cleans as it 
dissolves oily and greasy substances.

Before first use, the unit should be cleaned as 
described in Maintenance Section.
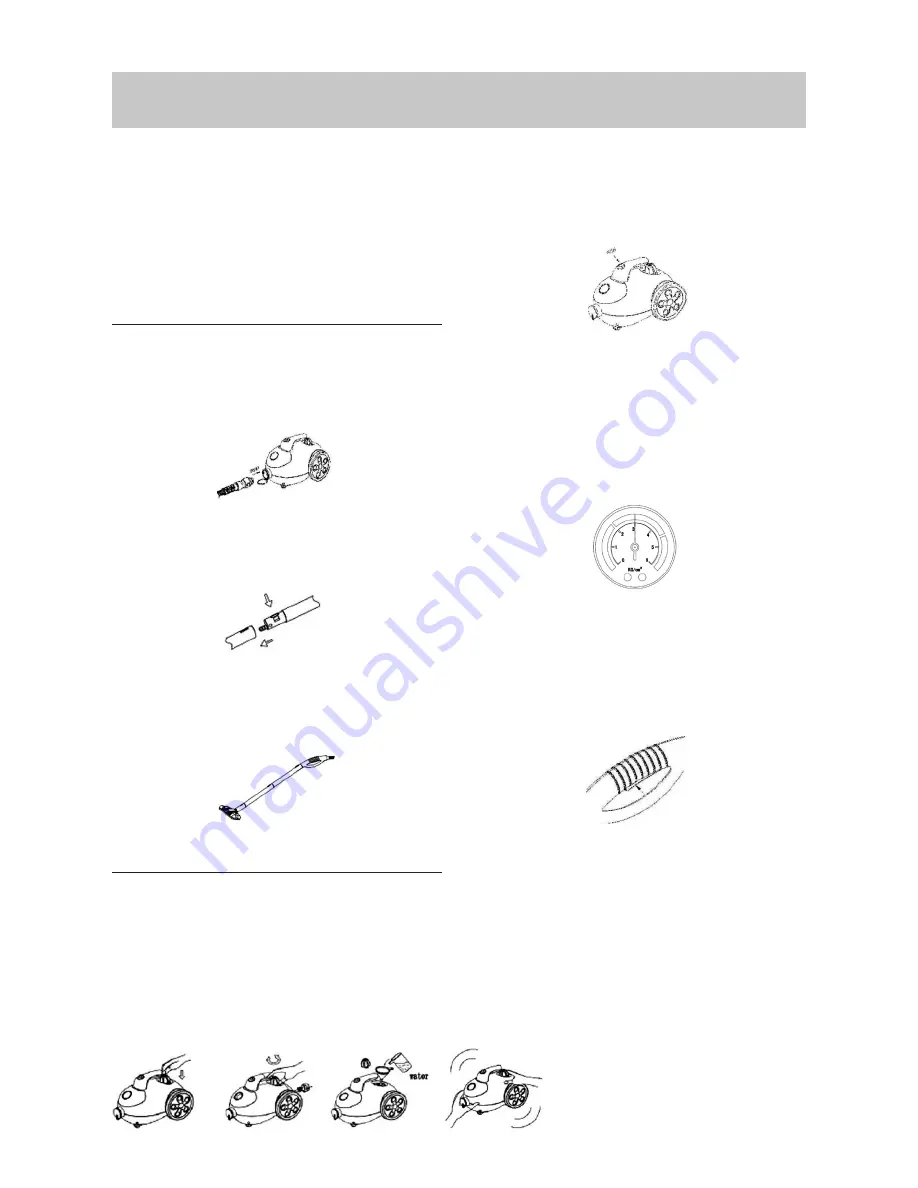
Assembly

a. 

Connect the flexible hose into the steam 
outlet by lining up the outlet nozzle and firmly 
pushing in place. You will hear a click when 
correctly assembled (fig. 1).

b. 

Gently push in the assembly button and insert 
the steam handle into the corresponding hole on 
the extension tube until it slides into place (fig. 2).

c. 

Assemble the extension tube and mop head 
or steam jet nozzle in the same way (ensure 
the assembly button clicks to secure in place) 
(fig. 3).

Using the Appliance

a. 

Place the steam cleaner on a flat surface. 

b. 

Open the safety filler cap by turning it in an anti 
clockwise direction, fill water into the water tank 
(suggest to fill in 500ml water), then tighten in a 
clockwise direction (fig. 4-7). 

Note:

 Do not overfill the water tank and only fill 

with tap or distilled water.

c. 

Ensure the required accessories are correctly 
assembled.

d. 

Insert into the power socket, then press the 
on/off switch. The red light will illuminate (fig. 8).

e. 

Wait for 6-7 mins, when the pressure guage 
reaches 3bar (the number 3 on the dial) (fig. 9), 
it’s ready to use. Push the steam release button 
under the steam nozzle handle (fig. 10). 

Note:

 If the steamer is left unused for a few 

minutes, the steam in the hose will cool down 
and become water. The initial steam release 
may drip, start over a sink or paper towel.

f. 

When finished, steam must be released from 
the boiler. Press the on/off switch to turn the 
steamer off, the red indicator light will turn off. 
Pull out the power cable, then release all the 
steam inside the boiler until the pressure gauge 
indication is zero by pressing and holding the 
steam release button (fig. 10).

g. 

Leave the steamer to cool before storing or 
performing any maintenace duties.

fig. 3

fig. 4

fig. 5

fig. 6

fig. 7

fig. 2

fig. 1

fig. 8

fig. 9

fig. 10

Summary of Contents for YQ-688

Page 1: ...Instruction Manual YQ 688 ZW 9006A Bagless Specification Parameters Rated Voltage 220 240V Rated Power 1400W Rated Frequency 50Hz Pressure 3 Bar Net Weight 4 6kg Multi Steamer 1400w ...

Page 2: ...rom heated surfaces 10 Do not unplug by pulling on the power cord To unplug grasp the plug not the power cord Do not use extension cords or outlets with inadequate current carrying capacity 11 Do not handle plug or steamer with wet hands or operate appliance without shoes 12 Do not put any objects into openings Do not use with any opening blocked 13 Do not put hands or feet under the hand steamer ...

Page 3: ...proceeding We also recommend that you check the use and care instructions from the floor manufacturer IMPORTANT Do not store the unit with damp wet micro fibre cleaning pad attached Never leave the steamer in one spot on any surface for any period of time with a damp or wet micro fibre cleaning pad attached as this will damage your floors WARNING Danger of Scalding Please use caution when using th...

Page 4: ...st to fill in 500ml water then tighten in a clockwise direction fig 4 7 Note Do not overfill the water tank and only fill with tap or distilled water c Ensure the required accessories are correctly assembled d Insert into the power socket then press the on off switch The red light will illuminate fig 8 e Wait for 6 7 mins when the pressure guage reaches 3bar the number 3 on the dial fig 9 it s rea...

Page 5: ...service agent or qulified technician Due to our program of continuous product improvement and innovation sometimes the product you buy may differ slightly from the one shown on the product carton PROBLEM POSSIBLE REASONS SOLUTIONS No steam is being released No power Verify that the socket outlet is operating and cleaner is plugged in No power Verify the on off switch is in the On position There is...

Page 6: ...tions If International Cleaning Solutions decide to repair or replace the cleaner it will do so at its own cost International Cleaning Solutions is unable to accept responsibility under this warranty for any repair work not carried out by an authorised International Cleaning Solutions Service Agent or from the use of non genuine parts If any part is no longer available or manufactured Internationa...

Page 7: ...SUPERHERO STEAM MOP 07 This page intentionally left blank ...

Page 8: ... 688 International Cleaning Solutions Pty Ltd ABN 24 119 462 798 Level 1 Building 2 Brandon Business Park 530 Springvale Road Glen Waverley Vic 3150 Customer Care 1800 815 270 Made in China V1 0712 Multi Steamer 1400w ...

Reviews: