background image


Premier VS Infrared Heating System   

Page 73   

June 04, 2014 

PARTS 

Part No. Description

Part No. Description

VT001

VS


COMBUSTION


TUBE,


4"


OD

CT002

TUBE,


4"OD


HR

CT001

TUBE,


4"


OD,


HEAT


TREATED


ALUM.

CT012

TUBE,


4"OD


ALUMINIZED


NHT

CT010

ELBOW,


90


DEG,


4"


OD

CT055

ELBOW,


4"OD


x


45


DEGREES

CT020

U

TUBE,


4"OD


on


10"


RADIUS


(ROUND)

CT050

TEE,


4"


DOUBLE


SWEPT

CT021

TEE


FITTING,


4"OD


SQUARE

CT051

TEE,


4"


SINGLE


SWEPT

CT022

CROSS,


4"


O.D.


ALUMINIZED

VT001S

SHORT


COMBUSTION


TUBE


VS

CR010

COUPLING


ASS'Y


4"


ALUMINIZED

VS016

END


VENT


CAP

CT038

TUBE,


5"OD

CH010

TURNBUCKLE

CT040

ELBOW,


90


DEG,


5"OD

CR003

HANGER,


TUBE


&


REFLECTOR

CT052

TEE,


5",


SINGLE


SWEPT

CR024

REFL.


BRACKET


&


CLIP


SET

CT039

TEE


FITTING,


5",


DOUBLE


SWEPT

CR001

REFLECTOR


124"

CT056

CROSS,


5"OD,


SQUARE

CR002

END


CAP

CT078

CROSS,


5"


OD,


DOUBLE


SWEPT

CS005

4"


AIR


INLET


HOOD

CT041

REDUCER


6"

5"


w/PS


NIPPLE

CR015

DAMPER


COUPLING,


4"

 ‐ 

MANUAL

CT042

REDUCER,


5"

4"


ALUMINIZED

CR025

HANGER


STRAP,


4"


OD


TAILPIPE

CR028

COUPLING


5"


DIA

VH044

CONDENSATE


TRAP


ASSEMBLY

CR070

DAMPER


COUPLING,


5"

 ‐ 

MANUAL

CR029

HANGER


STRAP

 ‐ 

5"


TAILPIPE


CR039

REFLECTOR


KIT

 ‐ 

MITERED


90


DEGREE

VR003

BURNER


REFLECTOR


KIT

VT003

S/S


COMBUSTION


TUBE


VS

CT030

S/S


RADIANT


TUBE


CR019

SIDE


REFLECTOR

CR005

S/S


COUPLING


ASS'Y,


4"


CR016

BRACKET


ASS'Y


(for


SIDE


SHIELD)

CR027

S/S


COUPLING


LINER

CR035

RETAINER


CLIP

SIDE


SHIELD

CR047

S/S


DAMPER


COUPLING

 ‐ 

MANUAL

CR032

S/S


REFLECTOR

CR018

BOTTOM


REFLECTOR/SHIELD

CR033

S/S


SIDE


REFLECTOR

CR017

SUPPORT


ASS'Y


(for


BOTTOM


SHIELD)

CT032

TUBE,


COATED


INSIDE


ONLY

CR051

DECORATIVE


GRILLE


15"


x


60"


x


.5"

CT033

TUBE,


COATED


INSIDE


&


OUT

CR052

DECO


GRILLE


SUPPORT


60"

VT004

COMBUSTION


TUBE


VS


COATED


INSIDE

CR053

DECO


GRILLE


CROSS


STRAP


15"

VT005

COMBUSTION


TUBE


VS


COATED


IN


&


OUT

CR054

DECO


GRILLE


END


ANGLE


15"

CT034

ELBOW


90


DEGREE,


COATED


INSIDE

CT035

ELBOW


90


DEGREE,COATED


INSIDE


&


OUT

CR026

DECO


GRILLE


PANEL


24"


x


48"

CT036

TEE,


4"


SQUARE


COATED


INSIDE

CS059

DECO


GRILLE


SIDE


SHIELD

CT037

TEE,


4"


SQUARE


COATED


INSIDE


&


OUT

CR053

DECO


GRILLE


CROSS


STRAP


15"

CR054

DECO


GRILLE


END


ANGLE


15"

VT013

MOTORIZED


DAMPER


4"


Dia.

CS027

T

BAR


SHIELD

VT014

MOTORIZED


DAMPER


5"


Dia.

Stainless


Steel


(S/S)

Coated


Tubes

MODULATING


SYSTEM


COMPONENTS

SPECIALTY


TUBING


COMPONENTS

COMMON


COMPONENTS

Side


Reflecter


Components

Bottom


Shield


Components

DECO

GRILLE


Components


(Suspended


from


Heater)

DECO

GRILLE


Components


(Suspended


Ceiling)

OPTIONAL


SIDE


SHIELD


EQUIPMENT

5"


Tailpipe

Table K:  Main System Component Parts List 

Summary of Contents for Premier VS

Page 1: ...ntenance can cause injury death or property damage Read the installation operating and maintenance instructions thoroughly before installing or servicing this equipment AVERTISSEMENT Une installation...

Page 2: ...or explosion hazard CAUTION FIRE OR EXPLOSION This heater is equipped with an automatic ignition device Do not attempt to light the burner by hand Failure to comply could result in a serious fire and...

Page 3: ...es 23 B Tailpipe Tubes 28 C Burners 29 D Reflectors 33 E Optional Shield Equipment 37 F Deco Grille Option 41 Part 2 Vacuum Pump Venting 43 A Vacuum Pump Mounting 44 B Ventilation Connections 48 C Add...

Page 4: ...s are specially engineered built for the individual Positions they are installed in along each Branch Burner Rate BTU hr is determined by the Vacuum Setting of the Branch Rates can be adjusted by chan...

Page 5: ...Repair Garages NFPA 88B in the US and CAN CGA B149 1 B149 2 in Canada Parking Structures Technical requirements are outlined in the Standard for Parking Structures ANSI NFPA 88a in the US and CAN CGA...

Page 6: ...t L i n e Burner 1 Combustion Tube Burner 1 Coupling R a d i a n t B r a n c h A Burner 2 R a d i a n t L i n e R a d i a n t B r a n c h B Burner 2 Reducer Flexible Boot T a i l p i p e D a m p e r...

Page 7: ...i a n t B r a n c h B R a d i a n t L i n e R a d i a n t B r a n c h A Coupling Burner 1 T a i l p i p e T a i l p i p e D a m p e r C o u p l i n g s Burner 2 R a d i a n t L i n e Combustion Tube...

Page 8: ...0 2cm Vacuum Switch Reducer w Vacuum Switch 4 10 2cm Or 6 15 2cm Tubes 4 10 2cm 5 12 7cm Tube U Bend 4 10 2cm 16 40 6 cm 16 40 6 cm 20 50 8 cm 12 30 5 cm 16 40 6 cm 6 15 2 cm 12 30 5 cm 12 30 5 cm 7 4...

Page 9: ...61 cm 16 40 6 cm 17 43 cm Tube Elbow 5 12 7cm 4 10 2cm 17 43 cm 4 10 2cm 16 40 6 cm 28 71 cm Side Reflector 15 5 39 4 cm 25 63 5 cm 17 43 cm 5 12 7cm 5 12 7cm 17 43 cm 29 74 cm 10 25 4 cm Bottom Shie...

Page 10: ...120 VAC 60 Hz 0 2 Amp 36 0 9 m cord connecter with grounded 3 prong plug Flue and Outside Air Connection 4 type C duct for flue adaptor and outside air optional provided at the heater Natural Gas Min...

Page 11: ...bel CL034 Burner Rating Plate VL007 Warning Diagram UL007 O P E N I N S I D E o f P A N E L Manufacturer s Logo SRP Wiring Diagram VL008 Venting Label VL005 Clearance Label VL002 Burner Rate Chart VL0...

Page 12: ...llation Operating and Maintenance Instructions thoroughly before installing or servicing this equipment AVERTISSEMENT For use with natural gas or propane A conversion kit as supplied by the manufactur...

Page 13: ...orifice LP Gas requires No K drill size orifice A conversion kit as supplied by the manufacturer shall be used to covert to the alternate fuel A flow plate appropriate to the position of the burner i...

Page 14: ...UH See Manual for Complete Details NOTES 29 26 23 21 B 34 32 C FIG 1 B FIG 4 A D D C C FIG 2 B 21 74 D A 23 79 FIG 3 C B 26 82 A 29 86 FIG 4 C D B 32 89 34 92 for space heating applications inches MIN...

Page 15: ...60Hz 1A MODEL NO No modele ELECTRICAL RATING Class electrique LIGHTING INSTRUCTIONS I I SHUT DOWN INSTRUCTIONS E S D T C E R U S Patent 5 842 854 G N F I D E Press d alimentation MIN SUPPLY PRESSURE R...

Page 16: ...AC 60Hz 1 PH 0 75 HP Tube Connection 6 dia Inlet 4 dia Outlet Figure 7 Vacuum Pump A Available in RH or LH Style 7 73 7 13 18 1 8 38 21 3 4 25 10 8 4 0 10 2 8 78 19 6 22 3 8 12 20 6 Dimensions Inches...

Page 17: ...VAC 60Hz 3 PH 1 5 HP Tube Connection 6 dia Inlet 6 dia Outlet Figure 8 Vacuum Pump B Available in RH or LH Style 10 01 25 4 9 03 22 9 8 24 20 9 11 02 28 0 6 0 15 2 2 97 7 5 8 79 22 3 Dimensions Inches...

Page 18: ...d fire retardant treated or plastered The stated clearance to combustibles represents a surface temperature of 90 F 50 C above room temperature Building materials with low heat tolerance such as plast...

Page 19: ...8 199 206 211 59 64 67 72 75 77 150 163 170 183 191 196 4 4 6 6 6 6 10 2 10 2 15 3 15 3 15 3 15 3 4 4 6 6 6 6 10 2 10 2 15 3 15 3 15 3 15 3 73 77 80 84 87 89 186 196 204 214 221 226 49 52 54 56 58 60...

Page 20: ...in the Equipment Specifications section If possible lay the entire system out on the floor prior to installation This will help identify any potential problems with the installation as well as any di...

Page 21: ...in Radiant Branch Total Output for Branch MBTU hr Minimum Tailpipe for Branch ft m minimum tailpipe length must be increased by 50 3 2 3 2 Burner Input Rate at each Position MBTU hr OR 3 If result is...

Page 22: ...ncrements of Tube and Reflector can be used until one reaches the Common Tailpipe areas or Vacuum Pump connections The general order of material in this manual is recommended for low hassle installati...

Page 23: ...tallation NOTE The Premier VS System does not typically require the use of Baffles if Baffles are desired please consult with the Manufacturer SRP prior to installation A Radiant Line Tubes 1 Locate h...

Page 24: ...aps with screws Reflector End Cap Tight Screws Loose Screws Reflector overlap approx 4 Secure every second reflector overlap with 8 3 8 screws Burner 2 Coupling Install the J bolts in the hangers imme...

Page 25: ...1 below Figure 11 End Vent Cap Orientation Concrete Beam Beam Clamp Turnbuckle 24 Min 3 8 Threaded Rod I Beam I Beam Anchor 12 Min S Hook Note Close all S Hooks Turnbuckles J Bolts 12 Min Truss Eye Bo...

Page 26: ...ustion Tubes have the Burner mounting hole positioned at 12 o clock and facing downstream Refer to Figure 17 4 Join consecutive pieces of Tube using Couplings Insert one end of both Tubes fully into t...

Page 27: ...ready for Burner installation s Figure 14 View of System after Installation of Radiant Line Tubes Combustion Tube VT001 Radiant Tube CT001 or CT002 Reflector Hanger CR003 Combustion Tube VT001 Turnbuc...

Page 28: ...ch Branch Symmetric Identical Branches require the same Vacuum setting so One Damper coupling is located before the Tailpipe splits into separate Branches Non Symmetric Branches require a separate Dam...

Page 29: ...furthest end of the branch from the Vacuum Pump and the Burner number increases as the branch runs towards the Vacuum Pump As shown in Figure 16 referred to in your System Design Layout Each Burner is...

Page 30: ...nger after a Burner mounting hole location This prevents the Tube from twisting rotating once the Burner is installed Refer to Figure 9 and Figure 17 2 J bolts must be installed before the Reflectors...

Page 31: ...hold it in place on the underside of the Burner Casting during installation 2 Align Fasten Burner to Combustion Tube with U Bolts DO NOT over tighten the nuts on the U bolts this damages the Combustio...

Page 32: ...ts Burner 1 Burner 2 Secure Burner With U bolts Install J bolts only in the Hanger immediately following a Burner Ensure there is a Hanger a Max of 8 from the Front of each Burner J bolt J bolt T o T...

Page 33: ...in the Reflector run allows unimpeded installation and servicing of the Burner 4 Install Reflector Brackets Place one at each Reflector overlap position and one in the middle of each 10 ft 3 m Reflect...

Page 34: ...f first Reflector Reflector CR001 CR032 Reflector End Cap CR002 Reflector Bracket Clip Sets CR024 Spring Clip Secure support with 8 x 3 8 screws and tighten firmly where required Reflector Bracket Det...

Page 35: ...8 x 3 8 screws on the open end of the Reflector which will be under the Burner at the end of the Reflector run Burner Reflectors are for use instead of End Caps If Burner Reflectors for Continues Refl...

Page 36: ...all Reflectors O V E R U N D E R O V E R Overlap Reflectors as shown Tight Screws Reflectors CR001 CR032 overlap approx 4 Loose Screws Tighten Reflector Bracket screws 8 3 8 x 1 1 4 on every second R...

Page 37: ...r Reflectors are installed after the Burner installation and before during assembly of the main Reflector run All pieces are connected using 8 x 3 8 Screws The Side pieces and End Sections are install...

Page 38: ...screws through one Side Segment into one End Cap Position under Burner Attach second End Cap to first Side Segment Attach second Side Segment to both End Caps Base of Burner Reflector is now assemble...

Page 39: ...main Reflector tightly with 8 x 3 8 screws spaced about 18 0 5 m apart Install three 3 Side Reflector Brackets per Side Reflector spaced about 48 1 2 m apart using 8 x 3 8 screws DO NOT tighten screws...

Page 40: ...igure 27 Side Reflector Installation Detail Reflector Hanger 8 x 3 8 Screw 8 x 3 8 Screw Reflector 8 x 3 8 Screws Notch the Side Reflector for Reflector Brackets and Hangers Reflector Screws to be ins...

Page 41: ...m is above the ceiling structure Refer to Figure 28 and Figure 29 below for their respective details Figure 28 Deco Grille Mounted Directly To Heater Notch Deco Grille Support for Hangers Supports Ref...

Page 42: ...rt 1 Figure 29 Deco Grille Mounted With T Bar 2 Min Reflector Hanger T bar T bar Suspended Ceiling Notch Side Shield as required for Reflector Brackets and Hangers CR027 T bar Shield CR059 Side Shield...

Page 43: ...der placing the Pump somewhat off past the centerline of the connecting Tailpipe so that as the system grows the Flexible Boot Connection in fact improves performance Safety Warnings Confirm that the...

Page 44: ...ly 3 Install using the Vacuum Pump Mounting Kit if purchased Chain threaded rods for ceiling mounting are NOT included in package 4 Ensure elevation of Inlet will allow for the alignment of the Tubing...

Page 45: ...mp Suspension Isolators Mount bracket to wall with suitable fasteners VH010 Mounting Kit When suspending from ceiling add threaded rod to prevent horizontal movement of pump Turnbuckles for height adj...

Page 46: ...gravity opening to a building Discharge must be at least a specified distance from any opening through which vent gases can enter a building Venting must terminate beyond any combustible overhead and...

Page 47: ...per Vacuum Pump Outlet Sealant RTV Silicone Fasteners Minimum of Two 2 sheet metal screws 8 x 3 4 per joint For specific Part Numbers of Wall Vent connection pieces see Figure 33 OR the listing in th...

Page 48: ...two Use the Silicone Connector Boot to connect the Vent Pipe to the Vacuum Pump Outlet Refer to Figure 33 or Figure 34 respectively for mounting type details Fasten To Ceiling Bolts Approved Thimble...

Page 49: ...sing high temperature Silicone Sealant RTV Silicone 4 Where condensing designs are specified a Condensate Drain may be installed as shown in Figure 36 Ensure connection to Drain Pipe is flexible to al...

Page 50: ...cked with the Vacuum Pump details can be found in Electrical Connections A Combustion Air Supply Duct Connections 1 Install Blower if required 2 Install Combustion Air Supply ductwork and Damper Coupl...

Page 51: ...ompleted Burners must be isolated from any pressure testing in excess of psi 3 5 kPa Failure to comply may expose the Burner components to damaging high pressure requiring replacement of key component...

Page 52: ...s Figure 39 Connector Installation Details 3 7 62 cm Max Displacement 12 30 cm Heater Movement Vertical As Shown Below Alternate Positions Okay END VIEW Air Flow Direction CORRECT POSITIONS INCORRECT...

Page 53: ...mostat for better control of heat levels and fuel usage Thermostats must be located mounted within the operting heat envelope of the Radiant Line Branch being controlled Thermostats must be protected...

Page 54: ...panel door on the Burner Cover Burners are connected via a standard three prong plug grounded which has a Power Cord length of 3 ft 90 cm and extends from the back of the Burner Any repair replacement...

Page 55: ...e Vacuum Pump 1 Mount the Vacuum Switch and make the connections to the Blower as required See Figure 42 below for details Ensure that field wiring maintains the required clearances when being routed...

Page 56: ...Air Blower Connection Diagram Part VE007 Vacuum Switch SPDT C R Y G W 1 5 4 2 COIL Black Black COIL 3 6 115V 60 HZ 15 A Supply Voltage 115 VAC 1 3 HP 1 PH Fresh Air Blower White Red Transformer Relay...

Page 57: ...l Panel according to the device OEM Manual as required for the Heating Zone system Plan Layout 6 Mount position the Vacuum Switch onto the Radiant System as shown in Figure 35 Connect the Vacuum Switc...

Page 58: ...CE046 Transformer Red Red White Neutral VS Burners White 1 PH Vacuum Pump Motor OR 3PH Motor Starter Hot Supply Voltage 120 V 60 HZ White Black Thermostat 6 3 COIL Black Black COIL 2 4 5 1 t W G Y R C...

Page 59: ...DT TRANSFORMER DPDT RELAY P N CE047 TRANSFORMER THERMOSTAT ZONE 2 t 120V 60 HZ SUPPLY VOLTAGE 1 PH VACUUM PUMP MOTOR OR 3PH MOTOR STARTER AIR SWITCH PURPLE ZONE 2 VS BURNERS NEUTRAL VS BURNERS ZONE 1...

Page 60: ...Burners Zone 2 To 24V Relays in VS Burners Zone 3 To 24V Relays in VS Burners Zone 4 24 Volt AC SE010 24 Volt 100VA Transformer Mounted Externally 115V 60 Hz Grounded Supply VE007 N O Vacuum Proving S...

Page 61: ...rs Zone 1 To 24V Relays in VS Burners Zone 2 To 24V Relays in VS Burners Zone 3 24 Volt AC 115V 60 Hz Grounded Supply VE007 N O Vacuum Proving Switch At The Pump To DI1 CM Of VFD VE093 Relay Boards CO...

Page 62: ...urners Zone 2 To 24V Relays in VS Burners Zone 3 24 Volt AC 115V 60 Hz Grounded Supply VE007 N O Vacuum Proving Switch At The Pump To DI1 DI2 CM Of VFD VE093 Relay Boards CONTROL PANEL CM DI1 T3 T2 T1...

Page 63: ...pe section of the system and used in the 10 ft 3 m following all Burners with a rating of 150 000 BTU HR or higher Ensure that Tubes are fully inserted in the Couplings and tightened with band clamp h...

Page 64: ...k up gas pressure is not above 14 in W C 3 Set all thermostats below room temperature and turn ON main power no part of the System should be energized 4 Check each Radiant Branch in each Zone in seque...

Page 65: ...ted 6 Shut down the System 7 Turn ON the Gas Supply 8 Turn up the Thermostat s to start the System and let it run with Burners operating for at least 30 minutes 9 With a manometer check the vacuum at...

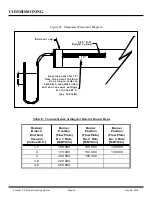
Page 66: ...cap 12 0 25 O D R idgid Tubing H Inches W C Figure 48 Manometer Placement Diagram Radiant Branch End Vent Vacuum Inches W C Burner Position Flow Plate No 1 Rate MBTU hr Burner Position Flow Plate No...

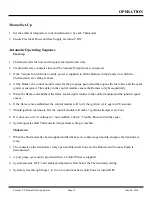
Page 67: ...e is established the flame sensor signal returns to the control module and the ignition spark ceases 6 If the flame is not established the control module will re try the ignition cycle again in 30 sec...

Page 68: ...s Set spark gap at 0 125 3 175 mm and clean the electrodes 3 Verify that flame observation glass is clean free of cracks and airtight 4 Inspect air filter Change as necessary 5 Observe each flame thro...

Page 69: ...as required to avoid obstructions 2 Check that Flexible Boot Connectors are without cracks kinks or leaking connections 3 Ensure that the Vacuum Pump and motor mounting bolts are tight 4 Make a visual...

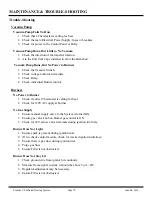
Page 70: ...ividual Burner control Burners No Power to Burner 1 Check if correct Thermostat is calling for heat 2 Check for 120VAC supply at Burner No Gas Supply 1 Ensure manual supply valve to the System is turn...

Page 71: ...ADAPTOR AND GASKET AIR 6 VH001 COMBUSTION AIR FILTER 7 CH007 VALVE TRAIN GASKET BURNER MOUNT 8 VG016 BURNER HEAD ASSEMBLY ELECTRODE INCLUDED 9 CE008 TRANSFORMER 10 CE056 CONTROL MODULE FENWAL 11 CE010...

Page 72: ...No Description CG022 GAS FLEX CONNECTOR 36 x 1 2 dia CG024 GAS FLEX CONNECTOR 36 x 3 4 dia CG011 SHUT OFF VALVE for gas flex 1 2 CG028 SHUT OFF VALVE for gas flex 3 4 Part No Description CT011 VENT TE...

Page 73: ...T VT003 S S COMBUSTION TUBE VS CT030 S S RADIANT TUBE CR019 SIDE REFLECTOR CR005 S S COUPLING ASS Y 4 CR016 BRACKET ASS Y for SIDE SHIELD CR027 S S COUPLING LINER CR035 RETAINER CLIP SIDE SHIELD CR047...

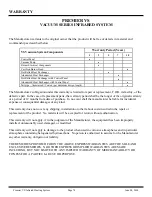
Page 74: ...r a period of 12 months from date of purchase In no event shall the manufacturer be liable for incidental expense or consequential damages of any kind This warranty does not cover any shipping install...

Reviews: