background image

H07023380 / DT2000477-03

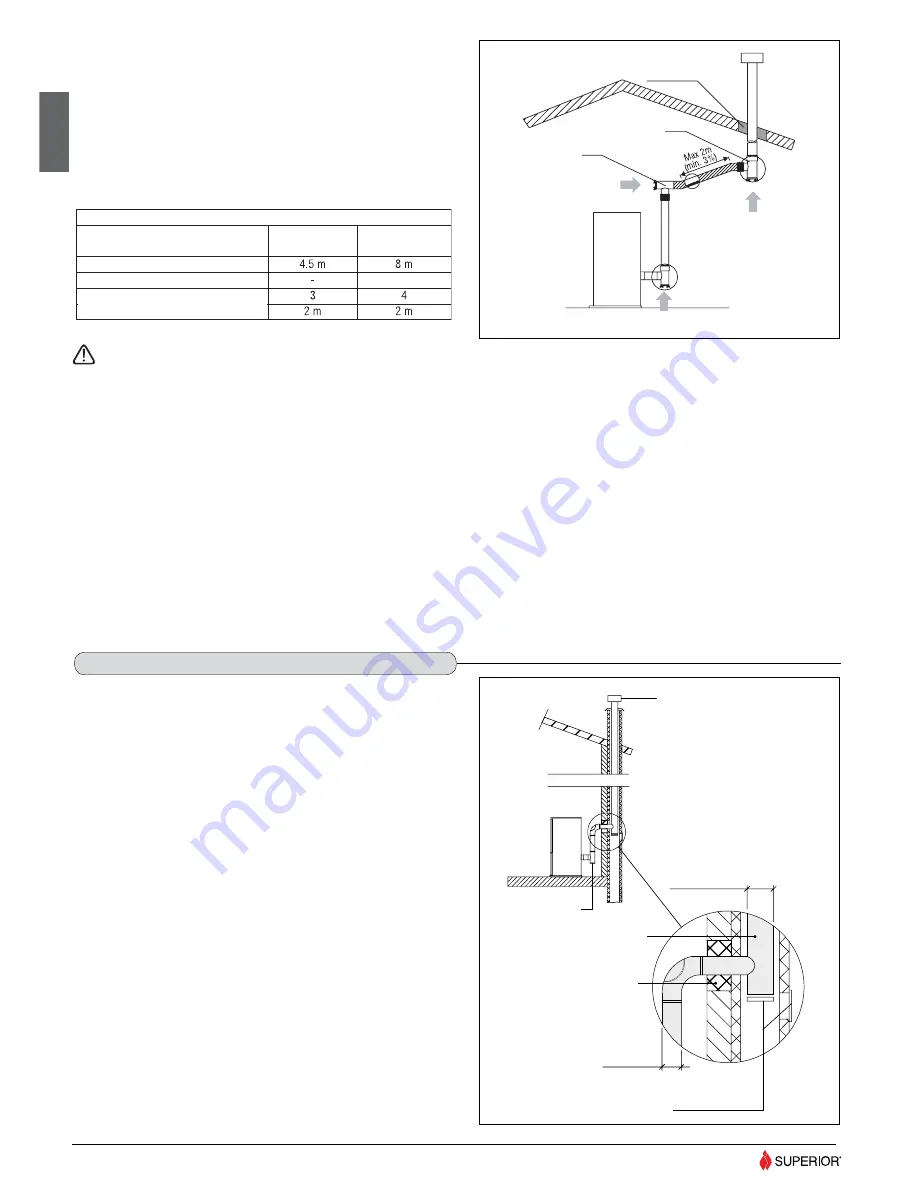
Pipes and maximum usable lengths

Pipes of painted aluminium-clad steel (minimum thickness 1.5mm), stainless 
steel (AISI 316) or enamelled steel (minimum thickness 0.5mm) with a 
nominal diameter of 80 or 100 mm (for pipes which run inside the fl ue 
maximum diameter 150 mm) can be used.
The male-female connectors must have a minimum length of 50 mm.
The diameter of the pipes depends on the type of installation. The stove was 
designed to take 80 mm diameter pipes but, as shown in Table 1, in some 
cases the use of double-lined 100 mm diameter pipes is recommended.

Fig. 20

10

English

DT2030338-00

If you wish to use an existing chimney it is strongly recommended that 
you have it checked by a professional chimneysweep to ensure that it is 
completely airtight. The reason for this is that the smoke, because it is 
slightly pressurised, can infi ltrate any cracks in the fl ue and escape into 
living spaces. If upon inspection you fi nd that the chimney is not completely 
sound, it is recommended that you insert piping made of new material. If the 
existing chimney is wide enough we recommend a pipe with a maximum 
diameter of 150mm. It is also recommended that you insulate the chimney 
fl ue (Fig. 21 - 22).

Pipes and bends made by the factory are recommended for connection to the 
fl ueway, since they are sized to fi t the fl ue outlet of the appliance.
Other pipes may be applied after adaptation and checking of the compatibility 
of the coupling, taking into account that the pipes and bends must be made 
in compliance with current regulations. In this case, however, the factory only 
guarantees trouble-free operation for parts that it manufactures and that are 
used according to specifi cations.

1.10  CONNECTING TO A CONVENTIONAL CHIMNEY

DT2010230-02

Losses in pressure associated with a 90° bend can be compared to those incurred by one metre of pipe. An inspectable union-tee can be 
considered equivalent to a 90° bend. 

EXAMPLE:

 if installing a section greater than 4.5m in length with 80mm diameter pipe, calculate the maximum usable length in the following ways:

- If a maximum of 

three 90° bends

 are used, the maximum length of the section will be 

4.5m

.

- If a maximum of 

two 90° bends

 are used and bearing in mind that a 90° bend can be replaced by one metre of pipe, the maximum length of the section 

will be 

4.5m+1m=5.5m

.

- If a maximum of one 90° bend is used and bearing in mind that a 90° bend can be replaced by one metre of pipe, the maximum length of the section 
will be 

4.5m+1m+1m=6.5m.

Where 100mm diameter pipe must be used, connect it to the stove fl ue outlet with a 80mm union-tee then use a 80mm 100mm adaptor (not supplied by 
Superior) (Fig. 19).

Union-tee

The use of this type of fi tting must allow for the collection of condensate mixed with soot, which builds up inside the pipe. It must also permit periodic 
cleaning of the fl ue without the need to disassemble the pipes. This type of fi tting can be bought at Superior retail outlets together with the pipes. An example 
is given below of a fl ueway connection, which allows complete cleaning without having to disassemble the pipes (Fig 20). 

COMIGNOLO

RACCORDO A T

Ø 80 mm

ISOLANTE

Ø 150 mm MAX

INSERIMENTO DI UN TUBO

SPORTELLI PER

ISPEZIONE

CON CANNA FUMARIA

NON INTEGRA

Fig. 21

DT2030339-01

INSULATING 
MATERIAL

DIRECTION OF 

CLEANING

DIRECTION OF CLEANING

TEE

TEE

DIRECTION OF 

CLEANING

TABLE 1 – LENGHT PIPES

TYPE OF INSTALLATION

WITH 80mm 

DIAMETER PIPE

WITH DOUBLE-WALLED 

100mm DIAM. PIPE

required

Maximum length (with three 90° bends)
For installations more than 1200m above sea level
Maximum number of bends
Length of horizontal sect. w/ minimum 3% gradient

CHIMNEY STACK

WITH DAMAGED FLUE

TEE

PIPE INSERTION

INSULATING MATERIAL

INSPECTION
WINDOWS

Summary of Contents for MONIA

Page 1: ...H07023380 DT2000477 03 English Pellet stove INSTRUCTION FOR INSTALLATION USE AND MAINTENANCE Il manuale di istruzioni è parte integrante del prodotto MONIA ...

Page 2: ...he instructions for installation use and maintenance given in this booklet or due to unauthorised alterations or to the use of other than original spare parts Appliance installation and use must conform with the manufacturer s instructions as well as with European and national legislation and local regulations Installation electrical connection checks maintenance and repairs are operations which m...

Page 3: ...fety devices 31 6 13 Stove status 33 6 14 Opening th door 33 6 15 Humidifier optional 34 6 16 Disposal of ashes 34 7 0 MAINTENANCE 35 7 1 Cleaning the grate and the grate support 35 7 2 Cleaning the ash tray 35 7 3 Cleaning the firebox 36 7 4 Cleaning the smoke chamber 36 7 5 Cleaning the flue system 36 7 6 Cleaning the ceramic cladding 36 7 7 Cleaning the enamelled metal parts 37 7 8 Cleaning the g...

Page 4: ...r product conforms to all the indications given below Fig 1 4 DT2010216 05 English DT2030321 00 CHIMNEY STACK FLUEWAY CONNECTION TO FLUE SOOT REMOVAL INSPECTION HOLE FRESH AIR INTAKE CHECK OF FLOOR LOAD BEARING CAPACITY MINIMUM SAFETY DISTANCES END ELBOW WITH INSPECTION WINDOW ...

Page 5: ...ed corners with a radius of at least 20mm and a maximum ratio between the sides of 1 5 Fig 3 4 5 The walls must be smooth if possible and without narrowing Bends must be regular and without discontinuity Fig 6 It is forbidden to make fixed or mobile apertures on the flue pipe to connect appliances other than the one to which it is already connected It is forbidden to pass other air ducts or servic...

Page 6: ...en below 6 8 metres from any buildings or other obstacles that are higher than the chimney stack 50 centimetres higher than any obstacles located at a distance less than 5 metres outside the reflux area The size and shape of this area differ according to the angle of inclination of the roof and it is therefore necessary to adopt the minimum heights shown below Fig 9 Fig 8 B equivale al doppio di A ...

Page 7: ...ined in different ways through a fresh air intake direct into the room of installation Fig 12 with ducting through pipes direct to the room of installation increasing the recommended minimum free cross section by at least 15 Fig 13 from an adjacent room to the place of installation provided this air flows freely through permanent apertures communicating with the outside Fig 14 15 The adjacent room...

Page 8: ...a correct check and calculation of the requirement of the environments to be heated see REFERENCE STANDARDS 1 6 LOAD BEARING CAPACITY OF THE FLOOR DT2010032 00 1 7 HEATING CAPACITY DT2010130 01 8 English The appliance should be installed in a location which allows safe and convenient use as well as easy maintenance If the product being installed requires an electrical socket the room must also be ...

Page 9: ...greater distances than those indicated above be left all round the stove to make any necessary work on the appliance easier Parete posteriore Parete laterale Parete laterale B B A D STUFA E E F F SCARICO POSTERIORE SCARICO LATERALE del focolare Zona radiante dell apertura C Protezione pavimento DT2032441 0 Install the product in compliance with the recommended safety distances from heat sensitive ...

Page 10: ...230 02 Losses in pressure associated with a 90 bend can be compared to those incurred by one metre of pipe An inspectable union tee can be considered equivalent to a 90 bend EXAMPLE if installing a section greater than 4 5m in length with 80mm diameter pipe calculate the maximum usable length in the following ways If a maximum of three 90 bends are used the maximum length of the section will be 4 ...

Page 11: ...lls create an insulating barrier equal to or greater than 10cm around the connector using mineral based insulating material rock wool ceramic fibre with a nominal density greater than 80kg m3 If the connector has to pass through non flammable partitions or walls create an insulating barrier equal to or greater than 5cm around the connector using mineral based insulating material rock wool ceramic fib...

Page 12: ...r Weight with cladding kg 98 English 2 1 FEATURES DT2011592 00 Cladding enamelled steel with majolica insert Interior steel Baffle plate and hearth cast iron Grate cast iron Door cast iron with ceramic glass heat resistant up to 750 C Handle enamelled steel Control panel display with digital controls and remote control optional Timer thermostat standard with daily weekly and weekend programming mo...

Page 13: ...rial number is located on the underside of the hopper lid A label bearing the serial number is also applied on the cover last page of the Installation operation and maintenance booklet Always give the information shown on these plates to the dealer or the Service Centre when requesting service or spare parts DT2032205 0 NOME PRODOTTO DT2032204 0 NUMERO MATRICOLA English 2 4 PRODUCT IDENTIFICATION ...

Page 14: ...om fan D Pellet loading auger E Flue gas fan F Capacitor G N O Pressure switch normally open H N C 80 thermostat normally closed I J Remote control receiver optional POS KEY TO PARTS M Power supply with fuse 5X20 4AH250V N Smoke sensor O Room sensor P External thermostat Q Serial port DB9 R Motherboard S Fuse 5X20 4AL250V T U V Flat cable NO KEY TO COLOURS 1 White 2 Yellow green 3 Black 4 Brown 5 ...

Page 15: ...2 1 2 3 7 4 1 External socket for connection of room sensor 2 Socket for power lead 3 External pressure pipe tap 4 Knockout for inserting cable gland PG7 for connection of external thermostat 5 Room sensor connection 6 Power cable connection 7 DB9 serial socket DT2032282 0 5 6 Fig 29 4 1 ELECTRICAL CONNECTION AND CONTROLS DT2011601 01 DT2032296 00 Fig 28 3 0 PREPARING FOR INSTALLATION To prevent a...

Page 16: ...pin terminal of the electronic board Fig 31 Refit the panel proceeding in the reverse order to removal 1 Thermostat 2 Electronic board 2 pin terminal 3 Cable gland 4 Thermostat cable terminal 4 2 INSTALLING THE EXTERNAL THERMOSTAT DT2011598 00 English Installation can be carried out with any type of room thermostat but requires a PG7 cable gland similar to the one shown in fig 30 To connect the ther...

Page 17: ...astening screw B Remove the screw securing the flue outlet pipe C to be found in the lower part of the actual pipe Draw the rear flue gas outlet pipe D out of the stove once removed the pipe may be disposed of Fig 38 4 4 SIDE FLUE GAS OUTLET OPTIONAL DT2011599 00 DT2032323 0 A Fig 37 DT2032323 00 DT2032324 0 D B C Fig 38 Remove the side panel after unscrewing the 2 front screws E Fig 35 and loosen t...

Page 18: ...cratch or buckle the panel Apply the edge gasket G provided in the kit around the edge of the hole made in the panel Cut off any excess gasket Fig 41 Refit the left side panel proceeding with the steps described for removal in the reverse order Connect to the flueway in accordance with the instructions given in the section GENERAL RULES Finish installing the cladding DT2032326 0 E Fig 39 DT2032327 0...

Page 19: ...tractor fan cable Fig 43 Fit the remote control receiver C in the direction as shown in the figure to the side onto the inner face of the removed front panel and fasten it to the threaded bush using the screw provided in the kit Fig 45 When installing align the spherical rounded part of the receiver C with the central slot in the lower front panel E Check that the remote control receiver cable cann...

Page 20: ...h approx Apparent density approx Specific weight approx Moisture content approx Residual ash approx N B the above data refer to beech fir wood pellets Pellet characteristics 6 6 5 mm 5 kWh kg Natural pure wood pellet 10 30 mm 650 kg m3 1 0 kg dm3 8 0 5 5 0 FUEL DT2010233 04 To ensure trouble free operation DO NOT use pellets with dimensions other than those recommended by the manufacturer DO NOT use...

Page 21: ...ical system but is not in the operating mode the actual time e g 12 30 appears in the left part of the display while the readout OFF appears in the right part DT2032436 00 The control panel keys and their various functions are listed below These have been numbered in order to make identification easier Key 4 ON OFF Key 5 6 adjustment selection Key 1 2 adjustment selection Used for manual startup an...

Page 22: ... ENABLED appears on the right display after which the initial display returns FUNCTION ENABLED 6 3 PROGRAMMING DT2011652 00 Press key 6 for at least 5 seconds to enter stove programming Repeatedly press key 5 or 6 to scroll the main menu which appears on the right hand display Having selected the function to be programmed confirm using the SET key Now display the submenus by repeatedly pressing key...

Page 23: ...ME SET THE CLOCK WITH THE CURRENT DAY HOUR AND MINUTES as with a new watch To set the actual time see the table SETTING THE CLOCK This setting will only be necessary the first time of activating the clock If several programs are active with overlapping times the stove will start up with the first programmed start time and will always stop at the first set time irrespective of the daily weekly or week...

Page 24: ...or 2 to set the required power level during the first operating cycle Confirm by pressing the SET key SET D PO 1 scrolling readout Press key 1 or 2 to set the required room temperature during the first operating cycle Confirm by pressing the SET key SET TEMP ROOM 1 scrolling readout Programming automatically passes to the second operating cycle To continue programming for the second cycle proceed in s...

Page 25: ...s Use key 5 or 6 to scroll the menu that appears on the right display until the scrolling readout SET CHRONO appears Confirm by pressing the SET key SET CHRONO WEEKEND PROGRAM DT2011656 00 Use key 5 or 6 to scroll the available functions that appear on the right display until the scrolling readout PROGRAM SETT EN appears Confirm by pressing the SET key Use key 1 or 2 to scroll the options ON to enab...

Page 26: ...5 or 6 to scroll the menu that appears on the right display until the scrolling readout MEMORY COUNTERS appears Confirm by pressing the SET key MEMORY COUNTERS TIME METER STORAGE DT2011679 00 HOURS TOTAL The scrolling readout HOURS TOTAL appears on the right display and the total hours of operation on the left display Use key 5 to go back within the time meter storage menu Press key 6 The scrolling...

Page 27: ...escription of activity Display Press key 6 for a few seconds Use key 5 or 6 to scroll the menu that appears on the right display until the scrolling readout MODE DISPLAY appears Confirm by pressing the SET key Use key 1 or 2 to select on the left display the option TEMP enabling room temperature display or HOURS enabling timetable display Confirm by pressing the SET key DISPLAY scrolling readout Aft...

Page 28: ...ce of all paint residue When the hopper is being loaded for the first time the loading auger needs time to fill up during this stage the pellets are not distributed inside the firebox and it is highly probable that the first attempt at ignition fails If the alarm is activated shut down the stove by pressing the ON OFF key for a few moments remove the fuel in the grate and then set the stove for a new ...

Page 29: ...operation The power setting appears in the right hand display P1 P2 P3 P4 The time or the room temperature appears in the left hand display See paragraph DISPLAY MODE The power and the room temperature settings may be adjusted during normal operation NORMAL OPERATION DT2011662 00 SET PO To change the power setting press key 6 The scrolling readout SET PO set power appears in the right display Use ...

Page 30: ...nually as follows pour a small quantity of pellets into the grate use a lit piece of firelighter diavolina to ignite the pellets close the door start the stove using the ON OFF button This procedure is only to be carried out in an emergency while waiting for the servicing technician to arrive If there is a blackout while the stove is in operation there are two possibilities of procedure according t...

Page 31: ... Sales Service Centre WHAT TO DO Shut down the stove by holding the ON OFF key down for several seconds The alarm will stop Wait until combustion of any pellets remaining in the grate has finished After having cleaned the grate restart the stove by pressing the ON OFF key The readout ALL must no longer appear on the display If this is not the case call the After Sales Service Centre The pressure sw...

Page 32: ...y After approx 30 seconds the alarm buzzer sounds if activated SAFETY STOVE PROBE SMO WHAT TO DO Shut down the stove by holding the ON OFF key down for several seconds The alarm will stop Call the After Sales Service Centre If the sensor is momentarily or accidentally removed from its normal position or is not connected properly to the electronic board the alarm is activated The scrolling readout ...

Page 33: ...y 5 or 6 to scroll the menu that appears on the right display until the scrolling readout STATE STOVE stove status appears Confirm by pressing the SET key The pellet loading time and the flue gas temperature alternate on the left display The room temperature and any alarms appear on the right display Alarm indications ALL General ALF2 Pressure switch anomaly PUL Clean grate NO CONN Flue gas sensor o...

Page 34: ...le surface at a safe distance from combustible materials until the cinders have been completely extinguished Only when they have been fully extinguished can the ashes be thrown away with organic waste assuming that nails or other non organic material are not present The stove is provided with a niche for a humidifier optional located under the ceramic insert of the top plate once the ceramic claddi...

Page 35: ...Superior After Sales Service Centre or a qualified electrician for all and any work connected with installation maintenance or servicing that involves access to electrical parts Maintenance is to be considered compulsory for correct and efficient stove operation If maintenance is not carried out with the recommended frequency stove performance could suffer The manufacturer will not be responsible fo...

Page 36: ...even mild detergent Products are available on the market which are suitable for cleaning ceramics as well as concentrated products for cleaning porcelain These will remove oil ink coffee and wine stains etc DT2032288 0 LINGUETTE INCASTRO INFERIORE DEFLETTORE INTERNO ECCENTRICO Fig 52 Once a week clean the firebox as follows Remove the grate baffle and draw out the grate Turn the eccentric clamps to ...

Page 37: ...ATTERY DT2010094 00 7 12 SHUTTING DOWN DT2011801 00 The following maintenance should be carried out ONCE A YEAR and is necessary to ensure efficient and safe stove operation Clean the firebox thoroughly Clean and inspect the flue Check the condition of seals and gaskets Clean mechanical and moving parts motors and fans Check electrical and electronic components 7 13 PROGRAMMING MAINTENANCE DT2010097 ...

Page 38: ... power cable Replace the power cable use only original spares Fuses blown Check the fuses in both the plug and the electronic board replacing them if necessary If the problem persists call an electrician Faulty control panel Replace the control panel use only original spares Faulty flat cable Replace the flat cable use only original spares Faulty electronic board Replace the electronic board use onl...

Page 39: ... safety device MASS TEMP stove status Blocked flue or flue gas outlet Clean the flue and the outlet Faulty electronic board Replace the electronic board use only original spares Faulty limit temperature control sensor Replace the control sensor use only original spares Badly positioned smoke sensor Check that the sensor is correctly positioned see wiring diagram Incorrect parameter settings Check par...

Page 40: ...dure If the problem persists contact an authorised technician Combustion gases have not reached the required ignition temperature Repeat ignition procedure If the problem persists contact an authorised technician Heat sensor badly connected Check the wiring and connections Blocked flue Clean flue system Failed ignition See NO ACC Faulty electronic board Replace the electronic board use only original...

Page 41: ...oard fuse type F4AL250V Fuse on the IEC power socket Draw out the fuse carrier and replace the fuse with the spare to be found inside the small drawer Type F4AH250V DT2032438 0 Cassettino porta fusibile Fig 58 DT2032439 0 Tappo porta fusibile Scheda madre Fig 57 8 1 REPLACING THE FUSES DT2010557 02 Motherboard Cartridge fuse safety plug Fuse carrier drawer 41 ...

Page 42: ...H07023380 DT2000477 03 42 ...

Page 43: ...H07023380 DT2000477 03 43 ...

Page 44: ...la d Asolo TV ITALY Tel 39 04235271 Fax 39 042355178 www superiorstufe com info superiorstufe com Technical Department Cod H07023380 DT2000477 rev 03 03 2010 Product serial number to be quoted when requesting service from the After Sales Service Centre ...

Reviews: