background image

SL-PPC-174P4T 

User’s Manual

24

3.4.2 COM1/COM2/COM3/ pin 9 output setting (JP5)

*Default setting

3.5  VGA interface

The panel PC's AGP VGA interface can drive conventional CRT dis-
plays. It is also capable of driving a wide range of flat panel displays, 
including electroluminescent (EL), gas plasma, passive LCD and active 
LCD displays.

Table 3.6: COM1/2/3 pin 9 output setting(JP5)

*Normal


+5 V output


+12 V output

Summary of Contents for SL-PPC-174P4T

Page 1: ...SL PPC 174P4T Pentium 4 processor based panel PC with 17 TFT LCD User s Manual...

Page 2: ...c VIA is a trademark of VIA Technologies Inc IBM PC AT PS 2 and VGA are trademarks of International Business Machines Corporation Intel and Pentium are trademarks of Intel Corporation Microsoft Window...

Page 3: ...ill no guarantee that interference will not occur If this equip ment is believed to be causing harmful interference to radio or television reception this can be determined by turning the equipment on...

Page 4: ...D ROM drive driver Drivers and Utilities CD ROM disc Mounting kits and packet of screws Heat sink optional refer to Notes 1 and 2 below If any of these items are missing or damaged contact your distri...

Page 5: ...your software operating system version application software etc A complete description of the problem The exact wording of any error messages Warning 1 Input voltage rated 100 250 VAC 50 60 Hz 3 A 2...

Page 6: ...any liquid into an opening This may cause fire or electrical shock 13 Never open the equipment For safety reasons the equipment should be opened only by qualified service personnel 14 If one of the f...

Page 7: ...eine Besch di gung vermieden 12 Durch die L ftungs ffnungen d rfen niemals Gegenst nde oder Fl ssigkeiten in das Ger t gelangen Dies k nnte einen Brand bzw elektrischen Schlag aus l sen 13 ffnen Sie n...

Page 8: ...SL PPC 174P4T User s Manual viii...

Page 9: ...1 Jumpers and Connectors 18 3 1 1 Setting Jumpers 18 3 1 2 Jumpers and switches 19 Table 3 1 Jumpers and their functions 19 3 1 3 Locations of jumpers 19 3 1 4 Connectors 20 Table 3 2 Panel PC connec...

Page 10: ...able B 4 LVDS connector 2 CN6 38 A 5 Inverter power connector CN5 38 Table A 5 Inverter power connector CN5 38 A 6 FDD connector CN10 39 Table A 6 FDD connector CN10 39 A 7 Touchscreen interface CN13...

Page 11: ...CHAPTER 1 General Information This chapter gives background information on the SL PPC 174P4T panel PC Sections include Introduction General specifications LCD specifications Dimensions...

Page 12: ...durable and versatile in all applications The panel PC can be placed on a desktop to replace the traditional desktop computer In addition its flexible design can be installed in any environment It can...

Page 13: ...tel 845GV 2nd level cache On die 256 or 512KB RAM two 184 pin DDR DIMM sockets up to 2GB DDR SDRAM PCI bus master IDE interface Supports two connectors Each con nector has one channel and supports two...

Page 14: ...l be set to 32MB Display type Simultaneously supports CRT and flat panel displays EL LCD and gas plasma Display resolution Supports non interlaced CRT and TFT LCD dis plays up to 1024 x 768 256K Audio...

Page 15: ...ive SAW Resolution Continuous 1024 x 1024 4096 x 4096 Light Transmission 75 85 91 Controller RS 232 interface RS 232 interface RS 232 interface Power Consumption 5 V 200 mA 5 V 100 mA 5 V 150 mA Softw...

Page 16: ...upports two PCMCIA card CardBus slots Two sockets support both a 16 bit PCMCIA card and a 32 bit CardBus simultaneously Hot insertion and removal CF Compact Flash Card Reader interface Environment Tem...

Page 17: ...F 50 000 hours Backlight MTBF 25 000 hours The VR control is defined by hot key in DOS or BIOS mode as below Ctrl Alt F3 Ctrl Alt F4 Note The color LCD display installed in the panel PC is high qualit...

Page 18: ...SL PPC 174P4T User s Manual 8 1 4 Dimensions Figure 1 1 Dimensions of the SL PPC 174P4T Units mm...

Page 19: ...er details system setup on the SL PPC 174P4T panel PC Sections include A Quick Tour of the Panel PC Preparing for First time Use Installation Procedures Running the BIOS Setup Program Installing Syste...

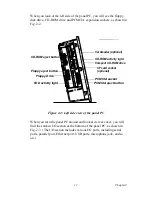
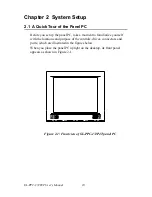
Page 20: ...anel PC take a moment to familiarize yourself with the locations and purpose of the controls drives connectors and ports which are illustrated in the figures below When you place the panel PC upright...

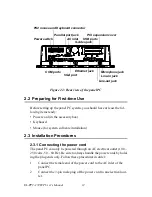
Page 21: ...d look at its rear cover you will find the sunken I O section at the bottom of the panel PC as shown in Fig 2 3 The I O section includes various I O ports including serial ports parallel port Ethernet...

Page 22: ...gh an AC electrical outlet 100 250 volts 50 60 Hz Be sure to always handle the power cords by hold ing the plug ends only Follow these procedures in order 1 Connect the female end of the power cord to...

Page 23: ...ou turn off or reset the system Whenever you turn on the power the system reads the settings stored in CMOS RAM and compares them to the equipment check conducted dur ing the power on self test POST I...

Page 24: ...M drive driver are stored in a CD ROM disc enti tled Drivers and Utilities The CD ROM drive driver is stored in a floppy disk Both CD ROM and floppy disk can be found in your acces sory box To set up...

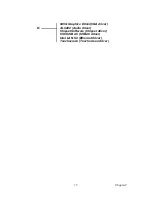
Page 25: ...15 Chapter2 845G Graphics Driver VGA driver ALC202 Audio driver Chipset Software Chipset driver ICH4 USB2 0 USB2 0 driver Intel LAN 6 2 Ethernet driver Touchscreen Touchscreen driver D...

Page 26: ...SL PPC 174P4T User s Manual 16...

Page 27: ...and instructions on setting jumpers and connecting periph erals switches and indicators Be sure to read all the safety precautions before you begin the installation procedures Sections include Jumpers...

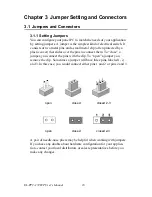
Page 28: ...ic cover that slides over the pins to connect them To close a jumper you connect the pins with the clip To open a jumper you remove the clip Sometimes a jumper will have three pins labeled 1 2 and 3 I...

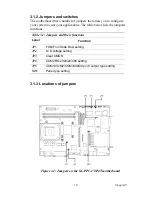
Page 29: ...table below lists the jumpers functions 3 1 3 Locations of jumpers Table 3 1 Jumpers and their functions Label Function JP1 FSB Front Side Bus setting JP2 LCD voltage setting JP3 Clear CMOS JP4 COM2...

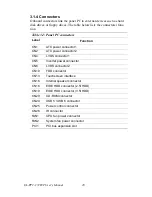
Page 30: ...TX power connector 1 CN2 ATX power connector 2 CN4 LVDS connector 1 CN5 Inverter power connector CN6 LVDS connector 2 CN10 FDD connector CN13 Touchscreen interface CN16 Internal speaker connector CN18...

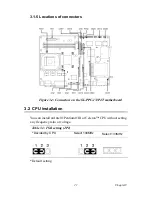
Page 31: ...nstallation You can install an Intel Pentium III or Celeron CPU without setting any frequency ratio or voltage Default setting Figure 3 2 Connectors on the SL PPC 174P4T motherboard Table 3 3 FSB sett...

Page 32: ...Default setting Warning To avoid damaging the computer always turn off the power supply before setting Clear CMOS Set the jumper back to Normal operation before turning on the power supply Table 3 4...

Page 33: ...l ports COM1 3 RS 232 COM2 RS 232 422 485 in one COM port connector 3 4 1 COM2 RS 232 422 485 setting JP4 COM2 can be configured to operate in RS 232 RS 422 or RS 485 mode This is done via JP4 Default...

Page 34: ...interface The panel PC s AGP VGA interface can drive conventional CRT dis plays It is also capable of driving a wide range of flat panel displays including electroluminescent EL gas plasma passive LC...

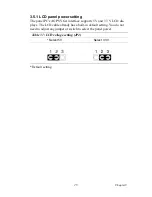
Page 35: ...s AGP SVGA interface supports 5 V and 3 3 V LCD dis plays The LCD cable already has a built in default setting You do not need to adjust any jumper or switch to select the panel power Default setting...

Page 36: ...SL PPC 174P4T User s Manual 26...

Page 37: ...CHAPTER 4 Hardware Installation and upgrading...

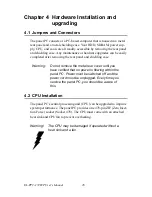
Page 38: ...ear panel and shielding case 4 2 CPU Installation The panel PC s central processing unit CPU can be upgraded to improve system performance The panel PC provides one 478 pin ZIF Zero Inser tion Force s...

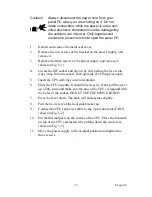
Page 39: ...e socket DO NOT USE EXCESSIVE FORCE 7 Press the lever down The plate will slide across slightly 8 Pull the two levers of the heat sink bracket up 9 Connect the CPU fan power cable to the 3 pin connect...

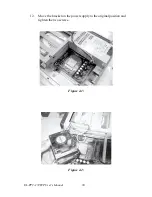
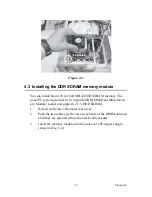
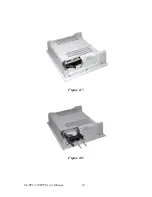
Page 40: ...SL PPC 174P4T User s Manual 30 12 Move the bracket on the power supply to the original position and tighten the two screws Figure 4 1 Figure 4 2...

Page 41: ...two 184 pin DDR DIMM Dual Inline Mem ory Module socket and supports 2 5 V DDR SDRAM 1 Detach and remove the metal rear cover 2 Push the two white eject levers on each side of the DIMM outward until th...

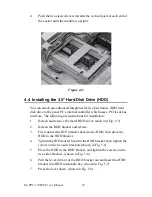
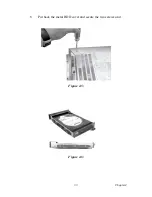
Page 42: ...allation 1 Detach and remove the metal HDD cover shown in Fig 5 5 2 Detach the HDD bracket and screws 3 First connect the IDE trransfer board to the HDD then place the HDD in the HDD bracket 4 Tighten...

Page 43: ...33 Chapter4 8 Put back the metal HDD cover and secure the two screws on it Figure 4 5 Figure 4 6...

Page 44: ...SL PPC 174P4T User s Manual 34 Figure 4 7 Figure 4 8...

Page 45: ...Appendix A Pin Assignments...

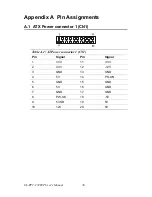
Page 46: ...A Pin Assignments A 1 ATX Power connector 1 CN1 Table A 1 AT Power connector 1 CN1 Pin Signal Pin Signal 1 3 3V 11 3 3V 2 3 3V 12 12V 3 GND 13 GND 4 5V 14 PS ON 5 GND 15 GND 6 5V 16 GND 7 GND 17 GND...

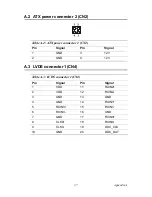
Page 47: ...X power connector 2 CN2 Pin Signal Pin Signal 1 GND 3 12V 2 GND 4 12V Table A 3 LVDS connector 1 CN4 Pin Signal Pin Signal 1 VDD 11 RXIN2 2 VDD 12 RXIN2 3 GND 13 GND 4 GND 14 RXIN1 5 RXIN3 15 RXIN1 6...

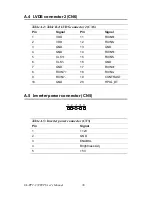
Page 48: ...ble B 4 LVDS connector 2 CN6 Pin Signal Pin Signal 1 VDD 11 RXIN6 2 VDD 12 RXIN6 3 GND 13 GND 4 GND 14 RXIN5 5 CLK1 15 RXIN5 6 CLK1 16 GND 7 GND 17 RXIN4 8 RXIN7 18 RXIN4 9 RXIN7 19 CONTRAST 10 GND 20...

Page 49: ...Pin Signal 1 Vcc 5V 14 Step 2 Index 15 GND 3 Vcc 5V 16 Write data 4 Drive select 17 GND 5 Vcc 5V 18 Write enable 6 Disk change 19 GND 7 NC 20 Track 0 8 NC 21 GND 9 NC 22 Write protect 10 Motor on 23 G...

Page 50: ...able A 7 Touchscreen interface CN13 Pin Signal Pin Signal 1 NRLSD 2 NDSR 3 NRX 4 NRTS 5 NTX 6 NCTS 7 NDTR 8 NRI 9 GND 10 GND 11 MSDAT 12 EXT MSDAT 13 MSCLK 14 EXT MSCLK 15 Vcc 16 Vcc Table A 8 Interna...

Page 51: ...panel control connector CN25 Pin Signal Pin Signal 1 Vcc 2 GND 3 PWRLED 4 PWRLED 5 HDLED 6 HDLED 7 LACTLED 8 LACTLED 9 LINK100LED 10 LINK100LED 11 LINK1000LED 12 LINK1000LED 13 POWERSW 14 POWERSW 15 R...

Page 52: ...SL PPC 174P4T User s Manual 42 A 11 Fan power connector FAN1 FAN2 Table A 11 Fan power connector FAN1 FAN2 Pin Signal 1 GND 2 12V 3 FAN_DET...

Page 53: ...r The SL PPC 174P4T is equipped with a watchdog timer that resets the CPU or generates an interrupt if processing comes to a standstill for any reason This feature ensures system reliability in indust...

Page 54: ...ated time interval is from 1 sec to 63 sec Data Time Interval 01 1 sec 02 2 sec 03 3 sec 04 4 sec 3F 63 sec After data entry your program must refresh the watchdog timer by rewrit ing the I O port 440...

Page 55: ...H MOV AL 08H select logical device 8 OUT DX AL MOV DX 2EH MOV AL 30H Set watch dog activate or inactivate OUT DX AL MOV DX 2FH MOV AL 01H 01 activate 00 inactivate OUT DX AL MOV DX 2EH MOV AL F5H Sett...

Page 56: ...SL PPC 174P4T User s Manual 46 Exit extended function mode MOV DX 2EH MOV AL AAH OUT DX AL...

Reviews: