安装线材
Fitting a cable
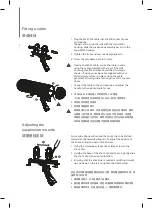
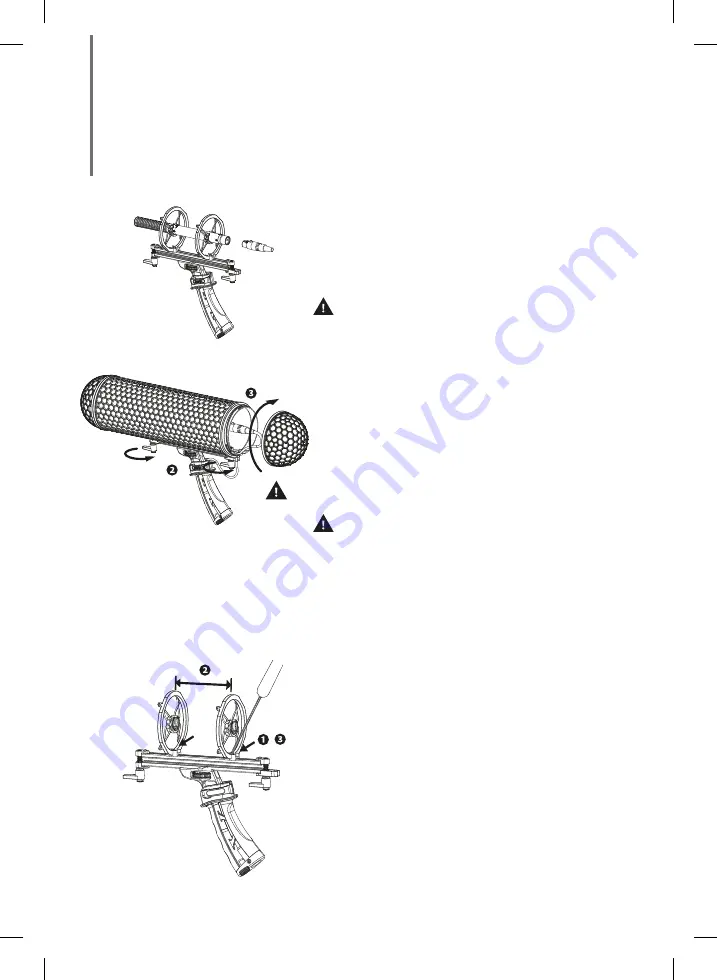
1. Plug the WSK1 XLR cable into the XLR socket of your
microphone.
Taking care to align the rails with the main WSK1
housing, slide the suspension assembly back in to the
main WSK1 housing.
2. Tighten the front and rear rail clamping levers.
3. Screw the rear dome back in to place.
1. 将 SWK1 XLR 线材插入您的麦克风 XLR 底座
。
小心的将悬架组件对准轨道及 SWK1 主外壳滑回原位。
2. 将前后导轨固定杆锁紧。
3. 转后圆顶盖回到原位。
• 如果使用 WSK1 线材 , 将线材固定在轨道后方的謢环处 , 确保
与图面上显示相同。假如使用与 WSK1 不同的线材 , 将其简
单固定在轨道后方护环处 , 确保有足够空间可以安装后圆顶盖
• 将导线连接到麦克风且调整手柄使用所需的角度。
• If using the WSK1 cable, secure the cable in place
using the cable grommet at the rear of the rails,
ensuring that the orientation matches the image
shown. If using your own cable supplied with your
Blimp, simply secure it in place using the cable
grommet, ensuring there is enough room for the rear
dome.
• Connect the cable to the microphone and adjust the
handle to the desired angle for use.
调整悬挂支架
Adjusting the
suspension mounts
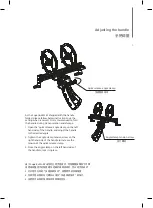
Some microphone will require the shock clip to be shifted
forwards or backwards along rail. To adjust the position of
the shock, follow the instructions below.
1. Using the screwdriver, loosen the clamp screw on the
shock clip.
2. Holding the base of the shock clip and the rail, gently slide
the shock clip to the desired location.
3. Ensuring that the shock clip is centred and sitting straight
up and down on the rail, re-tighten the clamp screw.
有些麦克风需要调整避震夹的前后位置 , 要调整避震夹的位置 , 请
按照如下的说明
1. 使用螺丝起子 , 拧下避震夹上的螺丝。
2. 握住避震夹及滑轨的基础 , 轻轻的将避震夹滑移到有需的位置。
3. 确定避震夹至中 , 且垂直在轨道上 , 重新锁紧螺丝。
8


