Chapter 6: Advanced Chassis Setup
6-7
6-6
S
UPER
S
TORAGE
S
YSTEM 6038R-DE2CR16L User's Manual
Warning:
Regardless of how many hard drives are installed, all drive carriers must
remain in the drive bays to maintain proper airflow.
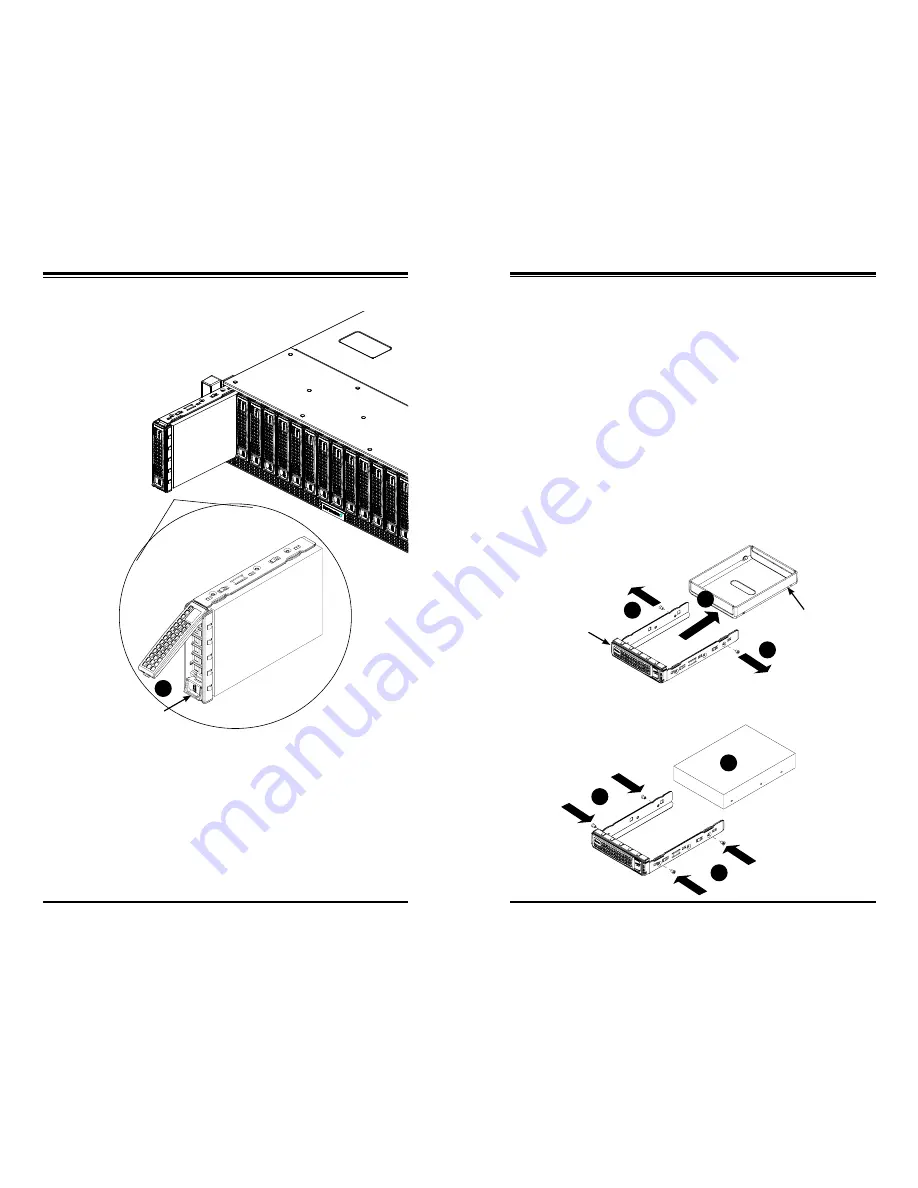
Figure 6-5. Removing the Dummy Drive from the Carrier
Drive Carrier
Dummy Drive
1
1
1
1
1
1
1
2
Release Button
Figure 6-6. Installing a Drive to a Carrier
1
4
1
4
1
3
Installing a SAS Hard Drive (Figures 6-5 and 6-6)
1. Remove the screws securing the dummy drive to the drive carrier.
2.
Remove the dummy drive. Place the carrier on a flat surface.
3. Slide the hard drive into the carrier with the printed circuit board side down.
4. Carefully align the mounting holes in both the drive tray and the hard drive.
5. Secure the hard drive to the tray using the screws provided.
6. Insert the drive carrier into the chassis. Make sure to close the carrier handle
to lock the carrier into place.
Figure 6-4. Removing a HDD Carrier from the Chassis
Warning:
Enterprise level hard disk drives are recommended for use in Supermicro
chassis and servers. For information on recommended HDDs, visit the Supermicro
website.
Summary of Contents for 6038R-DE2CR16L
Page 1: ...USER S MANUAL 1 0a SUPER STORAGE SYSTEM 6038R DE2CR16L ...
Page 6: ...SUPERSTORAGESYSTEM 6038R DE2CR16L User s Manual x Notes ...
Page 17: ...3 4 SUPERSTORAGESYSTEM 6038R DE2CR16L User s Manual Notes ...
Page 45: ...6 10 SUPERSTORAGESYSTEM 6038R DE2CR16L User s Manual Notes ...
Page 69: ...A 2 SUPERSTORAGESYSTEM 6038R DE2CR16L User s Manual Notes ...

