30
SuperStorage Server 6039P-E1CR16H/L User's Manual
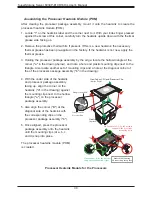
Assembling the Processor Heatsink Module (PHM)
After creating the processor package assembly, mount it onto the heatsink to create the
processor heatsink module (PHM).
1.
Locate "1" on the heatsink label and the corner next to it. With your index finger pressed
against the screw at this corner, carefully turn the heatsink upside down with the thermal
grease side facing up.
2.
Remove the protective thermal film if present. If this is a new heatsink, the necessary
thermal grease has been pre-applied in the factory. If the heatsink is not new, apply the
thermal grease.
3. Holding the processor package assembly by the edge, locate the hollow triangle at the
corner ("a" in the drawing below), and note a hole and plastic mounting clips next to the
triangle. Also locate another set of mounting clips and a hole at the diagonal corner of
the of the processor package assembly ("b" in the drawing).
4. With the under side of the heatsink
and processor package assembly
facing up, align the corner on the
heatsink ("A" in the drawing) against
the mounting clips next to the hollow
triangle ("a") on the processor
package assembly.
5. Also align the corner ("B") at the
diagonal side of the heatsink with
the corresponding clips on the
processor package assembly ("b").
6. Once aligned, press the processor
package assembly onto the heatsink
until the mounting clips (at a, b, c,
and d) snap into place.
The processor heatsink module (PHM)
is created.
Heatsink
(Upside Down)
C
D
d
c
a
b
A
B
On Locations of (C, D),
the notches
snap onto the heat sink’s
mounting holes
On Locations (A, B), the notches
snap onto the heatsink’s sides
A
B
D
C
Make sure Mounting
Notches snap into place
Triangle on the CPU
Triangle on the
Processor Clip
Non-Fabric CPU and Processor Clip
(Upside Down)
Processor Heatsink Module for the Processors

