6-2
SC846B JBOD Chassis Manual
General Safety Guidelines
•
Always disconnect power cables before installing or removing any components
from the computer, including the control board.
•
Disconnect the power cable before installing or removing any cables from the
control board.
•
Make sure that the control board is securely and properly installed in the chassis
to prevent damage to the system due to power shortage.
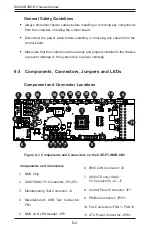
6-3 Components, Connectors, Jumpers and LEDs
Component and Connector Locations
Components and Connectors
1. BMC Chip
2. SAS2/SAS3 I
2
C Connectors JP1-JP4
3. Manufacturing Test Connector: J3
4. Manufacturer's USB Test Connector:
FB1
5. BMC LAN LED Header: JP6
Figure 6-1. Components and Connectors on the CSE-PTJBOD-CB3
1
2
5
6
1
3
1
3
3
2
1
4
3
2
1
4
3
2
1
4
3
2
1
4
24
13
12
1
+
+
+
+
A
1
E
3
K
7
9
R
3
2
1
1
2
3
1
2
7
8
1
2
7
8
1
2
7
8
1
2
7
8
1
2
19
20
1
5
1
5
6
9
1
2
10
+
+
4
1
4
1
4
1
4
1
4
1
4
1
4
1
4
1
4
1
4
1
1
7
6 12
15
17
13
14
16
19
18
A
C
A
C
A
E
K
R
Y
1
5
10
20
12
13
24
25
36
37
48
MH2
MH4
JP6
U*
U18
U17
U16
U14
U13
JP7
JP5
JP1
JP2
JP3
JP4
JPW1
BT1
C10
Y2
U9
MH3
MH1
C153
J4
J6
J7
J5
JF1
JPI2C1
J3
J2
U12
U11
C131
C8
C9
FAN1
FAN2
FAN3
FAN4
FAN5
FAN6
FAN7
FAN8
FAN10
FAN9
J8
U8
Q27
Q16
D16
FB1
C6
C21
C4
LE2
LE1
F1
Y1
Q5
Q4
U1
U5
U6
U3
U7
L7
JP5
JP7
2-3:DHCP 1-2:S
ta
tic IP
2-3:SAS2_847D
1-2:SAS3
JF1
NMI X PWR LED X NIC1 X OH/FF X RST ON PWR ON
%
#
1
10
1
11
1
10
1
10
1
10
1
10
1
10
1
10
1
10
1
10
1
10
1
1
1
9
1
6
1
7
1
7
1
7
1
7
1
8
1
3
1
2
1
2
1
2
1
5
1
2
1
4
6. BMC LAN Connector: J8
7. (SC847D only) SAS2
I
2
C Connectors: J4 - J7
8. Control Panel Connector: JF1
9. PMBus Connector: JPI
2
C1
10. Fan Connectors: FAN1 - FAN10
11. ATX Power Connector: JPW1


