SC510 Chassis Manual
5-2
J
I
H
D
B
8
7
6
5
4
3
2
F
E
A
1
L
K
G
C
DESIGN /
³]-p :
MODEL NO./
¾÷«¬ :
SIZE/¹Ï®Ø
APPROVED /
¼ f®Ö :
DRAWN /
ø¹Ï
:
MATERIAL /
§÷½è :
UNIT /
³æ¦ì
:
FINISH /
ªí-±³
B¸Ì :
DATE /
¤é´Á:
DATE /
¤é´Á:
DATE /
¤é´Á:
TITLE /
«~¦W :
PART NO. /
®Æ¸¹ :
Ablecom Technology Inc.
A
BLEC
DWG NO. /
¹Ï¸¹
:
²Ä¤T¨¤ªk
THE 3RD PROJECTION
¤j˚T¬ì§ÞªÑ¥÷¦³--¤½¥
q
M
R E V I S I O N S /
-×-q
REV
ª©¥»
DESCRIPTION
±Ô-z
LOCATION
¦ì¸
m
DRAWN
-קïªÌ
DATE
¤é´Á
SC510
SC510_SYSTEM_ASSY
A1
*
SCALE /
¤ñ¨Ò :
1:1
SHEET
1
OF
1
*
SHO
06-Nov-07
See Note.
SHO
06-Nov-07
MM
*
REV.
ª©¥»
1
RANGE
½ d³ò
TOLERANCE
¤½®t
X.xx ± 0.10
X.x ± 0.25
X
± 1.00
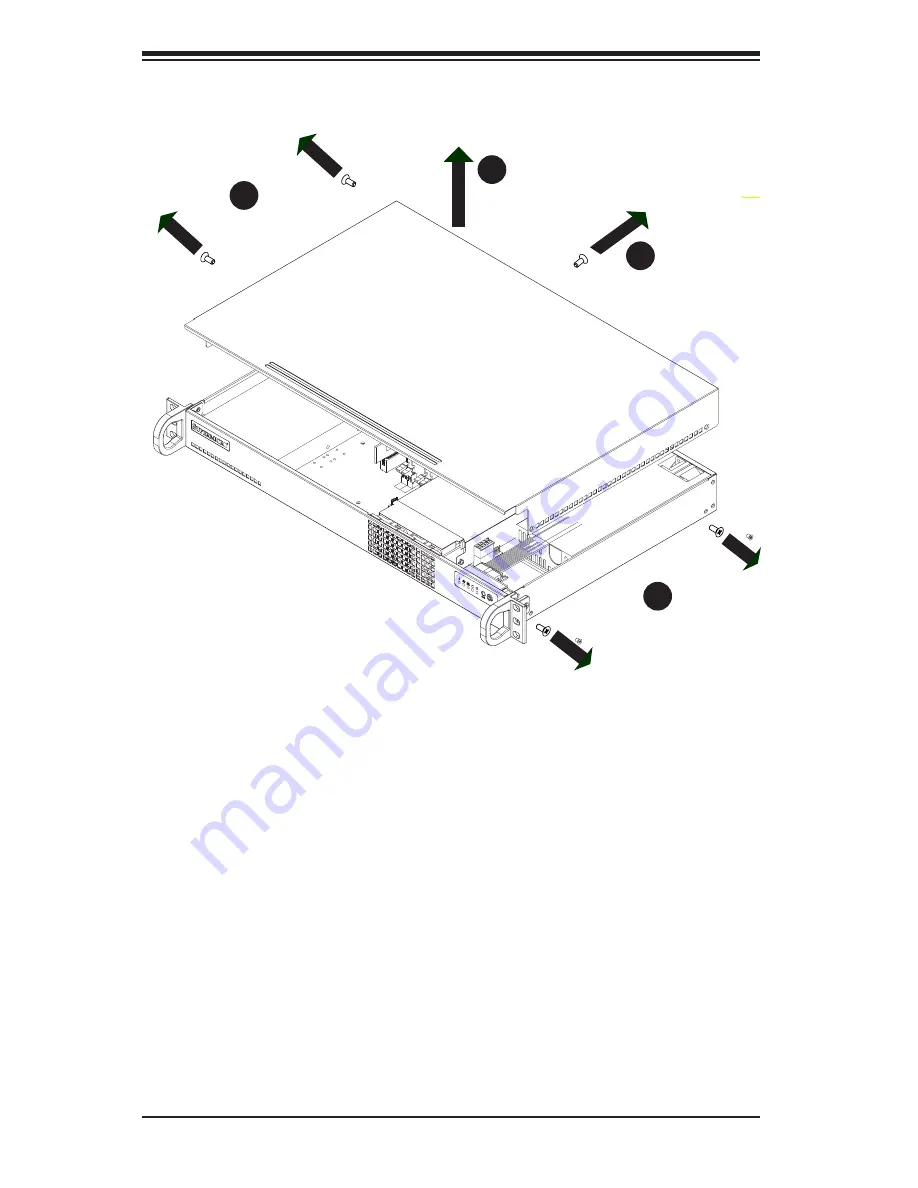
5-3 Removing the Chassis Cover
1. Power down the system and remove the power cord from the rear of the
power supply as described in Section 5-2.
2.
Remove the five screws that hold the chassis cover in place.There are two
screws on each side of the chassis, and one screw on the back.
3. Once the screws have been removed, lift the cover upward to remove it from
the chassis.
Warning
: Except for short periods of time, do
not
operate the server without the cover
in place. The chassis cover must be in place to allow proper airflow and prevent
overheating.
Figure 5-1. Removing the Chassis Cover
1
2
1
1
Summary of Contents for SC510 Series
Page 10: ...SC510 Chassis Manual 1 4 Notes ...
Page 30: ...2 20 SC510 User s Manual Notes ...


