4-5
C
hapter
4
:
C
hassis
S
etup
and
M
aintenance
To install the motherboard:
1. R
eview
the
documentation
that
came
with
your
motherboard
.
Become
familiar
with
component
placement,
requirements,
precautions,
and
cable
connections
.
2.
Open
the
chassis
cover
.
3
. R
emove
the
riser
card
bracket
.
4. A
s
required
by
your
motherboard,
install
standoffs
in
any
areas
that
do
not
have
a
permanent
standoff
.
To
do
this:
A.
Place
a
hexagonal
standoff
screw
through
the
bottom
the
chassis
.
B
. S
ecure
the
screw
with
the
hexagon
nut
(rounded
side
up)
.
5. L
ay
the
motherboard
on
the
chassis
aligning
the
permanent
and
optional
standoffs
6
. S
ecure
the
motherboard
to
the
chassis
using
the
rounded,
Phillips
head
screws
.
7
. S
ecure
the
C
P
U
(s),
heatsinks,
and
other
components
to
the
motherboard
as
described
in
the
motherboard
documentation
.
8. C
onnect
the
cables
between
the
motherboard,
backplane,
chassis,
front
panel,
and
power
supply,
as
needed
. A
lso,
the
blowers
may
be
temporarily
removed
to
allow
access
to
the
backplane
ports
.
9
. R
eplace
the
riser
card
bracket
. I
f
you
are
installing
an
add
-
on
card,
skip
for
-
ward
in
this
manual
for
add
-
on
card
installation
instructions
.
Summary of Contents for SC812L-280U
Page 4: ...SC812L Chassis Manual iv Notes ...
Page 9: ...ix Preface Front Panel to the Motherboard A 3 A 4 Chassis Screws A 4 ...
Page 10: ...SC812L Chassis Manual x Notes ...
Page 14: ...SC812L Chassis Manual 1 4 Notes ...
Page 22: ...SC812L Chassis Manual 3 4 Notes ...
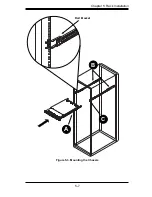
Page 41: ...5 7 Chapter 5 Rack Installation Figure 5 3 Mounting the Chassis A B Rail Bracket C ...
Page 46: ...SC812L Chassis Manual 5 12 Notes ...
Page 47: ...1 Appendices Appendices Appendix A Compatible Cables ...
Page 48: ...SC812L Chassis Manual 2 Notes ...

