background image

1-9

Chapter 1: Safety Information and Technical Specifications

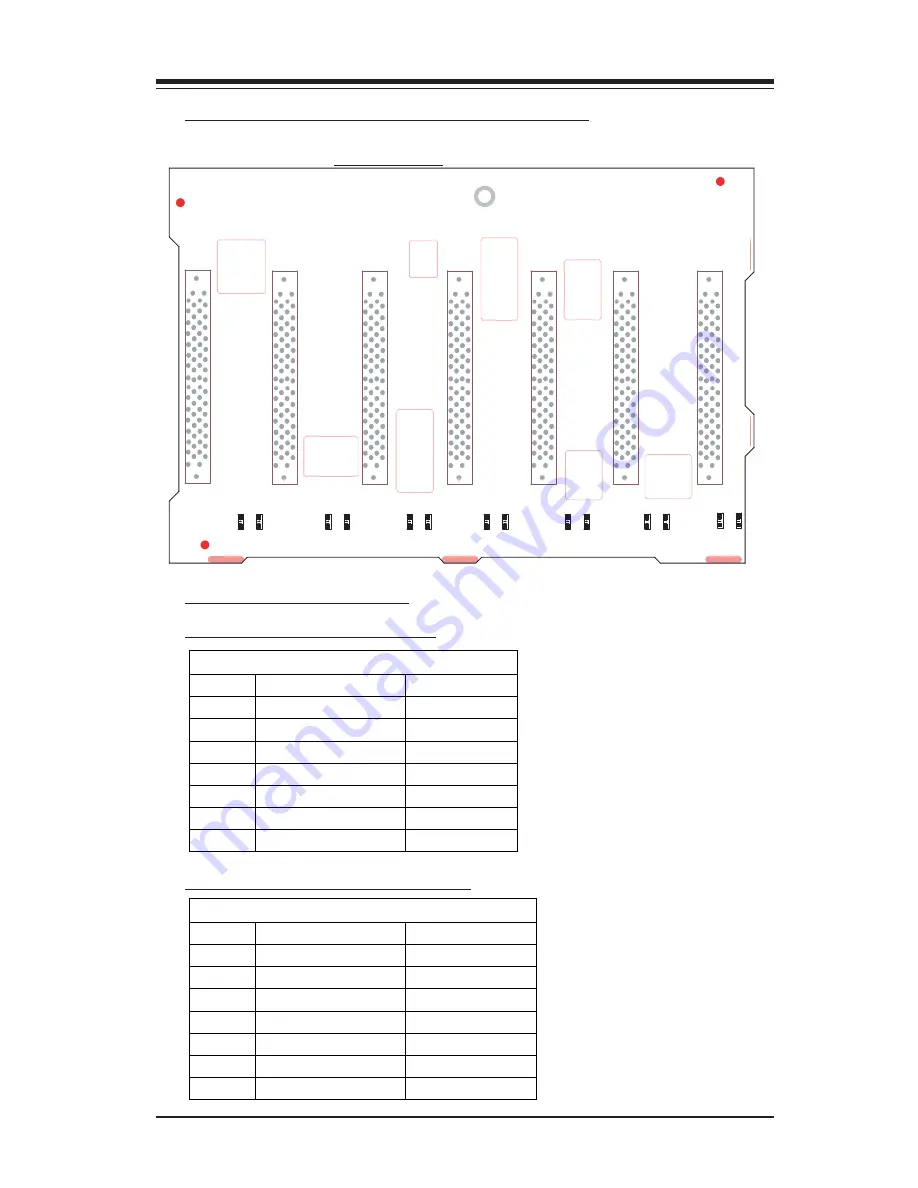
B-4 Connector/LED Indicator Locations (Rear)

Rear View 

(*Not drawn to scale)

D24

D25

D23

D20

D22

D15

D17

D14

D13

D16

D6

D12

D5

SCA1

SCA2

SCA3

SCA4

SCA5

SCA6

SCA7

Ch. A-ID#0

Ch. A-ID#1

Ch. A-ID#2

Ch. B-ID#0

Ch. B-ID#1

Ch. B-ID#2

Ch. B-ID#3

D21

B-5 LED Indicators (Rear)

Drive Fail LED Indicators 

LED# Drive 

ID# 

SCA# 

D5 

Channel A-ID#0  SCA 1: Fail

D6 

Channel A-ID#1  SCA 2: Fail

D16 

Channel A-ID#2  SCA 3: Fail

D17 

Channel B-ID#0  SCA 4: Fail

D22 

Channel B-ID#1  SCA 5: Fail

D23 

Channel B-ID#2  SCA 6: Fail

D25 

Channel B-ID#3  SCA 7: Fail


Drive Activity LED Indicators 

LED# Drive 

ID# 

SCA# 

D12 

Channel A-ID#0  SCA 1: Active

D13 

Channel A-ID#1  SCA 2: Active

D14 

Channel A-ID#2  SCA 3: Active

D15 

Channel B-ID#0  SCA 4: Active

D20 

Channel B-ID#1  SCA 5: Active

D21 

Channel B-ID#2  SCA 6: Active

D24 

Channel B-ID#3  SCA 7: Active

SCSI Drive Fail LED Indicators

SCSI Drive Activity LED Indicators

Summary of Contents for 742i

Page 1: ...1 0a SC742 CHASSIS USER S GUIDE 742S 742i ...

Page 2: ... THE USE OR INABILITY TO USE THIS PRODUCT OR DOCUMENTATION EVEN IF ADVISED OF THE POSSIBILITY OF SUCH DAMAGES IN PARTICULAR THE VENDOR SHALL NOT HAVE LIABILITY FOR ANY HARDWARE SOFTWARE OR DATA STORED OR USED WITH THE PRODUCT INCLUDING THE COSTS OF REPAIRING REPLACING INTEGRATING INSTALLING OR RECOVERING SUCH HARDWARE SOFTWARE OR DATA Any disputes arising between manufacturer and customer shall be...

Page 3: ...ical Specifications 1 4 1 1 Safety Information 1 4 1 2 Technical Specifications 1 6 A 742 SATA Back Panel 1 6 B SCA742 E2 SCSI Dual Channel Back Panel w GEM318 1 8 C SCA 742 SCSI Single Channel Back Panel w GEM359 1 10 D SCSI Super GEM Driver Installation for the Windows OS 1 12 Chapter 2 Installation Instructions 2 1 ...

Page 4: ...static bag Handle the board by its edges only do not touch its components periph eral chips memory modules or gold contacts When handling chips or modules avoid touching their pins Put the motherboard and peripherals back into their antistatic bags when not in use For grounding purposes make sure your computer chassis provides ex cellent conductivity between the power supply the case the mounting ...

Page 5: ...crews or fasteners for easy identification 3 Follow the instruction given in Chapter 2 to remove the chassis covers Reinstalling the chassis covers To maintain proper system cooling and airflow do not operate the system without installing all chassis covers back to the chassis To reinstall the chassis covers please follow the steps listed below 1 Make sure that all components and devices are secur...

Page 6: ...J7 SATA 2 J8 SATA 3 J10 SATA 4 J12 SATA 5 J14 SATA 6 SATA 0 Act In SATA 5 Act In 1 x SATA 1 Act In 2 SATA 4 Act In 9 10 SATA 6 Act In SATA 2 Act In SATA 3 Act In x Act In JP26 Pin Definitions x JP10 JP13 4 Pin PWR Connectors JP26 ACT In 199 70MM 135 00MM JP25 1 1 JP18 D3 J5 J6 J7 J8 J10 J12 J14 JP26 JP13 JP10 4 Pin PWR 4 Pin PWR 12V 1 Ground 4 Ground 5V 4 Pin PWR Connectors Pin Definitions 2 3 ...

Page 7: ...pers JP18 Buzzer Reset Rear View Not drawn to scale A 4 Connector LED Indicator Locations Rear Side A 5 Activity LED Indicators D22 D21 D18 D15 D14 D13 D12 J1 J2 J3 J4 J9 J11 J13 SATA0 SATA1 SATA2 SATA3 SATA4 SATA5 SATA6 JP25 Overheat LED Activity LED Indicators LED Drive D12 SATA 0 Active D13 SATA 1 Active D14 SATA 2 Active D15 SATA 3 Active D18 SATA 4 Active D21 SATA 5 Active D22 SATA 6 Active ...

Page 8: ...d 5V 4 Pin PWR Connectors Pin Definitions 2 3 B 3 Jumpers JP18 Buzzer Reset 742 SCA E2 JP23 JP20 JP14 JP22 JP18 SCSI Chan A SCSI Chan B JP15 JP10 Channel A Jumpers Jumpers Definition JP14 Ch A Delay Start JP22 Ch A Remote Start Channel B Jumpers Jumpers Definition JP20 Ch B Delay Start JP23 Ch B Remote Start SCSI Channel A Jumpers SCSI Channel B Jumpers Buzzer Reset JP18 Open Disabled Closed Enabl...

Page 9: ...e ID SCA D5 Channel A ID 0 SCA 1 Fail D6 Channel A ID 1 SCA 2 Fail D16 Channel A ID 2 SCA 3 Fail D17 Channel B ID 0 SCA 4 Fail D22 Channel B ID 1 SCA 5 Fail D23 Channel B ID 2 SCA 6 Fail D25 Channel B ID 3 SCA 7 Fail Drive Activity LED Indicators LED Drive ID SCA D12 Channel A ID 0 SCA 1 Active D13 Channel A ID 1 SCA 2 Active D14 Channel A ID 2 SCA 3 Active D15 Channel B ID 0 SCA 4 Active D20 Chan...

Page 10: ...M359 Front View Not Drawn to Scale C 1 Connector Jumper Locations C 2 Connectors JP10 JP26 4 Pin PWR Connectors 12V 1 Ground 4 Ground 5V 4 Pin PWR Connectors Pin Definitions 2 3 C 3 Jumpers JP19 Buzzer Reset SCSI JP26 JP10 JP19 Buzzer Reset JP19 Open Disabled Closed Enabled Default ...

Page 11: ...ndicators LED Drive ID SCA D12 ID 0 SCA 1 Active D13 ID 1 SCA 2 Active D14 ID 2 SCA 3 Active D15 ID 3 SCA 4 Active D20 ID 4 SCA 5 Active D21 ID 5 SCA 6 Active D22 ID 6 SCA 7 Active C 4 Connector LED Indicator Locations Rear Rear View Not drawn to scale D22 D19 D18 D20 D17 D15 D16 D14 D13 D7 D6 D12 D5 SCA1 SCA2 SCA3 SCA4 SCA5 SCA6 SCA7 ID 0 ID 1 ID 2 ID 3 ID 4 ID 5 ID 6 D21 C 5 LED Indicators Rear ...

Page 12: ...CD is in 8 Choose Qlogic folder and click on Open 9 System will automatically detect GEM318 GEM359 and install the drive from this point on or 1 Right click the My Computer icon on your desktop and choose Properties 2 Click on the Hardware tab and click on Device Manager to bring up the list of system devices 3 You may see one or two yellow question marks that read QLogic GEM318 GEM359 SCSI Proces...

Page 13: ...1 13 Chapter 1 Safety Information and Technical Specifications Notes ...

Page 14: ...sis Side Cover You will need to remove the chassis side cover to A Remove or install drives into any of the 5 drive bays B Replace chassis fans C Access the motherboard Procedure 1 Remove the two screws from the back lip of the side cover this is the left cover when looking from the front 2 Push in the release tab on the cover and push the cover back to the rear of the chassis It should stop after...

Page 15: ...mponents here you must remove the four screws corresponding two both bays Drive Bays Remove the screws for the drive bay you wish to add or remove a component from The upper two bays are joined and so have four screws 3 After removing the screws push the drive module out the front of the chassis For the floppy drive bay you must first remove the two faceplates 4 Attach the dummy rails to the new d...

Page 16: ... bracket the fans are attached to for better access To do so first remove both fans by following step one Then unplug the fan cables from the motherboard Remove the single screw that attaches the fan mounting bracket to the chassis and lift the bracket out of the chassis To replace it reverse the procedure The mounting bracket has three tabs that fit into holes in the chassis make sure these tabs ...

Page 17: ...ver Push the same side of the cover out about inch Push on the open side of the cover to remove it from the chassis do not try to swing or pull it straight out after opening the left side 2 Front Cover Push the tabs toward the lip and 1 push that side of the cover out from the chassis When free about 2 pus the cover toward t other side of the chassis to completely release d h he 1 1 2 ...

Page 18: ...T26 Procedure 1 Push the release tab in the center of the cover lip while pushing the cover toward the rear of the chassis at the same time After the cover stops lift it off 2 Each chassis foot has a single screw Remove the screw then depress the foot s locking tab from the inside of the chassis Slide the foot off 3 You can now attach rack rails to the top and bottom now the sides of the chassis S...

Reviews: