background image

2-3

Chapter 2: System Safety

2-4

Operating Precautions

Care must be taken to assure that the cover of the blade unit is in place when the blade 
is operating to assure proper cooling. Out of warranty damage to the blade can occur if 
this practice is not strictly followed.

Any drive carrier without a hard drive installed must remain fully installed in the drive bay 
when the blade module is operating to ensure proper airflow.

Summary of Contents for SBA-7142G-T4

Page 1: ...SBA 7142G T4 Blade Module User s Manual Revison 1 0a ...

Page 2: ...resolution of any such disputes Super Micro s total liability for all claims will not exceed the price paid for the hardware product FCC Statement This equipment has been tested and found to comply with the limits for a Class A digital device pursuant to Part 15 of the FCC Rules These limits are designed to provide reasonable protection against harmful interference when the equipment is operated i...

Page 3: ...and servicing the SBA 7142G T4 Blade Module Chapter 3 Setup and Installation Refer to this chapter for details on installing the SBA 7142G T4 Blade Module into the SuperBlade chassis Other sections cover the installation and placement of memory modules and the installation of hard disk drives into the blade module Chapter 4 Blade Module Features This chapter covers features and component informati...

Page 4: ...SBA 7142G T4 Blade Module User s Manual iv Notes ...

Page 5: ...tallation 3 1 3 1 Overview 3 1 3 2 Installing Blade Modules 3 1 Powering Up a Blade Unit 3 1 Powering Down a Blade Unit 3 1 Removing a Blade Unit from the Enclosure 3 1 Removing Replacing the Blade Cover 3 2 Installing a Blade Unit into the Enclosure 3 2 3 3 Processor Installation 3 4 3 4 Onboard Battery Installation 3 5 3 5 Memory Installation 3 6 Populating Memory Slots 3 6 DIMM Installation 3 9...

Page 6: ...y Support 4 8 Hard Disk Drives 4 8 Chapter 5 RAID Setup Procedure 5 1 5 1 BIOS Setup 5 2 Chapter 6 BIOS 6 1 6 1 Introduction 6 1 Running Setup 6 1 6 2 Main BIOS Setup Menu 6 1 System Time System Date 6 2 6 3 Advanced Settings Menu 6 2 Boot Feature 6 3 Processor Clock Options 6 4 Advanced Chipset Control 6 4 IDE Configuration 6 6 PCI PnP Configuration 6 7 Super IO Device Configuration 6 8 Remote Ac...

Page 7: ...x A BIOS POST Codes A 1 A 1 BIOS POST Messages A 1 A 2 BIOS POST Codes A 4 Recoverable POST Errors A 4 Terminal POST Errors A 4 Uncompressed Initialization Codes A 4 Bootblock Recovery Codes A 5 Uncompressed Initialization Codes A 6 ...

Page 8: ...SBI 7226T T2 Blade Module User s Manual viii Notes ...

Page 9: ...re 3 5 16 Slot DIMM Numbering for Blade Module 3 8 Figure 3 6 Installing a DIMM into a Memory Slot 3 9 Figure 3 7 Installing a Hard Drive in a Carrier 3 11 Figure 4 1 SBA 7142G T4 Blade Unit Front View 4 1 Figure 4 2 Blade Control Panel 4 2 Figure 4 3 BHQGE Mainboard 4 4 Figure 4 4 BHQGE Block Diagram 4 5 Figure 4 5 Exploded View of SBA 7142G T4 Blade Module 4 7 Figure 5 1 IDE Configuration Screen...

Page 10: ...SBI 7226T T2 Blade Module User s Manual x Notes ...

Page 11: ...hipset Control Submenu 6 4 Table 6 4 IDE Configuration Submenu 6 6 Table 6 5 PCI PnP Configuration Submenu 6 7 Table 6 6 Super IO Configuration Submenu 6 8 Table 6 7 Remote Access Configuration Submenu 6 8 Table 6 8 Hardware Health Configuration Submenu 6 9 Table 6 9 ACPI Configuration Submenu 6 9 Table 6 10 IPMI Configuration Submenu 6 10 Table 6 11 Event Log Configuration Submenu 6 11 Table 6 12...

Page 12: ...SBI 7226T T2 Blade Module User s Manual xii Notes ...

Page 13: ...s that have been certified for use with the SuperBlade www supermicro com products superblade 1 2 Product Checklist of Typical Components Your blade module ships with its mainboard already installed in its chassis Memory hard disk drives and the CPU must all be installed by the user after shipment See Chapter 3 Setup and Installation on page 3 1 for details on installation of these components Asid...

Page 14: ...DDR3 1600 1333 1066 SDRAM DIMMs Both interleaved and non interleaved memory are supported so you may populate any number of DIMM slots Please refer to the Supermicro web site for a list of supported memory www supermicro com products superblade The detailed specifications for a blade module will contain a link to a list of recommended memory sizes and manufacturers Table 1 1 SBA 7142G T4 Blade Spe...

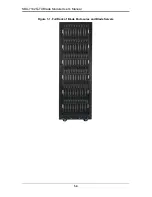
Page 15: ...installation details Density A maximum of ten blade modules may be installed into a single blade enclosure with two nodes Each blade enclosure is a 7U form factor so a standard 42U rack may accommodate up to six enclosures with 60 blade modules With the inclusion of six CMM modules twelve Gigabit Ethernet switches and twelve 10G or InfiniBand switches this would occupy up to 84U space in a convent...

Page 16: ...SBA 7142G T4 Blade Module User s Manual 1 4 Figure 1 1 Full Rack of Blade Enclosures and Blade Servers ...

Page 17: ...uper Micro Computer B V Het Sterrenbeeld 28 5215 ML s Hertogenbosch The Netherlands Tel 31 0 73 6400390 Fax 31 0 73 6416525 Email sales supermicro nl General Information support supermicro nl Technical Support rma supermicro nl Customer Support Asia Pacific Address Super Micro Computer Inc 4F No 232 1 Liancheng Rd Chung Ho 235 Taipei County Taiwan R O C Tel 886 2 8226 3990 Fax 886 2 8226 3991 Web ...

Page 18: ...SBA 7142G T4 Blade Module User s Manual 1 6 Notes ...

Page 19: ...boards they come into contact with Do not use mats designed to decrease electrostatic discharge as protection from electrical shock Instead use rubber mats that have been specifically designed as electrical insulators The power supply power cords must include a grounding plug and L line It must be plugged into grounded electrical outlets Power input requires 110 240 VAC depending upon your power s...

Page 20: ...nerated by two objects with different electrical charges coming into contact with each other An electrical discharge is created to neutralize this difference which can damage electronic components and printed circuit boards The following measures are generally sufficient to neutralize this difference before contact is made to protect your equipment from ESD Use a grounded wrist strap designed to p...

Page 21: ... unit is in place when the blade is operating to assure proper cooling Out of warranty damage to the blade can occur if this practice is not strictly followed Any drive carrier without a hard drive installed must remain fully installed in the drive bay when the blade module is operating to ensure proper airflow ...

Page 22: ...SBA 7142G T4 Blade Module User s Manual 2 4 Notes ...

Page 23: ...le Powering Down a Blade Unit A blade unit may be powered down in either of five ways Press the power button on the blade unit Use IPMIView or the web browser based management utility to power down if you have Operator or Admin privileges on the CMM Use SMCIPMItool when connected to the CMM to power down if you have Operator or Admin privileges on the CMM Use IPMIview or a browser connected to the...

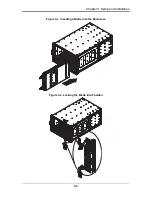
Page 24: ...he cover toward the front of the blade to lock it into place Installing a Blade Unit into the Enclosure Make sure the cover of the blade unit has been replaced first before installing a blade unit in the enclosure Installing a Blade Unit into the Enclosure 1 Slowly push the blade unit into its bay with the handles fully pulled out see Figure 3 1 2 When the blade stops push the handles back in to t...

Page 25: ...3 3 Chapter 3 Setup and Installation Figure 3 1 Inserting a Blade into the Enclosure Figure 3 2 Locking the Blade into Position ...

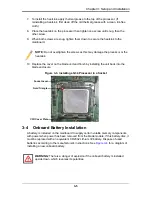
Page 26: ... down so that nothing comes into contact with the thermal grease on its underside 5 Raise the lever of the processor socket up until the processor is released from the socket then lift the silver cover plate and remove the processor Installing a Processor 1 If present remove the protective black PnP cap from the processor socket 2 Raise the lever of the processor socket until it reaches its upper ...

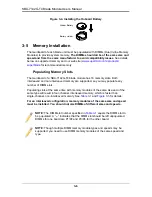
Page 27: ...igure 3 3 Installing a G34 Processor in a Socket 3 4 Onboard Battery Installation A battery is included on the mainboard to supply certain volatile memory components with power when power has been removed from the blade module If this battery dies it must be replaced with an equivalent CR2032 Lithium 3V battery Dispose of used batteries according to the manufacturer s instructions See Figure 3 4 f...

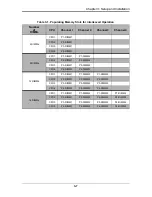
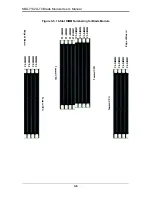
Page 28: ...so you may populate any number of DIMM slots Populating slots at the same time with memory modules of the same size and of the same type will result in four channel interleaved memory which is faster than single channel non interleaved memory See Table 3 1 and Figure 3 5 for details For an interleaved configuration memory modules of the same size and speed must be installed You should not mix DIMM...

Page 29: ...DIMM1 8 DIMMs CPU1 P1 DIMM1 P1 DIMM2 CPU2 P2 DIMM1 P2 DIMM2 CPU3 P3 DIMM1 P3 DIMM2 CPU4 P4 DIMM1 P4 DIMM2 12 DIMMs CPU1 P1 DIMM1 P1 DIMM2 P1 DIMM3 CPU2 P2 DIMM1 P2 DIMM2 P2 DIMM3 CPU3 P3 DIMM1 P3 DIMM2 P3 DIMM3 CPU4 P4 DIMM1 P4 DIMM2 P4 DIMM3 16 DIMMs CPU1 P1 DIMM1 P1 DIMM2 P1 DIMM3 P1 DIMM4 CPU2 P2 DIMM1 P2 DIMM2 P2 DIMM3 P2 DIMM4 CPU3 P3 DIMM1 P3 DIMM2 P3 DIMM3 P3 DIMM4 CPU4 P4 DIMM1 P4 DIMM2 P4...

Page 30: ... 16 Slot DIMM Numbering for Blade Module Edge of Board Toward CPU Toward CPU Edge of Board Toward CPU Toward CPU P1 DIMM2 P1 DIMM1 P1 DIMM3 P1 DIMM4 P3 DIMM3 P3 DIMM4 P3 DIMM2 P3 DIMM1 P4 DIMM2 P4 DIMM1 P4 DIMM3 P4 DIMM4 P2 DIMM3 P2 DIMM4 P2 DIMM2 P2 DIMM1 ...

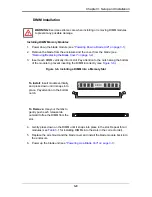
Page 31: ...DIMM into a Memory Slot 4 Gently press down on the DIMM until it snaps into place in the slot Repeat for all modules see Table 3 1 for installing DIMMs into the slots in the correct order 5 Replace the air shroud and the blade cover and install the blade module back into the enclosure 6 Power up the blade unit see Powering Up a Blade Unit on page 3 1 WARNING Exercise extreme care when installing o...

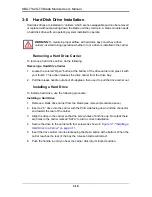
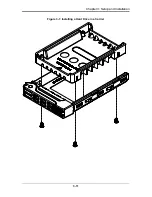
Page 32: ...e the following procedure Installing a Hard Drive 1 Remove a blank drive carrier from the blade see removal procedure above 2 Insert a 2 5 drive into the carrier with the PCB side facing down and the connector end toward the rear of the carrier 3 Align the drive in the carrier so that the screw holes of both line up Note that there are holes in the carrier marked SATA to aid in correct installatio...

Page 33: ...3 11 Chapter 3 Setup and Installation Figure 3 7 Installing a Hard Drive in a Carrier ...

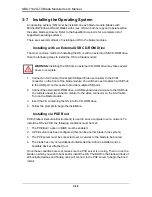
Page 34: ...d and a mouse to the USB hub You will also need to connect a monitor to the video connector on the SUV cable Turn on the blade module 3 Insert the CD containing the OS into the CD ROM drive 4 Follow the prompts to begin the installation Installing via PXE Boot PXE Preboot Execution Environment is used to boot a computer over a network To install the OS via PXE the following conditions must be met ...

Page 35: ...t may be performed with either of three software packages IPMIview SMCIPMItool or a Web based Management Utility These are designed to provide an administrator with a comprehensive set of functions and monitored data to keep tabs on the system and perform management activities Refer to the manuals on your SuperBlade CD ROM for further details on the various functions provided by these management p...

Page 36: ...SBA 7142G T4 Blade Module User s Manual 3 14 Notes ...

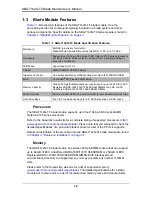
Page 37: ...s Four 1944 pin G34 sockets for AMD Opteron 6100 series processors Memory Supports up to 256 GB of ECC Registered DDR3 1600 1333 1066 SDRAM DIMMs or 64 GB of ECC Unbuffered DDR3 1600 1333 1066 SDRAM DIMMs in sixteen DIMM slots Storage Up to four 2 5 hot plug SATA or SSD hard disk drives Ports Serial USB and KVM port Features Onboard Matrox G200eW Graphics chip with 16 MB of SDRAM IPMI 2 0 Plug and...

Page 38: ...rns blade module on and off 2 KVM Button N A Initiates KVM function 3 Power LED Green Indicates power status On Orange Indicates power status Off with power cables plugged in 4 KVM UID LED Blue Indicates KVM being utilized on blade unit Flashing Blue Indicates UID activated on blade module 5 Network IB LED Flashing Green Indicates network activity over LAN Flashing Orange Indicates network activit...

Page 39: ... you wish to access To switch to another blade disconnect the cable then reconnect it to the new blade See the Web based Management Utility User s Manual on your SuperBlade system CD ROM for further details on using the KVM function remotely Table 4 3 Blade Module LED Indicators LED State Description Power LED Green Power On Amber Standby Red Power Failurea a In the event of a power failure the N ...

Page 40: ...nit is a proprietary design which is based on the AMD SR5650 SP5100 chipset See Figure 4 4 for a block diagram of this chipset Figure 4 3 for a view of the BHQGE Mainboard and Figure 4 5 for an exploded view diagram of the blade unit Figure 4 3 BHQGE Mainboard 7 1 10 3 4 8 1 3 2 2 1 1 2 2 9 6 4 11 5 ...

Page 41: ...ctor Not Shown 10 NPCM450 BMC Controller with Embedded Matrox G200eW Graphics chip 11 InfiniBand or 10G Daughter Card Connectors 4x DIMM 4x DIMM G34 SOCKET 3 4x DIMM G34 SOCKET 1 4x DIMM G34 SOCKET 2 VRM G34 SOCKET 4 VRM HT Link HT Link VRM VRM HT Link HT Link DDR3 1333 1066 DDR3 1333 1066 DDR3 1333 1066 DDR3 1333 1066 MIDDLE PLANE SATA CONN 4 PORTs SATA LPC I O 83527 LPC Front VGA WINBOND HERMON ...

Page 42: ...lso clear any passwords JBT1 consists of two contact pads located near the BIOS chip 10 in Figure 4 3 Clearing CMOS 1 First power down the blade and remove it from the enclosure 2 Remove the blade cover to access the mainboard see Removing Replacing the Blade Cover on page 3 2 for further details Short the CMOS pads with a metal object such as a small screwdriver 3 Replace the cover install the bl...

Page 43: ...4 7 Chapter 4 Blade Module Features 4 3 Blade Unit Components Figure 4 5 Exploded View of SBA 7142G T4 Blade Module 1 2 2 2 2 3 3 3 4 4 4 4 5 ...

Page 44: ...y reside in The four drives can be used to set up a RAID array SATA RAID 0 or 1 only or JBOD These drives use a blue color for the Blade HDD active LED Table 4 5 Main Components of SBA 7142G T4 Blade Unit Item Description 1 Blade Unit Module 2 SATA Hard Drives 4 total 3 DIMMs system memory 16 total 4 CPU Heatsinks 4 total 5 Top Cover WARNING Enterprise level hard disk drives are recommended for us...

Page 45: ...u later run a consistency check This is normal and is not a cause for concern NOTE The ACU allows you to use drives of different sizes in an array However during a build operation only the smaller drive can be selected as the source or first drive NOTE When migrating from single volume to RAID 0 migrating from a larger drive to a smaller drive is allowed However the destination drive must be at le...

Page 46: ...for RAID 1 In the ADVANCED SETTINGS screen of the BIOS Setup select the IDE CONFIGURATION sub menu and press ENTER 2 In the IDE Configuration screen that appears Figure 5 1 select the OnChip SATA Type option and select RAID 3 Press the Esc key once to exit the IDE CONFIGURATION screen and go to the EXIT menu in the BIOS setup From the Exit menu select SAVE CHANGES AND EXIT to Figure 5 1 IDE Config...

Page 47: ...5 3 Chapter 5 RAID Setup Procedure confirm your RAID configuration changes and exit the BIOS Setup Figure 5 2 Figure 5 2 Exit BIOS Setup ...

Page 48: ...7142G T4 Blade Module User s Manual 5 4 4 Your system will reboot When the reboot displays the screen message in Figure 5 3 press CTRL A to bring up the RAID Configuration Utility Figure 5 3 Screen Message ...

Page 49: ...the message Press the Delete key to enter Setup appears briefly at the bottom of the screen during the POST press the DELETE key to activate the main SETUP menu 6 2 Main BIOS Setup Menu The MAIN MENU screen has two main frames The left frame displays all the options that can be configured Grayed out options cannot be configured The right frame displays the key legend Above the key legend is an are...

Page 50: ... in the system System Time System Date You can edit the SYSTEM TIME SYSTEM DATE field to change the system time and date Highlight SYSTEM TIME or SYSTEM DATE using the ARROW keys Enter new values through the keyboard Press the TAB key or the ARROW keys to move between fields The date must be entered in DAY MM DD YYYY format The time is entered in HH MM SS format Please note that time is in a 24 ho...

Page 51: ...ff PS 2 Mouse Support Use this option to select support for the PS 2 mouse Options include Auto Enabled or Disabled Wait for F1 If Error This option sets the system to wait for the F1 key to be pressed if an error occurs Options include Enabled or Disabled Hit DEL Message Display This option displays the message Press DEL to run Setup in Post when enabled Options include Enabled or Disabled Interr...

Page 52: ...ble or disable the generation of ACPI _PPC _PPS and _PCT objects PowerCap This option can decide the highest performance P state in the OS Options include P state 0 P state 1 P state 2 P state 3 and P state 4 ACPI SRAT Table This option enables or disables the building of the ACPI SRAT Table CPU Down Core This option allows you to specify the Down Core support for the CPU Options include Disabled ...

Page 53: ...AM Timing Configuration DRAM Timing Configuration This option allows you to set the DRAM Timing configuration as Auto or Manual IOMMU This option enables or disables the IOMMU setting Memory Timing Parameters This option selects which node s timing parameters to display Options include CPU Node 0 or CPU Node 3 Memory Information Static memory information is also displayed in this submenu that incl...

Page 54: ...by increasing the amount of data transferred Only 512 bytes of data can be transferred per interrupt if block mode is not used Block mode allows transfers of up to 64 KB per interrupt Select Disabled to allow the data to be transferred from and to the device one sector at a time Select Auto to allows the data transfer from and to the device occur multiple sectors at a time if the device supports i...

Page 55: ...t required for system boot if your system has an OS that supports Plug Play Select No to allow AMIBIOS to configure all devices in the system PCI Latency Timer This option sets the latency of all PCI devices on the PCI bus Select a value to set the PCI latency in PCI clock cycles Options are 32 64 96 128 160 192 224 and 248 PCI IDE BusMaster When enabled this allows BIOS to use PCI busmastering fo...

Page 56: ...ED to prevent the serial port from accessing any system resources When this option is set to DISABLED the serial port physically becomes unavailable Select 2F8 IRQ3 to allow the serial port to use 2F8 as its I O port address and IRQ 3 for the interrupt address Serial Port 2 Attribute This option can set COM 2 as a normal serial port or virtual COM for SOL Options are COM or SOL Table 6 7 Remote Ac...

Page 57: ...arm CPU Information Static CPU health information is shown in this submenu The following information is shown CPU 1 Temperature CPU Temperature NB Temperature System Temperature CPU1 Vcore CPU2 Vcore CPU1 Mem VTT CPU2 Mem VTT CPU1 Mem CPU2 Mem 1 1V 5V 5VSB 12V 3 3Vcc and 3 3VSB Table 6 9 ACPI Configuration Submenu Menu Option Description ACPI Aware O S This option enables or disables ACPI support ...

Page 58: ...etting allows you to specify either a DHCP or Static IP Address Soruce If you select Static for the IP Address Source then the IP Address setting becomes active IP Address This setting allows you to set the IP Address for your LAN Configuration in decimal format of XXX XXX XXX XXX and with values less than 256 The current IP Address is statically displayed below Subnet Mask Use this sub menu for S...

Page 59: ...event logs The options are YES and NO to verify SR56x0 RD890S PCIE Error Log This option allows you to enable or disable the SR56x0 RD890S PCIE error log Options include Yes or No Table 6 12 Security Menu Menu Option Description Change Supervisor Password Select this option and press ENTER to access the sub menu and then type in the password Change User Password Select this option and press ENTER ...

Page 60: ...system 1st Drive These settings specify the boot sequence from the available hard disk drives devices installed in your system The devices to set are 1ST BOOT DEVICE 2ND BOOT DEVICE 3RD BOOT DEVICE 4TH BOOT DEVICE and so on CD DVD Drives This sub menu specifies the boot device priority sequence from the available CD DVD drives installed in your system 1st Drive These settings specify the boot sequ...

Page 61: ...his option to quit BIOS Setup without making any permanent changes to the system configuration and reboot the computer Select DISCARD CHANGES AND EXIT from the EXIT menu and press ENTER Discard Changes Select this option and press ENTER to discard all the changes and return to AMI BIOS Utility Program Load Optimal Defaults To set this feature select LOAD OPTIMAL DEFAULTS from the EXIT menu and pre...

Page 62: ...SBA 7142G T4 Blade Module User s Manual 6 14 Notes ...

Page 63: ...64k block at which the error was detected System RAM Failed at offset nnnn System RAM failed at offset nnnn of in the 64k block at which the error was detected Extended RAM Failed at offset nnnn Extended memory not working or not configured properly at offset nnnn System battery is dead Replace and run SETUP The CMOS clock battery indicator shows the battery is dead Replace the battery and run Set...

Page 64: ...On older boards check the cache jumpers You may have to replace the cache See your dealer A disabled cache slows system performance considerably CPU ID CPU socket number for Multi Processor error EISA CMOS not writeable ServerBIOS2 test error Cannot write to EISA CMOS DMA Test Failed ServerBIOS2 test error Cannot write to extended DMA Direct Memory Access registers Software NMI Failed ServerBIOS2 ...

Page 65: ...orrupted Parity Check 2 nnnn Parity error found in the I O bus BIOS attempts to locate the address and display it on the screen If it cannot locate the address it displays Press F1 to resume F2 to Setup F3 for previous Displayed after any recoverable error message Press F1 to start the boot process or F2 to enter Setup and change the settings Press F3 to display the previous screen usually an init...

Page 66: ... 80h Uncompressed Initialization Codes The uncompressed initialization checkpoint codes are listed in order of execution in table Table A 2 Table A 2 Uncompressed Initialization Error Codes Post Code Description D0h The NMI is disabled Power on delay is starting Next the initialization code checksum will be verified D1h Initializing the DMA controller performing the keyboard controller BAT test st...

Page 67: ... diskette FAT to find the clusters occupied by the AMIBOOT ROM file F3h Next reading the AMIBOOT ROM file cluster by cluster F4h The AMIBOOT ROM file is not the correct size E0h The onboard floppy controller if available is initialized Next beginning the base 512 KB memory test E1h Initializing the interrupt vector table next E2h Initializing the DMA and Interrupt controllers next E6h Enabling the...

Page 68: ...required initialization before the keyboard BAT command is issued 0Ch The keyboard controller input buffer is free Next issuing the BAT command to the keyboard controller 0Eh The keyboard controller BAT command result has been verified Next performing any necessary initialization after the keyboard controller BAT command test 0Fh The initialization after the keyboard controller BAT command test is...

Page 69: ...nitialization system static output devices will be done next if present See the last page for additional information 2Eh Completed post video ROM test processing If the EGA VGA controller is not found performing the display memory read write test next 2Fh The EGA VGA controller was not found The display memory read write test is about to begin 30h The display memory read write test passed Look for...

Page 70: ...4Ch The memory below 1 MB has been cleared via a soft reset Clearing the memory above 1 MB next 4Dh The memory above 1 MB has been cleared via a soft reset Saving the memory size next Going to checkpoint 52h next 4Eh The memory test started but not as the result of a soft reset Displaying the first 64 KB memory size next 4Fh The memory size display has started The display is updated during the mem...

Page 71: ...t 83h The command byte was written and global data initialization has completed Checking for a locked key next 84h Locked key checking is over Checking for a memory size mismatch with CMOS RAM data next 85h The memory size check is done Displaying a soft error and checking for a password or bypassing WINBIOS Setup next 86h The password was checked Performing any required programming before WINBIOS...

Page 72: ...tialization after the Coprocessor test next 9Eh Initialization after the Coprocessor test is complete Checking the extended keyboard keyboard ID and Num Lock key next Issuing the keyboard ID command next A2h Displaying any soft errors next A3h The soft error display has completed Setting the keyboard typematic rate next A4h The keyboard typematic rate is set Programming the memory wait states next...

Page 73: ...A 11 B1h Copying any code to specific areas 00h Code copying to specific areas is done Passing control to INT 19h boot loader next Table A 4 Uncompressed Initialization Error Codes Post Code Description ...

Page 74: ...SBA 7142G T4 Blade Module User s Manual A 12 Notes ...

Page 75: ...cted to result in significant injury or loss of life or catastrophic property damage Accordingly Supermicro disclaims any and all liability and should buyer use or sell such products for use in such ultra hazardous applications it does so entirely at its own risk Furthermore buyer agrees to fully indemnify defend and hold Supermicro harmless for and against any and all claims demands actions litig...

Page 76: ...SBA 7142G T4 Blade Module User s Manual ...

Reviews: