background image

    SC813 Chassis User's Guide

2-2

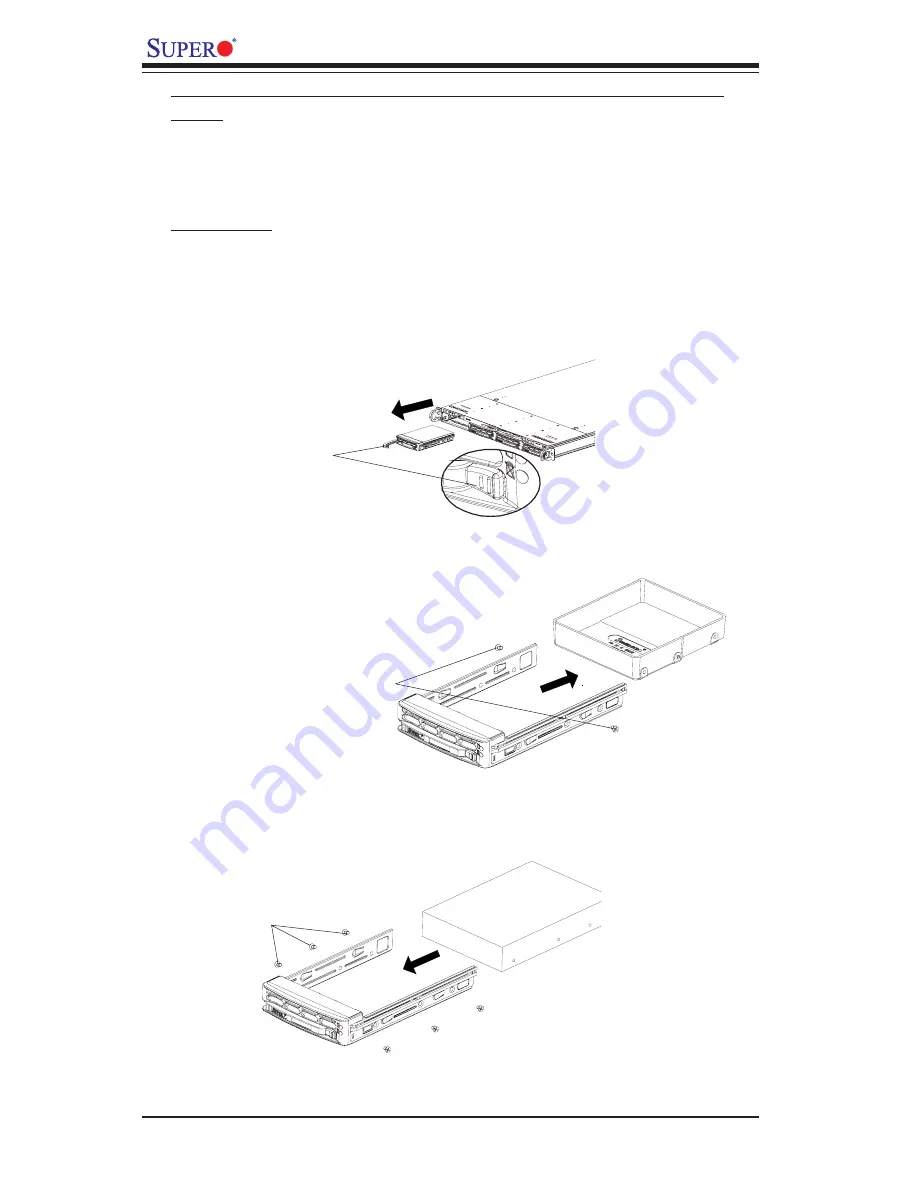
B. Accessing the SCA Drive Tray and Installing a Hard
Drive

To install the SCA drive into the chassis, you need to first  remove  the SCA

drive tray from the chassis so that the SCA drive can be installed in.

P r o c e d u r e s

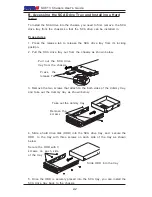
1. Press the release tab to release the SCA drive tray from its locking

position.

2. Pull the SCA drive tray out from the chassis


as shown below:

Pull out the SCA drive

tray from the chassis

P r e s s   t h e

release Tab

3. Remove the two screws that attach to the both sides of the dummy tray,

and take out the dummy tray as shown below:

Remove the

s c r e w s

Take out the dummy tray

4. Slide a hard drive disk (HDD) into the SCA drive tray, and  secure the

HDD  to the tray with three screws on each side of the tray


as shown

below:

Secure the HDD with 3

s c r e w s   o n   e a c h   s i d e

of the tray

Slide HDD  into the tray

5. Once the HDD is securely placed into the SCA tray, you can install the

SCA drive tray back to the chassis.

Summary of Contents for SC813 Series

Page 1: ...Rev 1 0b SUPER The SC813 SC813M Chassis Series InstallationGuide...

Page 2: ...1 6 Chapter 2 Installation Procedures 2 1 Section 1 Installing components into the SC813 Chassis 2 1 A Removing the top Cover of the SC813 Chassis 2 1 B Accessing the SCA Drive Tray to Install a Hard...

Page 3: ...ox contains the following One set of motherboard screws One set of drive screws One set of HDD hard disk drive screws One 1 AC power cord Rail Packaging includes One pair of rear inner slides to be in...

Page 4: ...owing One set of motherboard screws One set of drive screws One set of HDD hard disk drive screws One 1 AC power cord SC813 SC813M Front Panel LAN2 OH LAN1 PWR On Reset SW PWR SW B Front Panel LED Ind...

Page 5: ...x H x D 17 2 x 1 7 x 25 6 437mm x 43mm x 650 mm 17 2 x 1 7 x 25 6 437mm x 43mm x 650mm Weight 35 lb 15 9 kg 35 lb 15 9 kg Optional Kits Riser Cards Front Bezel Riser Cards Front Bezel Model SC813MS 35...

Page 6: ...um rated BTU 2750 BTUs Hr Nominal Output Vlotage 3 3V 20A 5 20A 12 36A 5 N A 12 1A 5Vsb 2A Serial 300W Series 350W Series 420W Series Mfr Model SP302 IS FSP350 60IU SP423 IS Mfr Part PWS 0054 PWS 042...

Page 7: ...ve the top cove from the chassis Procedures 1 Press the release tabs to release the top cover from its locking posi tion 2 Slide the top cover out from the chassis as shown below 3 You can now lift th...

Page 8: ...is as shown below Pull out the SCA drive tray from the chassis Press the release Tab 3 Remove the two screws that attach to the both sides of the dummy tray and take out the dummy tray as shown below...

Page 9: ...n the front side of the outer slides Note One pair of short brackets include screw threads and the other pair do not Use the only pair that will fit into your rack One pair of long brackets to be used...

Page 10: ...es with short and long brackets attached to the rack See the previous page 2 Use M5 screws and washers to secure the slide assemblies into the rack as shown below C 3 Installing the Slide Assemblies t...

Page 11: ...s into the grooves of the outer slide assemblies that are installed in the rack as shown below 2 Push the chassis all the way to the back of the outer slide assemblies as shown below The plastic bezel...

Page 12: ...the item Specify a location and choose Next 7 Click on Browse and choose D drive or wherever Supermicro Setup CD is in 8 Choose Qlogic folder and click on Open 9 System will automatically detect GEM3...

Page 13: ...a slim oppy drive This addendum describes the process involved to remove the front side USB COM port tray and replace it with a slim oppy drive Floppy Kit Before installing a slim oppy drive you must...

Page 14: ...SC813M Addendum 1 2 Figure 1 1 Floppy Kit Rails 2 Small ribbon cable 1 Screws 5 Power cable 1 Adapter 1 Floppy drive ribbon cable 1...

Page 15: ...Push this tab in to unlock the tray then push the tray out through the front of the chassis along with the cables you just detached from the motherboard and which are still at tached to the ports at...

Page 16: ...connect it to the oppy connector on the mother board Make sure you route this cable in such a way that it does not block air ow or touch other components and is not close to any fans 4 Replace the to...

Reviews: