background image


1

ENGLISH 

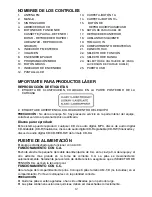
IMPORTANT SAFETY INSTRUCTIONS 

WARNING:


TO PREVENT FIRE OR SHOCK HAZARD DO NOT USE THIS PLUG WITH AN EXTENSION 

CORD, RECEPTACLE OR OTHER OUTLET UNLESS THE BLADES CAN BE FULLY 

INSERTED TO PREVENT BLADE EXPOSURE. TO PREVENT FIRE OR SHOCK HAZARD. 

DO NOT EXPOSE THIS APPLIANCE TO RAIN OR MOISTURE. 


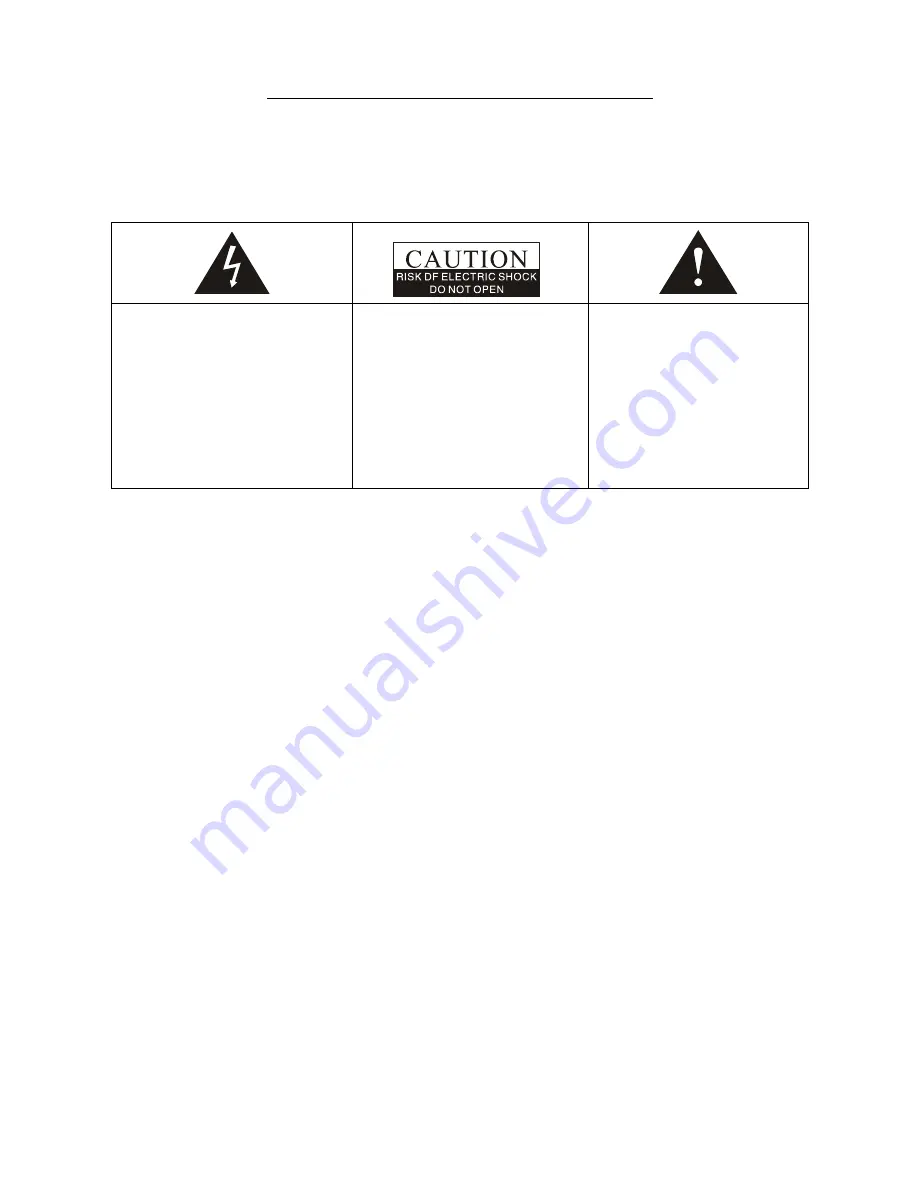
This lightning flash with 

arrowhead symbol, within an 

equilateral triangle, is intended 

to alert the user to the 

presence of insulated 

dangerous voltage within the 

products enclosure that may 

be of sufficient magnitude to 

constitute a risk of electric 

shock presents. 

Warning: to reduce the risk of 

electric shock, do not remove 

cover (or back ) no user - 

serviceable part inside. 


Refer servicing to qualified 

service personnel. 

The exclamation point 

within an equilateral triangle 

is intended to alert the user 

to the presence of important 

operating and maintenance 

(servicing) instructions in 

the literature accompanying 

the appliance.   


1.


Read these instructions. 

2.


Keep these instructions. 

3.


Heed all warnings. 

4.


Follow all instructions. 

5.


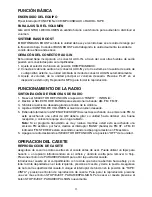
Do not use this apparatus near water. 

6.


Clean only with dry cloth. 

7.


Do not block any ventilation openings.   

8.


Do not install near any heat sources such as radiators, heat registers, stoves, or other 

apparatus (including amplifiers) that produce heat. 

9.


Protect the power cord from being walked on or pinched particularly at the plugs, 

convenience receptacles, and at the point where it exits from the apparatus. 

10.


Unplug the apparatus during lightening sorts or when unused for long periods of time. 

11.


Refer all servicing to qualified personnel.   

12.


This appliance should not be exposed to dripping or splashing water and no objects filled 

with liquids such as vases should be placed on apparatus. 

13.


The AC socket it is used to unplug the unit power cord and it must be easily accessible 

every time it is necessary. 

14.


No flames objects, like candles, must be placed on the unit. 

Dripping warning:

 The products should not be exposed to dripping or splashing and that 

no objects filled with liquids, such as vases, shall be placed on the product. 

Plug warning: 

The main plug is used as the disconnect device, the disconnect device 

shall remain readily operate. 

Ventilation warning:

 The normal ventilation of the product shall not be impeded for 

intended use. Make sure there is enough space above and besides the holes. Install the 

unit in a place with suitable ventilation openings (around 7cm). 


Summary of Contents for SC-745

Page 1: ...INSTRUCTION MANUAL PORTABLE STEREO CD MP3 USB PLAYER WITH STEREO RADIO CASSETTE RECORDER MANUAL DE INSTRUCCIONES ESTERÉO CD MP3 USB PLAYER PORTÁTIL CON GRABADORA DE CINTA Y RADIO SC 745 ...

Page 2: ...ot block any ventilation openings 8 Do not install near any heat sources such as radiators heat registers stoves or other apparatus including amplifiers that produce heat 9 Protect the power cord from being walked on or pinched particularly at the plugs convenience receptacles and at the point where it exits from the apparatus 10 Unplug the apparatus during lightening sorts or when unused for long...

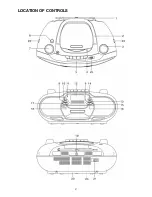
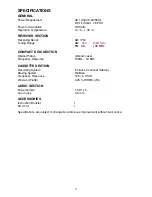
Page 3: ...2 LOCATION OF CONTROLS ...

Page 4: ...nit consult all servicing to qualified service personnel Discs for Playback This system can playback all digital audio CD MP3 finalized digital audio CD Recordable CD R discs finalized digital audio CD Rewritable CD RW discs and CD DA format digital audio CD CD R CD RW discs POWER SOURCE This unit is designed to be operated on AC DC AC OPERATION Plug the smaller end of AC power cord into AC jack o...

Page 5: ... 3 Tune to required station by rotating the TUNING KNOB 4 Rotate the VOLUME CONTROL to comfortable volume level 5 Extend the TELESCOPIC ANTENNA to its full length if you are listening to FM broadcasting Gently rock the unit back and forth to get the best reception when you are listening to AM program or place the unit in an open place Note If the broadcasting program is too noisy when you are list...

Page 6: ... you want to record 4 Press CD PLAY PAUSE button to start playback Press RECORD key to begin recording RECORD key and PLAY key go down simultaneously 5 Press PAUSE key to interrupt or edit recording Press it again to resume recording 6 Press STOP EJ Key to end recording To hear what you recorded follow instructions in PLAYING A CASSETTE TAPE RECORDING FROM AUX 1 Insert a blank cassette tape into t...

Page 7: ...ng the PLAY button to bright head and pinch roller into view Be sure to press the STOP button after cleaning the mechanism Damage to the pinch wheel can occur if the unit is left in PLAY mode with the power switch off Under no circumstances should you attempt to lubricate any part of the machine USING THE CD MP3 LOADING A DISC 1 Set the FUNCTION switch to CD MP3 USB AUX position 2 Open the CD door...

Page 8: ...is stopped Up to CD 20 tracks MP3 99 tracks can be stored in the memory in any order 1 In the stop mode press the PROG P MODE button the PROGRAM will flash and the P01 will be show on the display 2 Press the CD NEXT or BACK button to select the first desired track to be programmed 3 Press the PROG P MODE button to enter The display changes to show P02 4 With MP3 disc keep pressed FOLD 10 or FOLD 1...

Page 9: ...button once to cancel LISTENING TO USB FLASH DISK DEVICE 1 Set the FUNCTION switch to CD MP3 USB AUX position 2 Connect the USB Flash Disk Device into the USB PORT 3 If the audio CD in the tray please press and hold the PLAY PAUSE USB button to select the USB function 4 If the USB is readable the display will show USB and The total number of tracks after several seconds 5 Press the PLAY PAUSE USB ...

Page 10: ...108 MHz COMPACT DISC SECTION Optical Pickup 3 Beam Laser Frequency Response 100Hz 16 KHz CASSETTE SECTION Recording System 2 Tracks 2 channel Stereo Biasing System DC Bias Frequency Response 125 6 3 KHz Wow and Flutter 0 35 WRMS JIS AUDIO SECTION Power Output 1 8 W x 2 Aux in jack 3 5 mm ACCESSORIES Instruction Booklet 1 AC Cord 1 Specifications are subject to change for continuous improvement wit...

Page 11: ...turas de ventilación 8 No lo instale cerca de fuentes de calor tales como radiadores estufas u otros dispositivos incluyendo amplificadores que produzcan calor 9 Evite que el cable de alimentación sea pisado o doblado especialmente en la parte del conector toma de corriente y el punto donde sale del equipo 10 Unplug the apparatus during lightening sorts or when unused for long periods of time 11 S...

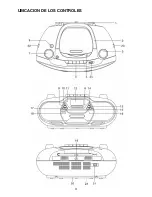
Page 12: ...11 UBICACION DE LOS CONTROLES ...

Page 13: ...vicio en la parte interior del equipo solicite el servicio al personal técnico cualificado Discos para reproducir Este sistema puede reproducir cualquier CD de audio digital MP3 discos de audio digital CD Grabable CD R finalizados discos de audio digital CD Regrabable CD RW finalizados y discos de audio digital CD CD R CD RW de formato CD DA FUENTE DE ALIMENTACIÓN El equipo está diseñado para func...

Page 14: ...girando el botón de la sintonía 4 Ajuste el CONTROL DE VOLUMEN al nivel de volumen deseado 5 Extienda totalmente la ANTENA TELESCÓPICA si está escuchando una emisora de FM Si está escuchando una señal de AM deberá girar su unidad hasta obtener una buena recepción o colocar el equipo en un lugar abierto Nota Si el programa transmitido es muy ruidoso mientras usted está escuchando una emisora FM est...

Page 15: ...ABAR DESDE UN CD MP3 1 Mueva el SELECTOR DE FUNCION a la posición CD MP3 USB AUX 2 loque un CD y seleccione la canción que desea grabar 3 Presione el botón RECORD y el botón PLAY se accionará automáticamente el CD también empezará la reproducción automáticamente 4 Presione el botón PAUSE para interrumpir o editar la grabación Púlselo otra vez para continuar la reproducción 5 Presione el botón STOP...

Page 16: ...dad Un rango de productos para cuidado del casete estan disponibles La cabeza para borrar y la grabar reproducir y la superficie del riel son delicadas y no deben de tocar con objetos metálicos como desatornilladores Usted puede encontrar mas fácil el limpiar el ensamblaje al presionar el boton de PLAY REPRODUCCION para traer la cabeza y los rieles a la vista Asegurese de presionar el boton de PAR...

Page 17: ...elante luego presione el botón CD SKIP SEARCH FORWARD BACKWARD para seleccionar la pista deseada Por ejemplo para seleccionar la pista 17 presione el botón FOLD 10 y luego presione el botón CD SKIP SEARCH FORWARD seis veces Seleccionar una carpeta deseada solo para discos MP3 Nota Si el disco MP3 contiene más de una carpeta Presione y mantenga presionado el botón FOLD 10 o FOLD 10 más de un segund...

Page 18: ...roscan sólo para CD Presione el botón PROG P MODE en modo PLAY hasta que se visualice INTRO en la pantalla la unidad empezará a reproducir los primeros 10 segundos de música de cada pista hasta que todas las pistas sean reproducidas Presione el botón PROG P MODE una vez más para cancelar OPERACIÓN DE UNA MEMORIA USB REPRODUCCION USB El conector de entrada USB es compatible con memorias USB esto no...

Page 19: ...10 220 60 50 Hz CC 12V UM 1 x 8 PCS Potencia 18 Watts Temperatura para Operacion 5 C 35 C SECCION RECIBIDORA Bandas recibidoras AM FM Rango de Sintonia AM 530 1600 KHz FM 88 108 MHz SECCION DEL CD Lector óptico 3 rayos laser Respuesta de Frecuencia 100Hz 16KHz SECCION DE LA CASETERA Sistema de grabación 2 Pistas 2 Canales Esteréo Sistema Biasing Borrador Magnetico Respuesta de Frecuencia 125 6 3 K...

Reviews: