background image


4.


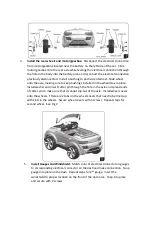
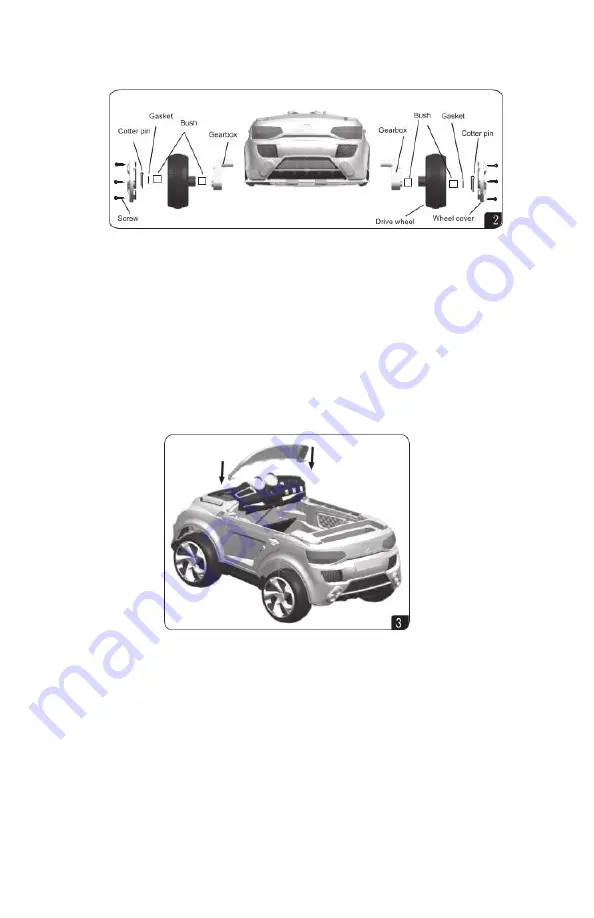
Install the rear wheels and motor/gearbox:  

Disconnect the electrical connection 

from motor/gearbox located near the battery on the left side of the car.  Slide 
motor/gearbox onto the rear axle while feeding the electrical connection through 
the hole in the body into the battery area and reconnect the electrical connection 
previously disconnected.  Install a bushing to each side of wheel.  Slide wheel 
onto the axle, making sure to keep bushings installed in the wheel stay in place.  
Install washer and insert cotter pin through the hole in the axle and spread ends 
of cotter pin to make sure that it cannot slip out of the axle.  Install wheel covers 
onto the wheels.  There are 2 tabs on the wheel covers that need to be lined up 
with slots in the wheels.  Secure wheel covers with 3 screws.  Repeat steps for 
second wheel.  See Fig 2


5.


Install Gauges and Windshield:

  Match color of electrical connector on gauges 

to corresponding electrical connector on the dash and make connection.  Snap 
gauge into place on the dash.  Repeat steps for 2

nd

 gauge.  Insert the 

windshield to proper location on the front of the dash area.  Snap into place 
and secure with 2 screws.  


Summary of Contents for Audi Q3

Page 1: ...ion and Operation Instructions Please read this instruction manual carefully It is important to read and follow all of the steps during assembly to ensure proper operation and safety of the child Plea...

Page 2: ...is recommended Please make sure that the child uses caution to avoid falls and collisions causing injury to the child or third party Do not pick up vehicle by steering wheel Do not pick up battery by...

Page 3: ...Screws Nuts 4 Rear Wheel 10 Right Window 16 Cotter Pins 5 Drive Motor 11 Back Window 6 Rearview Mirror 12 Steering Wheel ASSEMBLY INSTRUCTIONS 1 Install the car windows rear windows and rear speaker...

Page 4: ...the car until it snaps into place Install the exterior rearview mirrors into place and secure with screws from the bottom of the car 3 Install front wheels Install a washer on the front axle Install a...

Page 5: ...n place Install washer and insert cotter pin through the hole in the axle and spread ends of cotter pin to make sure that it cannot slip out of the axle Install wheel covers onto the wheels There are...

Page 6: ...olt and tighten until snug Charging the battery The charging port is located just under the front portion of the seat Plug the charger into the charging port first then plug the charger into wall outl...

Page 7: ...to the manual position To move the car forward forward reverse switch has to be set to the forward position and to move the car backward the switch will need to be set to the reverse position To oper...

Page 8: ...let 3 Battery charger is damaged Re connect the battery connector to the car electrical connector Try another wall outlet Replace battery charger Shortened battery life Battery was not charged fully B...

Page 9: ...ease turn off power switch If not using for an extended period of time please disconnect the battery CHARGING and BATTERY MAINTENANCE IMPORTANT Battery must be charged for a minimum of 12 hours prior...

Reviews: