background image


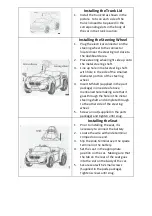
Installing the Trunk Lid 

1.


     Install the trunk lid as shown in the   
     picture.  Tabs on each side of the   
     trunk lid need to be placed in the   
     corresponding slots in the body of  
     the car in the trunk location.


Installing the Steering Wheel 

1.


Plug the electrical connector on the 
steering wheel to the connector 
located near the steering rod close to 
the dashboard area. 

2.


Place steering wheel right side up onto 
the metal steering shaft. 

3.


Line up hole in metal steering shaft 
with hole in the side of the smallest 
diameter portion of the steering 
wheel. 

4.


Insert M5 bolt (supplied in the part 
package) in one side of above 
mentioned hole making sure that it 
goes through the hole in the metal 
steering shaft and complete through 
to the other side of the steering 
wheel. 

5.


Screw on nut (supplied in the parts 
package) and tighten until snug.


Installing the Seat 

1.


Prior to installing the seat, it is 
necessary to connect the battery. 

2.


Locate the wire with slide terminal 
crimped on one end. 

3.


Slip the slide terminal over the spade 
terminal on the battery. 

4.


Set the seat in the appropriate 
position on the car.  Making sure that 
the tab on the rear of the seat goes 
into the slot on the body of the car. 

5.


Secure seat with 2 small screws 
(Supplied in the parts package).  
Tighten screws until snug.


Summary of Contents for BMW i8 Style

Page 1: ...ctions Please read this instruction manual carefully It is important to read and follow all the steps during assembly to ensure proper operation and safety of the child Please keep this manual for fut...

Page 2: ...afety equipment is recommended Please make sure that the child uses caution to avoid falls and collisions which could cause injury to the child or third party Do not pick up vehicle by steering wheel...

Page 3: ...11 R Gearbox 1 20 Battery Bracket 1 3 Front Wheel 2 12 R Mirror 1 21 Battery 1 4 Wheel Cover 4 13 L Mirror 1 22 Remote Control 1 5 Washer 6 14 Grill 1 23 N A 6 Cotter Pin 4 15 Decal 2 24 N A 7 Seat 1...

Page 4: ...all wheel and bushing as shown in photo See Fig 1 8 Place a washer onto the axle and slip the cotter pin through hole in axle and spread ends of cotter pin to secure the assembly 9 Install wheel cover...

Page 5: ...wheel 4 Insert M5 bolt supplied in the part package in one side of above mentioned hole making sure that it goes through the hole in the metal steering shaft and complete through to the other side of...

Page 6: ...he car Once power is on all the lights come on accompanied by the sound of the engine To allow child to operate the car remote control manual switch must be set to the manual position To move the car...

Page 7: ...s lead acid and other materials that are toxic and corrosive Do not open the charger Exposed wiring and circuitry inside case could cause electric shock NEVER allow a child to handle or charge the bat...

Page 8: ...Possible Solutions Car will not move 1 Battery voltage is low 2 Battery connector or wires are loose 3 Battery is damaged or dead 4 Electrical box or motor is damaged Charge the battery Re connect the...

Page 9: ...epartment A dead spot means the electric power is not being delivered to the terminal connection Call our service department Self Resetting Breaker The vehicle is equipped with a self resetting breake...

Reviews: