background image

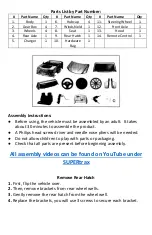
Install Rear Hatch 

1.

 Align the tabs on the hatch with the car. 

2.

 Snap into place, then secure with screws. 


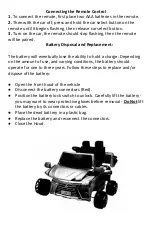
Connecting the Battery 

1.

 Remove the battery cover by twisting the latches. 

2.

 INSPECT WIRING, power connections should be red wire to positive 

(+) side of battery and black wire to negative (-) side of battery.  
Typically, these connections are made during the quality control 
inspection prior to shipping.   

3. 

Check all remaining connectors to make sure all wiring is connected 

for proper operation. 

4. 

Replace the battery cover. 


Install the Windshield and Hood 

1.

 Align the tabs on the windshield with the car and press firmly into 

place.  

2.

 Screw down and secure the windshield.  

3.

 Once the windshield is secure, insert the tabs on the hood to the slots 

on the windshield. 

4.

 Then close the hood.  


Install the Side Mirrors 

1.

 Align side mirror with the hole on the body. 

2.

 Gently pressing in slide mirror into hole. 

3.

 Mirror will pop into place, repeat for other side.  


Install the Seat 

1.

 Align the tabs on the back of the seat with the hole on the rear hatch. 

2.

 Then align the screw holes, and secure with screws.  


Summary of Contents for Licensed Lexus LX

Page 1: ...sembly and Operation Instructions Please read this instruction manual carefully It is important to read and follow all the steps during assembly to ensure proper operation and safety of the child Plea...

Page 2: ...sions causing injury to the child or third party Do not pick up vehicle by steering wheel Do not pick up battery by wires or charger Keep all plastic bags out of the reach of young children Not recomm...

Page 3: ...embled by an adult It takes about 30 minutes to assemble the product A Philips head screw driver and needle nose pliers will be needed Do not allow children to play with parts or packaging Check that...

Page 4: ...ps 1 4 for all tires 6 Then collect the hubcaps and the stickers 7 Place one sticker in the center of each hubcap 8 Snap hubcap into place on the tire 9 Repeat for all tires Connecting the Steering Wh...

Page 5: ...all wiring is connected for proper operation 4 Replace the battery cover Install the Windshield and Hood 1 Align the tabs on the windshield with the car and press firmly into place 2 Screw down and s...

Page 6: ...ventually lose the ability to hold a charge Depending on the amount of use and varying conditions the battery should operate for one to three years Follow these steps to replace and or dispose of the...

Page 7: ...open the battery Battery contains lead acid and other materials that are toxic and corrosive Do not open the charger Exposed wiring and circuitry inside case could cause electric shock NEVER allow a c...

Page 8: ...eat such as stoves and heaters Plastic parts may melt Recharge the battery after each use Only an adult should handle the battery Recharge the battery at least once a month when not being used Do not...

Page 9: ...eded Uneven or uphill path Vehicle is being used in harsh conditions Change the battery Charge the battery Do not exceed max weight limit Use on flat surfaces Avoid using car in harsh conditions Noise...

Reviews: