background image

SPECIFICATIONS:


Car Type: 

Rolls Royce Style 

Battery Type: 

6V7AH 

Electric Motor: 

12V30W(Drive)  12V8W(Steering) 

Age Range: 

 5 Years 

Max. Weight: 

65 lbs 

Product Size: 

50

”L x 

34

”W x 2

5

”H


Avg. Speed: 

 3 MPH 

Charging time: 

8-12 hrs 

Avg. Use Time: 

1-2 Hrs (depending on use) 

Remote Battery: 

2 - AA (not included) 


IMPORTANT! 


Assembly is required by an adult 


Keep small parts out of reach of young children.  (To avoid choking potential) 


Adult supervision is recommended during operation by child to avoid injury. 


Charger connection should be performed by an adult. 


Battery must be charged for a minimum of 12 hours prior to first use of the car 
to avoid damage to the battery. 


Keep all plastic bags out of the reach of young children. 


Please check the product regularly for any loose parts or wires to ensure 
proper operation. 


Please retain instruction manual for future reference. 


Please make sure that the child uses caution to avoid falls and collisions 
causing injury to the child or third party. 


Not recommended for children under the age of 2 yrs. Due to small parts that 
could cause a choking hazard. 


Battery charger should be examined for damage prior to each use.  It is 
important to inspect the cord and both ends for damage.  In the event there is 
damage found, DO NOT USE THE CHARGER!  Contact us for replacement 
charger. 


Please retain packaging in the event it is necessary to return for repair. 


WARNING!!  NOT TO BE USED ON STREETS or IN TRAFFIC. 

PARTS LIST: 

:


Summary of Contents for Rolls Royce Style

Page 1: ...ation and Operation Instructions Please read this instruction manual carefully It is important to read and follow all of the steps during assembly to ensure proper operation and safety of the child Pl...

Page 2: ...Scan this QR Code to view the Rolls Royce Assembly Video...

Page 3: ...r to avoid damage to the battery Keep all plastic bags out of the reach of young children Please check the product regularly for any loose parts or wires to ensure proper operation Please retain instr...

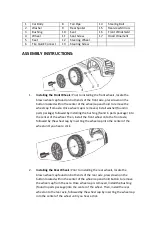
Page 4: ...ckage followed by installing the bushing found in parts package into the center of the wheel Then install the front wheel onto the front axle followed by the wheel cap by inserting the wheel cap into...

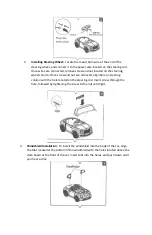
Page 5: ...and nut are removed align hole on steering column with the hole located on the steering rod Insert screw through the hole followed by tightening the screw to the nut until tight 4 Windshield Installa...

Page 6: ...he wire to any of the 4 white slots located on the white power board Once connected place spoiler tabs into the open slots at the rear of the car and push until you hear a click 7 Installing Seat Inse...

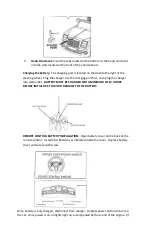
Page 7: ...e charger into wall outlet BATTERY MUST BE CHARGED FOR A MINIMUM OF 12 HOURS BEFORE INITIAL USE TO AVOID DAMAGE TO THE BATTERY REMOTE CONTROL BATTERY INSTALLATION Open battery cover on the back of the...

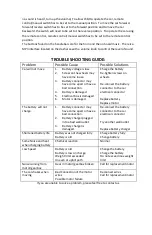
Page 8: ...6 Motor is damaged Charge the battery Re tighten screws on wheels Re connect the battery connector to the car electrical connector Replace battery Replace motor The battery will not charge 1 Battery...

Page 9: ...ease turn off power switch If not using for an extended period of time please disconnect the battery CHARGING and BATTERY MAINTENANCE IMPORTANT Battery must be charged for a minimum of 12 hours prior...

Reviews: