background image

6

ASSEMBLY INSTRUCTIONS - PELLET GRILL

1.  Unpack and Prepare for Assembly - Remove all items from inside grill body and lay grill body on 

its back . For ease of assembly, complete steps 1-5 below before standing grill upright .

Note:  Flatten the cardboard box out and lay everything on it . This serves as a good working area and 

it helps prevent the grill from getting scratched or damaged during installation .

2.  Attach legs -  with fixed wheels (#3) on the right side, with wheels facing outward to the front 

and back of grill . Attach legs with the rotating casters (#2) on the left side of the grill . Attach all 

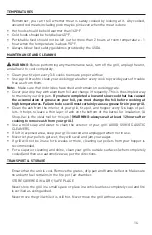
four legs using bolts (A), flat washers (B), lock washers (C) and nuts (D) DO NOT FULLY TIGHTEN 

HARDWARE All hardware is found in included Hardware Packet (#12) .

3.  Attach Bottom Shelf - Align shelf (#4) between grill legs and attach using 4 bolts (A), flat wash-

ers (B), lock washers (C) and nuts (D) . FULLY TIGHTEN HARDWARE.

4.  Grill Handle Assembly - Attach the handle (#5) to grill lid using the small bolts that are screwed 

into handle .

5.  Stand Grill Upright - You will need two people to do this as the grill is very heavy .

A

B

C

D

 Correct Hardware Arrangement

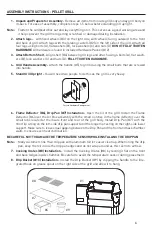
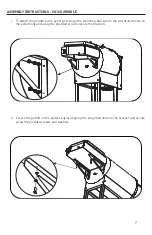
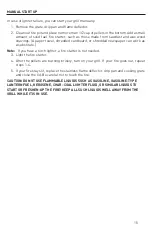
6.  Flame Deflector (#6), Drip Pan (#7) Installation - Open the lid of the grill . Install the Flame 

Deflector (#6) over the Air Box assembly with the small notches in the flame deflector over the 

small tabs located at the inside front and rear of the grill body . Install Drip Pan (#7) with the 

short lip sitting on the left-side drip pan support and the longer lip resting on the right-side lower 

support . Make sure to leave equal gapping between the Drip Pan and the front and back chamber 

walls to ensure even heat distribution .

BE CAREFUL NOT TO DAMAGE THE TEMPERATURE SENSOR WHILE INSTALLING THE DRIP PAN
Note:  
Many customers line their drip pan with aluminum foil for easier clean up . When lining the drip 

pan, keep the foil inside the drip pan edges and do not wrap around as this restricts airflow .

7.  Cooking Grates (#8) Installation -  Install the Cooking Grates (#8) by resting it flat on the front 

and back ledges inside chamber . Be careful to avoid the temperature sensor during placement .

8.  Drip Bucket (#10) Installation - Install the Drip Bucket (#9) by clipping the handle to the inte-

grated hook on grease spout on the right side of the grill and allow it to hang .

#8

#7

#6

#9

#1

Summary of Contents for LIFE SMART SCS-P760

Page 1: ... com or email us at cs scsources com Please have your model and serial number ready ATTACH YOUR RECEIPT HERE Purchase Date ____________Serial Number located on back of unit __________________ LIFE SMART is a registered trademark of Supply Chain Sources LLC All Rights Reserved 1 COMBO PELLET SMOKER GRILL AND GRIDDLE model customer number SCS P760 Pellet Grill SG160 Griddle ...

Page 2: ...structions 6 Troubleshooting 8 Initial Set Up Procedure 10 Temperature Probe 10 Control Panel 11 Operating Instructions 11 Test Modes and Adjustments 12 Performance Tips 13 Temperatures 14 Transport and Storage 14 Maintenance and Cleaning 14 Manual Start Up 15 One Year Limited Warranty 16 ...

Page 3: ... Assembled Body 1 2 Front Grill Caster Wheel Legs 2 3 Hopper Base Large Legs 2 4 Bottom Shelf 1 5 Grill Door Handle 1 6 Flame Deflector 1 7 Drip Pan 1 8 Cooking Grates 2 9 Drip Bucket 1 10 Temperature Probe 1 11 Hardware Packet 1 A SG160 Griddle Body 1 B Griddle Bracket Assembly 2 C Hardware Screws 4 ...

Page 4: ...moker when not in use and before moving Never remove grounding plug or use with an adapter to two prongs Keep electric plugs off ground and dry Do not use water or other liquid spray to clean product without first unplugging electric controller and removing heating element Fuel such as charcoal briquettes is not to be used with appliance Use only on properly grounded outlet Leave a minimum of 60 c...

Page 5: ...gh for turkeys or large roasts 250 sq in Cooking area with optional second shelf Enamel powder coated steel cooking grate Steel fire pot Steel heat deflector Steel drip pan Stainless Steel ignition system Construction Specifications 3 exhaust vent holes and digitally controlled blower fan Steel hardware High temperature RTV caulk Rubber grommets at all wire through holes to prevent chaffing Modula...

Page 6: ...wo people to do this as the grill is very heavy A B C D Correct Hardware Arrangement 6 Flame Deflector 6 Drip Pan 7 Installation Open the lid of the grill Install the Flame Deflector 6 over the Air Box assembly with the small notches in the flame deflector over the small tabs located at the inside front and rear of the grill body Install Drip Pan 7 with the short lip sitting on the left side drip ...

Page 7: ...pellet grill Align the mounting brackets to the pre drilled holes on the pellet body and using the provided screws secure the brackets 2 Secure the griddle to the pellet body by aligning the pregrilled holes to the bracket and secure using the provided screws and washers ...

Page 8: ... wire connections If any wires have become detached refer to controller schematic on page 19 Grill is smoking ex cessively smoke is discolored Pellet quality age Inspect pellets ensure that pellets are dry and have not broken down into sawdust If problem persists remove pellets from the hopper and clean ash from your fire pot replace with fresh dry pellets Excess ash in fire pot Check the burn pot...

Page 9: ... pellets and try again If problem persists your auger motor may need to Flare ups Excessively greasy food while tempera ture setting is too high Cook at 350 degrees or below when cooking exces sively fatty foods Excessive grease build up Excessively greasy food Cook at 350 degrees or below when cooking exces sively fatty foods Smoke coming from hopper Excess ash in fire pot Clean grill interior Pe...

Page 10: ...ing drip pan keep foil inside drip pan edges and do not wrap around as this can restrict airflow 8 Turn on your Pellet Grill by pressing the power button at the left of the panel Set tem perature to 400 F by setting the digital control 9 Within a few minutes you will see smoke and your grill will light 10 Once the temperature is at 400 F allow it to run for 1hour this will provide a final cure and...

Page 11: ...int Meat 8 Actual Indicator Light Digital display shows actual temperature when illuminated 9 Probe Temp Button Toggles between the two meat Probes A or Probe B OPERATING INSTRUCTIONS 1 Press the power button I O to turn the grill on The digital display will illuminate and the grill begins startup procedure If your grill fails to light within 30 minutes of startup the grill will turn OFF and displ...

Page 12: ...display S 5 Each additional press of the Probe Temp button will advance you through below next function test 2 Displaying AUG is test mode for your auger motor You should be able to look in your grills fire pot and see the end of the auger turning very slowly 3 Displaying IGN is test mode for your grills ignition system You should be able to look into grills fire pot and see your igniter begin to ...

Page 13: ...g OTHER TIPS Clean your grill regularly to maintain beauty and proper function It is advised to clean before any long cook Always use grill on a level surface Clean fire pot regularly This will ensure proper ignition and proper heating Not all pellets are created equal always use dry and fresh pellets Always store pellets in a dry area Get to know your grill keep good cooking notes Practice makes ...

Page 14: ...oking at high temperatures Failure to do so will most certainly cause a grease fire in your grill Clean the ash from the interior of your grill fire pot and hopper every 5 6 bags of pel lets It helps to leave a thin layer of ash on the bottom of the barrel for insulation A Shop Vac is the ideal tool for this job WARNING always wait at least 12 hours after cooking to remove ash from your grill Use ...

Page 15: ...s a substitute Note If you have a torch lighter a fire starter is not needed 3 Light the fire starter 4 After the pellets are burning briskly turn on your grill If your fire goes out repeat steps 1 4 5 If your fire stays lit replace the stainless flame deflector drip pan and cooking grate and close the lid Be careful not to touch the fire CAUTION DO NOT USE FLAMMABLE LIQUIDS SUCH AS GASOLINE GASOL...

Page 16: ...nder this warranty will become the property of manufacturer The manufacturer reserves the right to change manufacturers of replacement parts or products for use in order to cover any existing warranty The purchaser may be asked to provide the supplier with proof of purchase documents including the date of purchase if requested Any evidence of alteration erasing or forgery of proof of purchase doc ...

Reviews: