

9
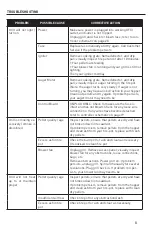
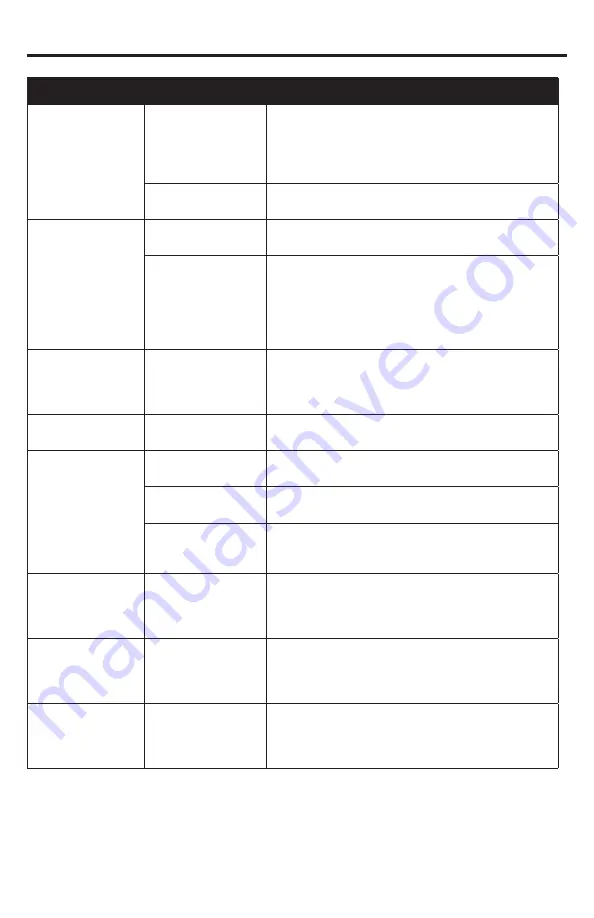
TROUBLESHOOTING
PROBLEM
POSSIBLE CAUSE
CORRECTIVE ACTION
Fire continues to go
out
Pellet quality / age
Inspect pellets; ensure that pellets are dry and have
not broken down into sawdust .
If problem persists, remove pellets from the hopper
and clean ash from your fire-pot, replace with clean
dry pellets .
Hopper obstruction
Unplug grill . Remove pellets from hopper . Clean
hopper of any obstructions or build up .
Pellets are not be-
ing delivered to fire
pot
Hopper obstruction
Unplug grill . Remove pellets from hopper . Clean
hopper of any obstructions or build up .
Auger failure
Remove cooking grate and flame deflector plate;
visually inspect auger turning in the fire pot . (Note:
the auger turns very slowly) If auger is not turning,
you may have an obstruction in your hopper . Clean
out pellets and try again . If problem persists, your
auger motor may need to
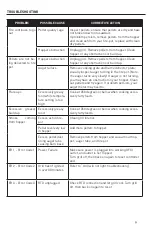
Flare ups
Excessively greasy
food while tempera-
ture setting is too
high
Cook at 350 degrees or below when cooking exces-
sively fatty foods .
Excessive grease/
build up
Excessively greasy
food
Cook at 350 degrees or below when cooking exces-
sively fatty foods .
Smoke
coming
from hopper
Excess ash in fire-
pot
Clean grill interior .
Pellet level very low
in hopper
Add more pellets to hopper .
Excess pellet dust
lining auger tube
causing burn back
Remove pellets from hopper and vacuum out hop-
per, auger tube, and fire pot .
ER 1 - Error Code 1 Power Failure
Make sure power is plugged into working GFCI
outlet, and outlet is not tripped .
Turn grill off, then back on again to reset controller
and
ER 2 - Error Code 2 Grill hasn’t ignited
in over 30 minutes
Refer to “Grill will not light troubleshooting”
ER 3 - Error Code 3 RTD unplugged
Check RTD connection and let grill cool . Turn grill
off, then back on again to reset


