6
ASSEMBLY INSTRUCTIONS - PELLET GRILL
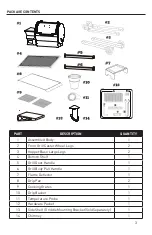
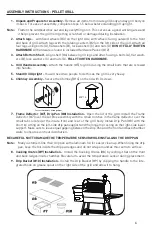
1. Unpack and Prepare for Assembly - Remove all items from inside grill body and lay grill body on
its back . For ease of assembly, complete steps 1-5 below before standing grill upright .
Note: Flatten the cardboard box out and lay everything on it . This serves as a good working area and
it helps prevent the grill from getting scratched or damaged during installation .
2. Attach legs - with fixed wheels (#3) on the right side, with wheels facing outward to the front
and back of grill . Attach legs with the rotating casters (#2) on the left side of the grill . Attach all
four legs using bolts (A), flat washers (B), lock washers (C) and nuts (D) DO NOT FULLY TIGHTEN
HARDWARE All hardware is found in included Hardware Packet (#12) .
3. Attach Bottom Shelf - Align shelf (#4) between grill legs and attach using 4 bolts (A), flat wash-
ers (B), lock washers (C) and nuts (D) . FULLY TIGHTEN HARDWARE.
4. Grill Handle Assembly - Attach the handle (#5) to grill lid using the small bolts that are screwed
into handle .
5. Stand Grill Upright - You will need two people to do this as the grill is very heavy .
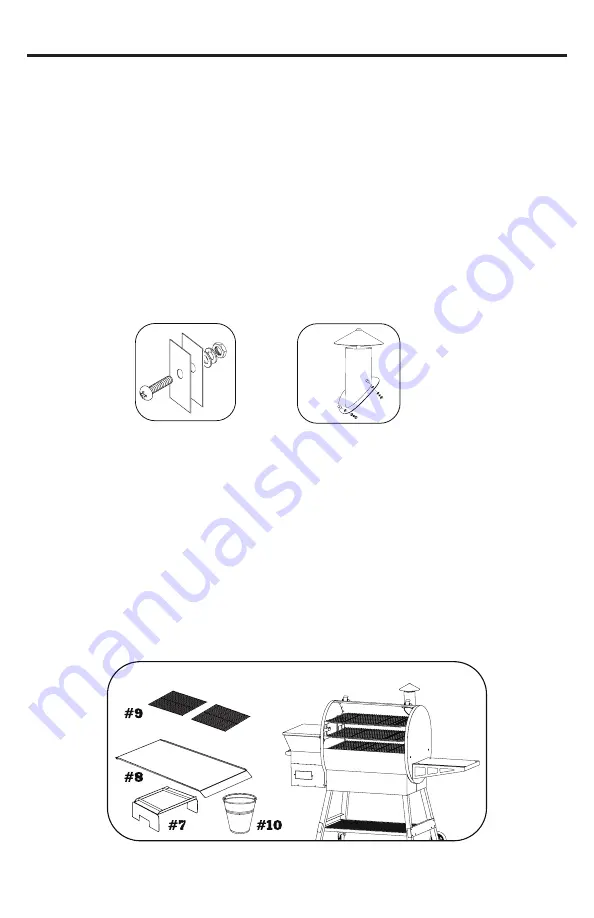
6. Chimney Assembly - Secure the Chimney[#14] on the lid with 3 screws .
A
B
C
D
Correct Hardware Arrangement
M8*16
7. Flame Deflector (#7), Drip Pan (#8) Installation - Open the lid of the grill . Install the Flame
Deflector (#7) over the Air Box assembly with the small notches in the flame deflector over the
small tabs located at the inside front and rear of the grill body . Install Drip Pan (#8) with the
short lip sitting on the left-side drip pan support and the longer lip resting on the right-side lower
support . Make sure to leave equal gapping between the Drip Pan and the front and back chamber
walls to ensure even heat distribution .
BE CAREFUL NOT TO DAMAGE THE TEMPERATURE SENSOR WHILE INSTALLING THE DRIP PAN
Note: Many customers line their drip pan with aluminum foil for easier clean up . When lining the drip
pan, keep the foil inside the drip pan edges and do not wrap around as this restricts airflow .
8. Cooking Grates (#9) Installation - Install the Cooking Grates (#8) by resting it flat on the front
and back ledges inside chamber . Be careful to avoid the temperature sensor during placement .
9. Drip Bucket (#10) Installation - Install the Drip Bucket (#9) by clipping the handle to the inte-
grated hook on grease spout on the right side of the grill and allow it to hang .


