background image

Gas Requirements

L.P. GAS INSTALLATION

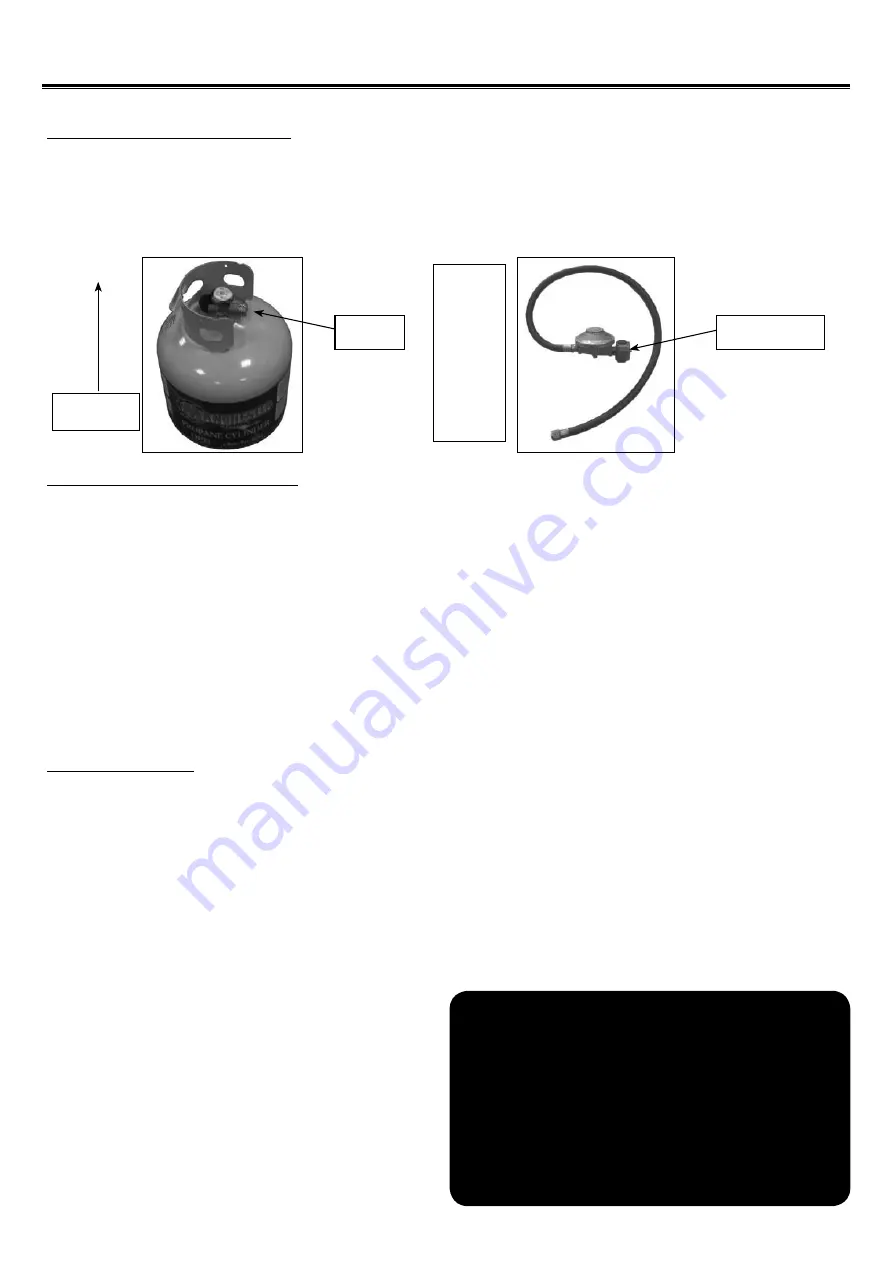
Gas Heaters that are set to operate with L.P. gas come with a high capacity hose and regulator assembly. 

(Note: Only use the pressure regulator and hose assembly supplied with the heater or a replacement 
pressure regulator and hose assemblies ).

 This assembly is designed to connect directly to a standard 

20 lb. L.P. cylinder. L.P. Cylinders are not included with the heater. L.P. Cylinders they can be purchased 
separately at an independent dealer.

L.P. TANK INFORMATION

Never use a dented or rusted L.P. tank or cylinder with a damaged valve.

L.P. cylinders are equipped with an O.P.D (Over

fi

 lling Prevention Device). The device shuts off the 

fl

 ow of gas 

to a cylinder after 80% capacity is reached. This limits the potential for release of gas when the cylinder is 
heated, averting a 

fi

 re or possible injury.

The L.P. cylinder must have a shut-off valve terminating in an L.P. gas supply cylinder outlet specified, 
as applicable, for connection No. 510 in the standard for compressed gas cylinder valve outlet and inlet 
connection ANSI/CGA-V-1. Cylinders must not be stored in a building, garage, or any other enclosed area. (The 
L.P. cylinder must have an over

fi

 ll protection device, OPD, and a collar to protect the cylinder valve.)

The L.P. gas supply cylinder must be constructed and marked in accordance with the speci

fi

 cations for L.P. 

gas cylinders of the U.S. Department of Transportation (DOT) or the National Standard of Canada, CAN/
CAS-B339, “ Cylinders, Spheres and Tubes for the Transportation of Dangerous Goods and Commission.”

L.P. TANK USE

• When turning the L.P. tank on, make sure to open the valve SLOWLY two (2) complete turns to 

ensure proper gas flow. Most gas tanks now come equipped with a leak detector mechanism 
internal to the tank, when gas is allowed to escape rapidly it shuts off the gas supply. Opening the 
valve rapidly may simulate a gas leak, causing the safety device to activate, restricting gas flow 
causing low 

fl

 ames. Opening the valve slowly will ensure this safety feature is not falsely triggered.

• When not in use, gas supply cylinder valve is to be in the “ OFF” position.

• The tank supply system must be stored upright to allow for vapor withdrawal.

• The regulator and hose assembly must be inspected before each use of the heater. If there is excessive 

abrasion or wear or if the hose is cut, it must be replaced prior to the heater being used again.

• Cylinders must be stored outdoors out of the reach of 

children and must not be stored in a building, garage 
or any other enclosed area.

• Only a qualified gas supplier should refill the L.P. 

tank.

• Place dust cap on cylinder valve outlet when ever 

the cylinder is not in use. Only install the type of dust 
cap on the cylinder valve outlet that is provided with 
the cylinder valve. Other types of caps or plugs may 
result in leakage of propane.

16

Upright Tank 
Orientation

Tank 

connection

LP hose/
regulator

supplied

(Type 1

connector)

Regulator Inlet

Connectot

!


WARNING

DO NOT store a spare L.P. gas cylinder under or near 

the heater. Never fi ll the cylinder beyond 80% full.

If this information is not followed exactly, a 

fi re causing death or serious injury may occur.

Summary of Contents for Four Seasons FM87PHLP

Page 1: ...8 00 AM and 5 00 PM Eastern time Monday through Friday or email us at saleshelp sureheat com FOR YOUR SAFETY 1 Read this Manual before attempting to assemble or operate your patio heater 2 Follow safe...

Page 2: ...Support Brackets Step 5 Tabletop Installation Step 6 Attach Reflection Studs to Screen Cover Step 7 Attach Head Assembly to Post Step 8 Install Reflector Step 9 Attach Reflector Assembly to Studs Ste...

Page 3: ...xtensively throughout this manual Always heed these precautions as they are essential when using any mechanical or fueled equipment RECOGNIZE SAFETY SYMBOLS WORDS AND LABELS WARNING indicates a potent...

Page 4: ...eration this product can be a source of ignition Keep heater area clear and free from combustible materials such as gasoline paint thinner cleaning solvents and other flammable vapors and liquids Do n...

Page 5: ...ane when not in use DANGER EXPLOSION FIRE HAZARD Never store propane near high heat open flames pilot lights direct sunlight other ignition souces or where temperatures exceed 120 49 Propane vapors ar...

Page 6: ...re 1 2 3 4 5 6 7 8 9 11 12 13 6 Reflector Panel 3 Reflector Plate Reflector Assembly Reflector Stud 3 Heater Burner Screen Heater Assembly Cylinder Housing Post Gas Hoseless Regulator Regulator Base W...

Page 7: ...um blade Adjustable opening wrench Leakage Detection Solution Instructions on how to make solution are included on page 15 Note You must follow all steps to properly assemble heater Hardware Picture Q...

Page 8: ...embly is parallel to the base and fully tighten bolts Wheel Assembly 2 Medium bolts 2 Large Flange Nuts Slip 4 Large Screws though holes of Base Lay Bucket inside of Base and screw on large nut Tighte...

Page 9: ...ttach Cylinder Housing loosely to Base with four Small Screws Step 4 Attach Post to Cylinder Housing top Open the door put post through the hole on the top of Cylinder Housing Attach post to Cylinder...

Page 10: ...astic connecting piece through the post as shown Slide the Fastening piece through the hole on the Tabletop Hold the tabletop in position and tighten the Fastening piece to the Plastic connecting piec...

Page 11: ...ach Head Assembly to Post 4 Small Bolts Head Assembly Insert hose end into the top of the post and then rest the burner head assembly onto the post making sure that the control knob is positioned abov...

Page 12: ...cessary for proper alignment of reflector section to loosely install all of the screws for assembly prior to tightening Once all of the screws have been loosely installed tighten with a wrench 9 Small...

Page 13: ...te the assembly of all three Reflector Panel sections Slide Reflector Plate onto Reflector Panels Insert one Small Screw Slide one small Flat Washer over threaded end of screw and loosely screw on Cap...

Page 14: ...s Support Heater Slide 3 Large Flat Washers over threaded end of Studs Install Reflector Assembly onto three 3 studs Install large flat washers on studs and securely tighten wing nuts Make sure not to...

Page 15: ...upply pressure of 10 W C is required for purpose of input adjustment The installation must conform with local codes or in absence of local codes with National Fuel Gas Code ANSI Z223 1 The minimum hou...

Page 16: ...Spheres and Tubes for the Transportation of Dangerous Goods and Commission L P TANK USE When turning the L P tank on make sure to open the valve SLOWLY two 2 complete turns to ensure proper gas flow...

Page 17: ...the knob on the fuel supply cylinder 5 Turn on the burner control knob for a moment to release the pressure in the hose then turn the control knobs back off 6 Wash off soapy solution with cold water a...

Page 18: ...onnections are tight and there are no leaks 5 Be sure the cylinder cover is clear of debris 6 Be sure any component removed during assembly or servicing is replaced and fastened prior to starting BEFO...

Page 19: ...use a ball of flame upon ignition WHEN HEATER IS ON Emitter screen will become bright red due to intense heat The color is more visible at night Burner will display tongues of blue and yellow flame Th...

Page 20: ...fire to occur behind the valve panel thereby damaging the heater and making it unsafe to operate We recommend you check the heater and remove any spiders insects and webs at least once a year to reduc...

Page 21: ...y lit Dirt built up around pilot Clean dirt from around pilot Connection between gas valve and pilot assembly is loose Tighten connection and perform leak check Thermocouple is not operating correctly...

Page 22: ...to temperatures above its rated specifications which can cause considerable warping disassembly including removal of the product from a built in installation damage resulting from accident alteration...

Reviews: