background image

Chapter 3: 

Sure

Step

TM

 STP-DRV-4035 Microstepping Drive

Sure

Step

TM

 Stepping Systems User Manual

3–6

5th Ed., Rev. B     01/2019

Eight Lead Motors

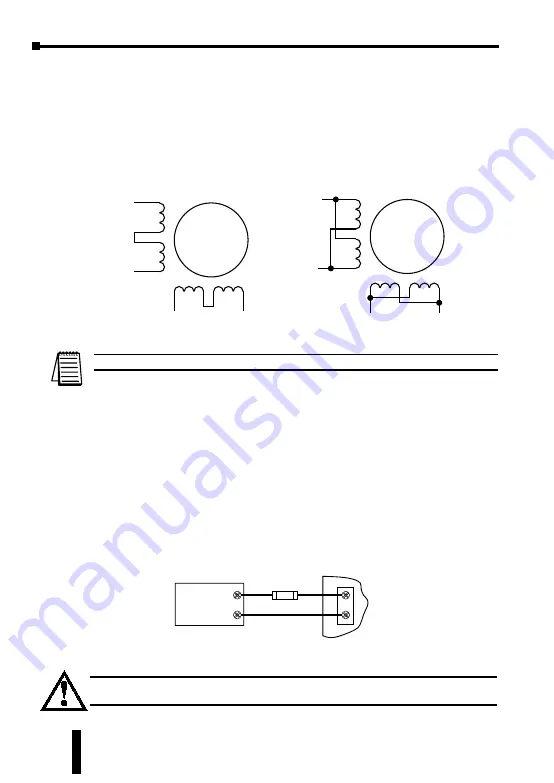
Eight lead motors can also be connected in two ways:  series or parallel. Series 
operation gives you more torque at low speeds and less torque at high speeds. 
When using series connection, the motor should be operated at 30% less than the 
rated current to prevent over heating. Parallel operation allows a greater torque at 
high speed. When using parallel connection, the current can be increased by 30% 
above rated current. Care should be taken in either case to assure the motor is not 
being overheated. The wiring diagrams for eight lead motors are shown below.

Note: Be aware that step motor wire lead colors vary from one manufacturer to another.

Connecting the Power Supply

The STP-PWR-3204 power supply from 

a

utomation

D

irect

 is the best choice to 

power the step motor drive. If you need information about choosing a different 
power supply, please read the section titled “Choosing a Power Supply” in Chapter 
7: “SureStep System Power Supplies”.
If your power supply does not have a fuse on the output or some kind of short circuit 
current limiting feature you need to put a 4 amp fast acting fuse between the drive 
and power supply. Install the fuse on the + power supply lead.
Connect the motor power supply “+” terminal to the driver terminal labeled “+ 
VDC”. Connect power supply “-” to the drive terminal labeled “VDC-”. Use no 
smaller than 18 gauge wire. 

Be careful not to reverse the wires. 

Reverse connection 

will destroy your drive and void the warranty.

A+

A–

B+

B–

8

lead

motor

8 Leads Series Connected

Orange

Org/Wht

Blk/Wht

Black

Red

Red/ 

Wht

Yel/ 

Wht

Yellow

8 Leads Parallel Connected

A+

A–

B+

B–

8

lead

motor

Orange

Org/ 

Wht

Blk/ 

Wht

Black

Red

Red/ 

Wht

Yel/ 

Wht

Yellow

VD
C

Step Motor

Power Supply

12 - 42 VDC

+

Fuse *

+–

* External fuse not required when using an

STP-PWR-3204 P/S; fuse is internal. 

Do NOT use STP-PWR-48xx or -70xx power supplies with an STP-DRV-4035 drive, 
because those power supplies exceed the voltage limit of this drive.

Summary of Contents for STP-DRV-4035

Page 1: ...Connection and Adjustment Locations 3 4 Connecting the Motor 3 5 Connecting the Power Supply 3 6 Connecting the Logic 3 7 Using Logic That is Not 5 volt TTL Level 3 9 The Enable Input 3 9 Setting Phas...

Page 2: ...ettings Optically isolated step direction and enable inputs Half 1 5 1 10 1 50 step switch selectable Automatic 50 idle current reduction can be switched off Block Diagram Optical Isolation Step V V S...

Page 3: ...Direction Signal Needs to change at least 2 microseconds before a step pulse is sent CW and CCW are viewed from the end opposite the drive end of the motor looking out of the shaft Enable Signal Logi...

Page 4: ...ctor STEP DIR EN Mounting Hole 1 of 6 Power Connector Motor Connector Switches for Selecting Current Step Resolution Current Reduction and Self Test Power On LED VDC STP DRV 4035 Step Motor Power Supp...

Page 5: ...P DRV 4035 microstepping drive Four Lead Motors Four lead motors can only be connected one way Please follow the wiring diagram shown to the right Note All AutomationDirect SureStep motors are four le...

Page 6: ...d information about choosing a different power supply please read the section titled Choosing a Power Supply in Chapter 7 SureStep System Power Supplies If your power supply does not have a fuse on th...

Page 7: ...into the drive signals a logic state to the phototransistors that are wired to the brains of the drive A schematic diagram input circuit is shown to the right You will need to supply a source of step...

Page 8: ...C N C Connecting to an Indexer with Sourcing Outputs Connecting to an Indexer with Sourcing Outputs COM DIR DIR DIR STEP STEP STEP Indexer with Sourcing Outputs STP DRV 4035 Drive EN EN N C N C Connec...

Page 9: ...e step position even when the amplifiers are disabled However the motor may move slightly when the current is removed depending on the exact motor and load characteristics Note If you have no need to...

Page 10: ...d 1 6 Each switch controls the amount of current in amperes A that its label indicates in addition to the minimum current value of 0 4 Amps There is always a base current of 0 4 Amps even with all fiv...

Page 11: ...PHASE 0 1 0 2 0 4 0 8 1 6 2 1 AMPS PHASE 0 1 0 2 0 4 0 8 1 6 2 2 AMPS PHASE 0 1 0 2 0 4 0 8 1 6 2 3 AMPS PHASE 0 1 0 2 0 4 0 8 1 6 2 4 AMPS PHASE 0 1 0 2 0 4 0 8 1 6 2 5 AMPS PHASE 0 1 0 2 0 4 0 8 1...

Page 12: ...ooth motion microstep drives can be used to provide motion in convenient units When the drive is set to 2 000 steps rev 1 10 step and used with a 5 pitch lead screw you get 0001 inches step Setting th...

Page 13: ...ch below Sliding the switch away from the 50 IDLE label disables the reduction feature Self Test The SureStep drive includes a self test feature This is used for trouble shooting If you are unsure abo...

Page 14: ...nk To operate the drive continuously at maximum power you must properly mount it on a heat sinking surface with a thermal constant of no more than 4 C Watt Often the metal enclosure of your system wil...

Page 15: ...15 Chapter 3 SureStepTM STP DRV 4035 Microstepping Drive 5th Ed Rev B 01 2019 Dimensions 3 00 76 2 0 125 3 2 4 00 101 6 2 50 63 5 3 75 95 3 3 70 94 0 1 50 38 1 0 875 22 2 0 15 3 8 0 25 6 4 0 25 6 4 D...

Page 16: ...Chapter 3 SureStepTM STP DRV 4035 Microstepping Drive SureStepTM Stepping Systems User Manual 3 16 5th Ed Rev B 01 2019 BLANK PAGE...

Reviews: